Get Started with OpenStackClient
OpenStack offers a way to administer your cloud over the command line using OpenStackClient.
The purpose of this guide is to introduce you to managing your cloud using the command line. You will learn how to install OpenStackClient, authenticate, and run introductory commands. Everything that can be done using Horizon, can also be accomplished using OpenStackClient.
Installing OpenStackClient
OpenStackClient is available as a Python pip package.
For more information about this package, see OpenStackClient's pip project page.
Note! -- There exist two OpenStackClient packages:
openstackclient and python-openstackclient. This guide recommends
using openstackclient as it comes with many more OpenStack service
command line clients. You can use either package, but if you want to
interact with a specific service's command line client, you may have to
install that separately.
How to Install OpenStackClient
Note! -- These instructions are meant for a Linux environment.
Before getting started, make sure Python 3 and pip are installed to
your machine.
The first step is to create a Python virtual environment. This is useful in that this environment will not interfere with your system's Python installation.
Step 1 -- Create Python virtual environment
The following demonstrates creating a virtual environment in the path
~/venv/openstackclient.
Create the environment:
python3 -m venv ~/venv/openstackclient
Activate the environment using source:
$ source ~/venv/openstackclient/bin/activate
(openstackclient) :~$
Notice the shell now has (openstackclient) where commands are entered.
This indicates the virtual environment is active.
Step 2 -- Update pip
Pip may need to be updated before installing OpenStackClient.
To do so, use:
python3 -m pip install -U pip
Step 3 -- Download OpenStackClient
With the virtual environment prepared, use pip to download the
OpenStackClient package:
pip3 install openstackclient
Step 4 -- Download OpenStack RC and clouds.yaml files
Next, you will need to obtain two files from Horizon:
- OpenStack RC
- clouds.yaml
These are located under the Project tab, then API Access.
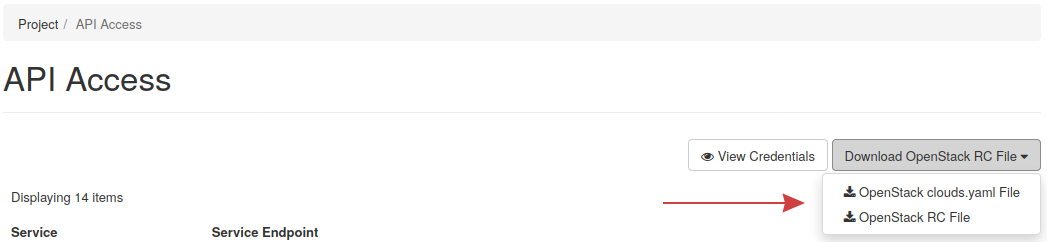
From here, click the Download OpenStack RC File drop-down, and then download both files.
The clouds.yaml file needs to exist in ~/.config/openstack for
OpenStackClient to function. When downloaded, ensure it can be located
as ~/.config/openstack/clouds.yaml.
Multiple clouds: If you are working with multiple clouds, add the
cloud entry to the existing clouds.yaml and the cloud can be specified
using OS_CLOUD=$cloud_name or --os-cloud=$cloud_name, where
$cloud_name is the name of the cloud you're working with.
Example clouds.yaml with two cloud entries, cloud-1 and cloud-2:
clouds:
  cloud-1:
    auth:
      auth_url: http://50.50.50.1:5000
      username: "admin"
      project_id: b93259ca0a5b4541b30e4e16ae1d699d
      project_name: "Apples"
      user_domain_name: "Default"
    region_name: "iad3"
    interface: "public"
    identity_api_version: 3
  cloud-2:
    auth:
      auth_url: http://50.50.50.2:5000
      username: "admin"
      project_id: 6d0ef671c4b2413d920b61e3777fe2ab
      project_name: "Oranges"
      user_domain_name: "Default"
    region_name: "iad3"
    interface: "public"
    identity_api_version: 3
Step 5 -- Finish preparing environment
Next, load the OpenStack RC file into your shell using source:
source ~/Downloads/user-openrc.sh
This action sets needed environment variables and will also ask you to authenticate as your OpenStack user:
(openstackclient):~$ source ~/Downloads/user-openrc.sh
Please enter your OpenStack Password for project User Cloud Test as user
user1:
Enter in the password for your user, and you are now set to use OpenStackClient.
Note! -- In addition to OpenStackClient, there are other command line clients for various OpenStack services that can be used. For example, Nova and Cinder each have their own command line client, as well as other services.
In later releases of OpenStack use of service-specific command line
interfaces will be deprecated. When using the command line to administer
OpenStack it is recommended to use OpenStackClient where possible as
opposed to individual service's command line interfaces such as nova's
CLI.
First Time Using OpenStackClient
For users using OpenStackClient for the first time, follow this section to learn how to list and show the details of the project associated with your OpenStack user.
As a first command, try listing the project your user is associated
with, using openstack project list:
$ openstack project list
+----------------------------------+-----------------+
| ID                               | Name            |
+----------------------------------+-----------------+
| a7f3c46fb8b3404c89dd94b0c33301e0 | User Cloud Test |
+----------------------------------+-----------------+
Next, list the details of the project under ID
a7f3c46fb8b3404c89dd94b0c33301e0, using the show subcommand:
$ openstack project show a7f3c46fb8b3404c89dd94b0c33301e0
+-------------+-----------------------------------------------------------------------+
| Field       | Value                                                                 |
+-------------+-----------------------------------------------------------------------+
| description | This is a testing Project used to create documentation for end users. |
| domain_id   | default                                                               |
| enabled     | True                                                                  |
| id          | a7f3c46fb8b3404c89dd94b0c33301e0                                      |
| is_domain   | False                                                                 |
| name        | User Cloud Test                                                       |
| options     | {}                                                                    |
| parent_id   | default                                                               |
| tags        | []                                                                    |
+-------------+-----------------------------------------------------------------------+
Note! -- Entering only openstack and running that will take you
into the OpenStackClient shell allowing commands to be run without
needing to prefix them with openstack:
(openstackclient) user@host:~$ openstack
(openstack) network list
+--------------------------------------+----------+--------------------------------------+
| ID                                   | Name     | Subnets                              |
+--------------------------------------+----------+--------------------------------------+
| 5cc755c9-41fc-44c2-87e7-642dfdfb0208 | External | a52754dd-13d9-4a36-bab6-10058f4887f5 |
+--------------------------------------+----------+--------------------------------------+
(openstack) exit
(openstackclient) user@host:~$
Type exit to leave the OpenStackClient shell.
Next Steps
Navigate to the next guide in this series to learn how to create networks in OpenStack.