Networking in OpenStack
This guide explains networking in OpenStack including how to create a private network, a router, and allocate and assign floating IPs.
You will learn how to create a private network on which instances will be deployed. The network created in this guide will be used later when creating an instance.
Note -- Private networks should be used where possible. Only expose the portions of your cloud to a public network when needed.
Neutron is the name of the service that manages networking in OpenStack. It provides "network connectivity as a service" between interfaces and uses the OpenStack Networking API.
Neutron allows networks, routers, floating IPs, and security groups to be created.
Create a network and router
This section demonstrates creating a private network and router. The router is important as it will allow you to create a route between networks, such as from the private network to the Internet.
Create a network
Step 1 -- Getting started
In Horizon, notice the sections on the left called Project and Identity. Components of an OpenStack cloud, like a private network, are created through the Project tab.

To create a network, under Project on the left, find Network, then navigate to Networks. Finally, locate the Create Network button near the top right.

Step 2 -- Create network
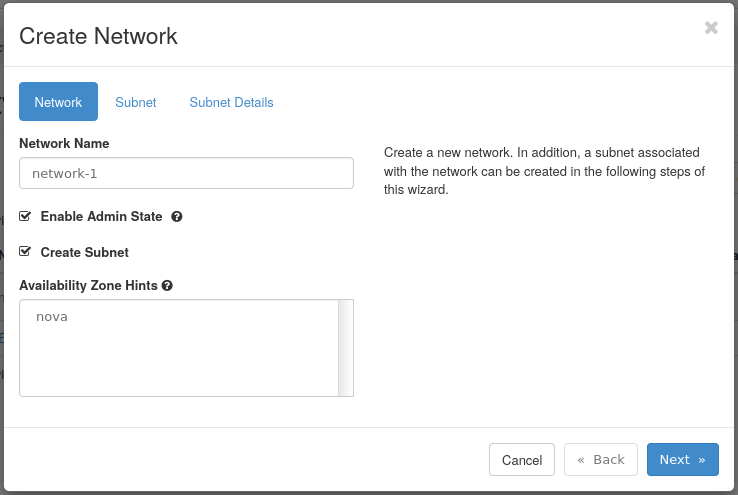
- Network Name -- This is the name of the network. In this example, the network is called network-1.
- Enable Admin State -- This enables the network and should remain checked.
- Create Subnet -- Leave checked to create a subnet.
- Availability Zone Hints -- This option's default is sufficient for this guide.
Fill out any other needed details and navigate to the Subnet tab.
Step 3 -- Create subnet
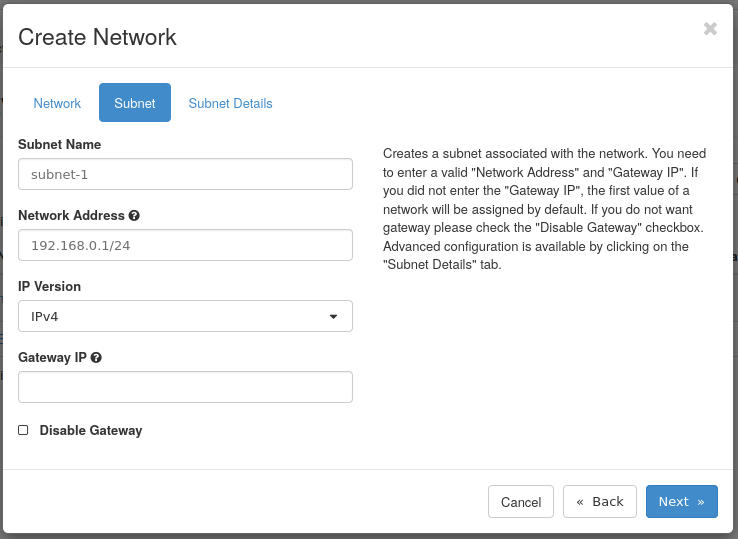
Subnet Name -- Specify a name for the subnet, this example is called subnet-1
Network Address -- Choose a network in CIDR notation. This example uses 192.168.0.1/24.
Gateway IP -- Optionally choose the gateway IP for this network. If the gateway IP is not filled out, one will be chosen by the Neutron service.
The final tab is called Subnet Details. This tab does not need to be filled out to create the network and subnet. This example will stop here, however on this page you can enable or disable DHCP, specify specific IPs to be allocated, set DNS name servers, and set Host Routes.
Step 4 -- Confirm network creation
With the previous steps done, the network has been created. Loading the Network -> Networks tab will display the new network:

Create a Router
With a network created, the next step is to create a router which will bridge the connection from the External or provider network to the private network.
Step 1 -- Getting started
To make a router in Horizon, under Project, find the Network section, then Routers under that. This page will list current routers and allows you to create a router.
To create a new router, click the Create Router button near the top right.

Step 2 -- Create a router
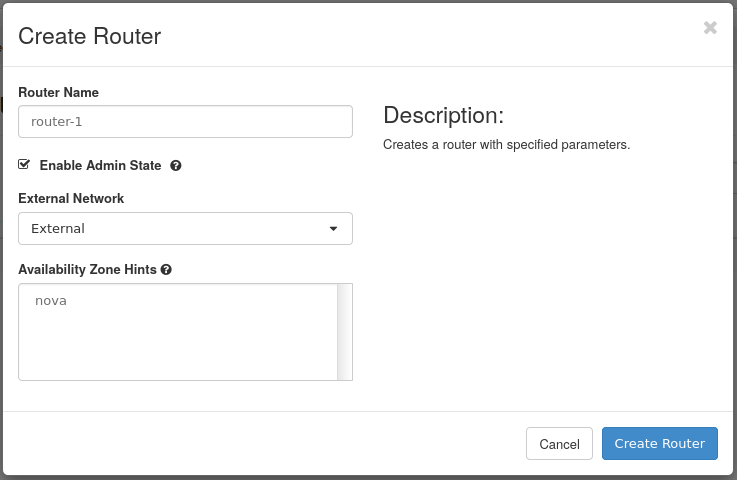
- Router Name -- Choose a name for the router. This example router will be called router-1.
- Enable Admin State -- Leave checked to enable the router.
- External Network -- The External network will be used
- Availability Zone Hints -- This option's default is sufficient for this guide.
The router will need to be connected to an external network, which will be the provider network. The network called External will be used.
Step 3 -- Confirm the router has been created
Once created it will show in the list of routers, under Network -> Routers.

Step 4 -- Connect router to private network
To allow the router to communicate with the External and the network-1 network, the network-1 network will need to be attached. Connecting the router to a network is called attaching an interface.
First, pull up the newly created router from the Network -> Routers section of Horizon.
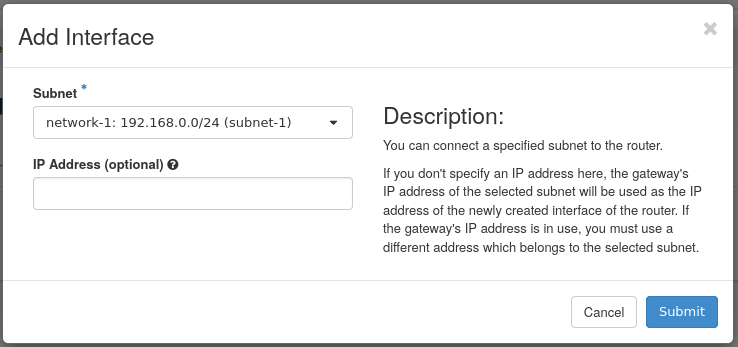
Next, to add an interface to this router, click the router's name in the listing of routers, then click the Add Interface button near the top right.

In the following choose the subnet-1 subnet to connect the router to and optionally choose an IP address for the interface. If you don't choose an IP, the gateway IP of the subnet will be used.
Step 5 -- Confirm the networks are connected
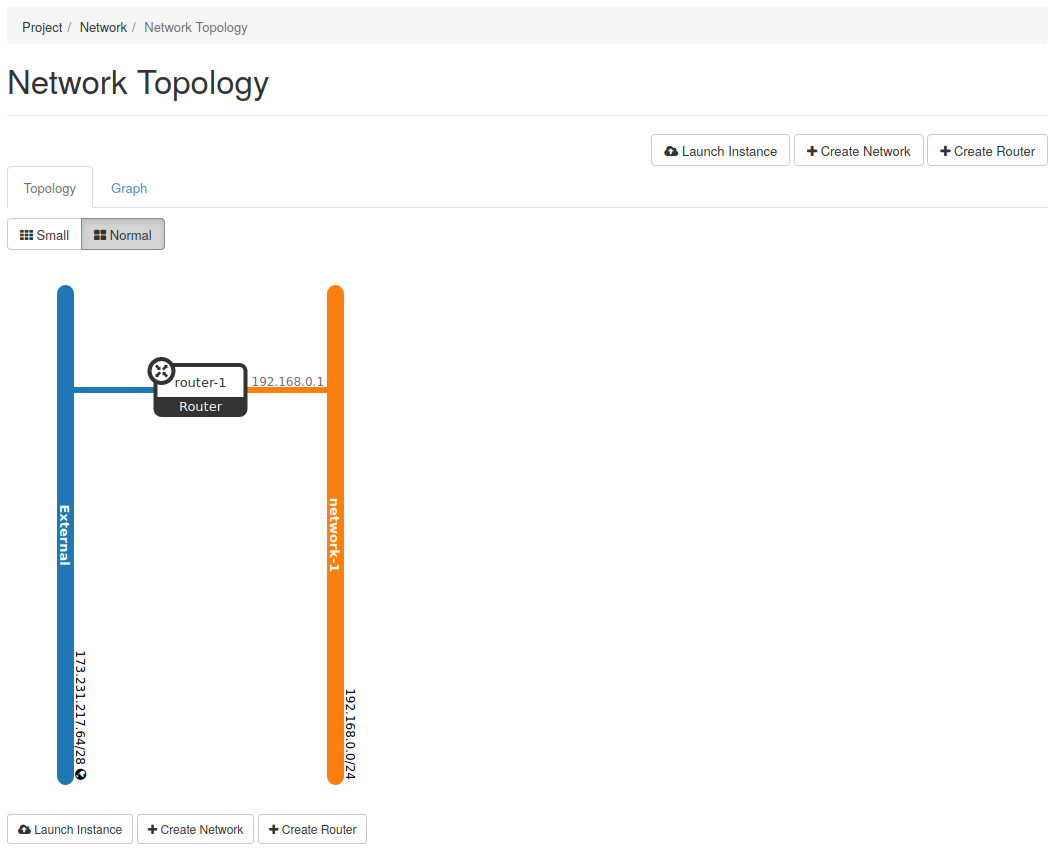
With the interface added to the router, the External and network-1 networks are now connected. This can visually be seen by navigating to the Network tab on the left, then the Network Topology tab under that.
Floating IPs
Floating IPs in OpenStack are publicy routable IP addresses that can be attached and detached to instances. For example if there's an instance associated with a private network but needs to be accessed from the Internet, a floating IP can be associated with the instance, allowing communication from the Internet.
Allocate and Assign Floating IPs
To use Floating IPs they will first need to be allocated from the provider network's pool of IPs.
Allocate floating IP
To allocate floating IPs in Horizon, navigate to the Network tab on the left, and find Floating IPs.

Click Allocate IP To Project to allocate a new IP.
Next, fill out needed details in the IP allocation form.
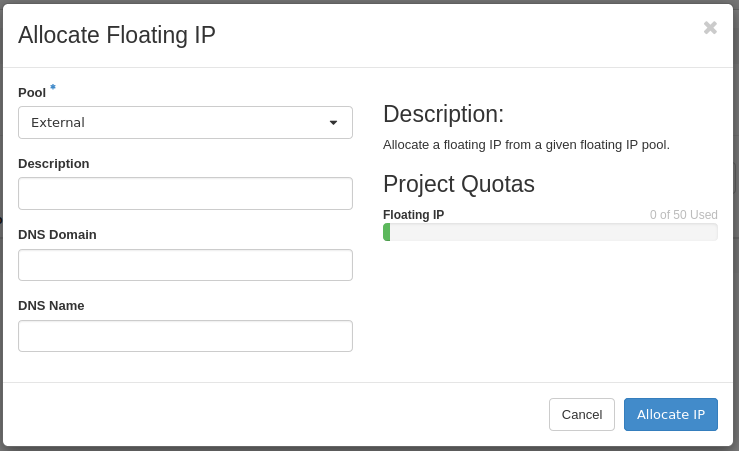
The IP will be obtained from the External provider network. This is the only network floating IPs can be assigned from.
Once the IP is added, it will appear in the floating IP list.

This floating IP address will be used later to access an instance over SSH.
Next Steps
The next guide goes over images in OpenStack, which are bootable operating systems.