How to Make Backups in OpenStack
Having a solid backup strategy is important in the event where data is lost and you need to recover it. In this guide, you will learn how to make backups of instance data, volumes, and how to store backups outside of the OpenStack cloud.
Testing Considerations
Backups should not only be created, but should be confirmed they contain all data as well as be restored and tested as part of a polished backup strategy. Consider a disaster recovery scenario where you have known backups, however they were never tested, and are not usable due to some circumstance.
Instance Backups
This section demonstrates how to create an instance backup using Horizon by creating a snapshot.
Step 1 -- Create Instance Backup
To create a backup of an instance, navigate to Project -> Compute -> Instances.
From there, find the instance in question and click the Create Snapshot button. This starts the process of backing up the instance data and may take some time to complete.

Step 2 -- Confirm Backup Completion
To confirm the snapshot was created successfully, navigate to Project -> Compute -> Images, then find the snapshot in the list.

How to Recover an Instance Backup
This section explains how to recover an instance backup using Horizon.
Step 1 -- Recover snapshot
To recover the instance snapshot, navigate to Project -> Compute -> Instances and launch a new instance. When filling out the form, ensure you select as the boot source Instance Snapshot and choose the snapshot to restore.

Step 2 -- Confirm restoration
To confirm the snapshot has restored list the instances in Horizon and check the status column. Check to ensure everything still works as expected within that instance.

Volume Backups
How to Create a Volume Backup
In addition to creating instance snapshots, you can also create backups of volumes in Horizon. This is important when a persistent volume is used and you want to create backup copies of it.
Step 1 -- Create volume backup
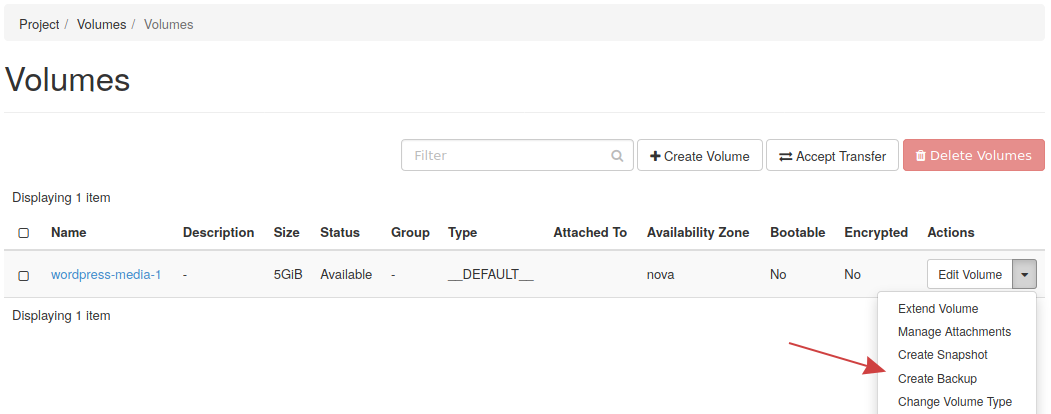
To back up a volume, navigate to Project -> Volumes -> Volumes, then to the volume in you are working with, select from the drop down on the right, Create Backup.

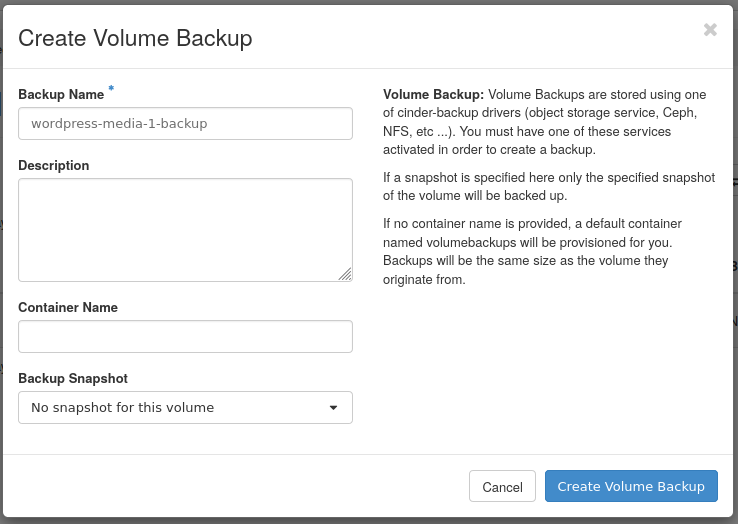
Fill out the following form with at least the name of the backup and any other fields needed.

Step 2 -- Confirm volume backup creation
To confirm the backup created successfully, navigate to Project -> Volumes -> Backups, then locate the backup in the list, and take note of the Status column. You should see Available indicating the backup is complete and ready to use.

How to Recover a Volume Backup
This section will explain the steps needed to recover a volume backup using Horizon.
Step 1 -- Find the volume backup
To find the volume backups, navigate to Project -> Volumes -> Backups and confirm the backup is in the list.

Step 2 -- Restore volume backup
To restore this backup, choose from the listing drop down on the right, the Restore Backup option.
Choose the Create a New Volume option to recover this backup into a new volume, that can be later attached to an instance as needed.
