OpenStack Watcher Demonstration
Introduction
Watcher is an OpenStack project that monitors infrastructure and performs optimizations on demand. With Watcher, an administrator can create objectives for resource optimizations within their cloud, and Watcher either performs the actions necessary to meet these goals or provides an action plan. Watcher does this by leveraging existing OpenStack services such as Keystone, Nova, Ironic, and Ceilometer to find ways to reduce the total operating cost of your cloud. There are a number of pre-defined goals Watcher can help accomplish. In this guide, we use demonstrate using a pre-defined Watcher goal to consolidate a cloud's workload.
Use Watcher to Consolidate your Cloud's Workload
This section demonstrates use of Watcher's VM Workload Consolidation Strategy. The commands and their output are recorded to provide an example Watcher demonstration. We provide the state of the cloud prior to and after applying Watcher.
Cloud State Before Watcher is Applied
The following screenshot shows the state of the hypervisors and the count of instances associated with each compute node.
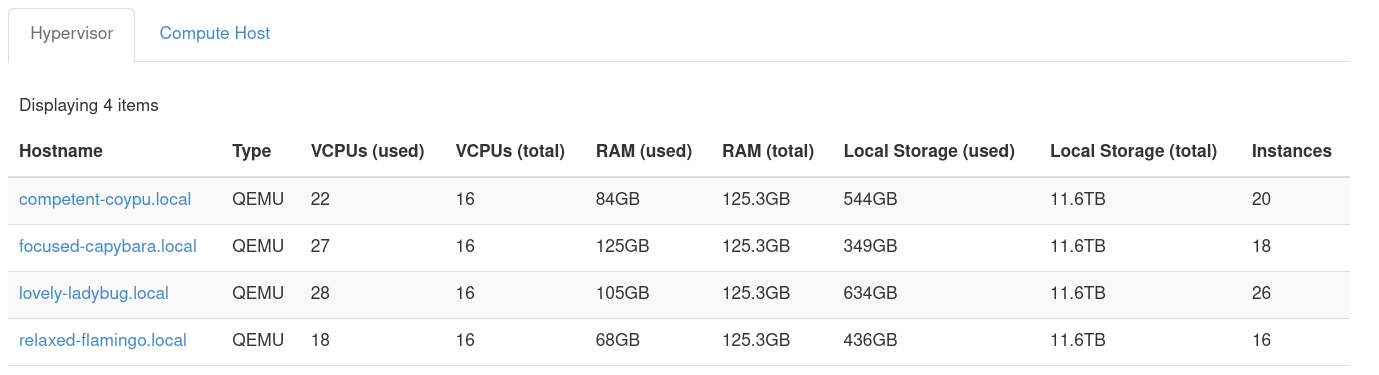
Figure 1: Hypervisor list and instance count prior to applying Watcher
This is a cloud with four compute nodes and a relatively even distribution of instances spread across them.
How to use Watcher's VM Workload Consolidation Strategy
Step 1: Obtain List of Goals
First, obtain a list of available goals with:
openstack optimize goal list
For example:
# openstack optimize goal list
+--------------------------------------+----------------------+----------------------+
| UUID                                 | Name                 | Display name         |
+--------------------------------------+----------------------+----------------------+
| 05260080-9aca-40e3-9ff5-f6d8f398d671 | airflow_optimization | Airflow Optimization |
| d3618295-7dd2-4174-83ee-8cd466b3381a | cluster_maintaining  | Cluster Maintaining  |
| 4488913d-b0d6-44eb-b6c6-8f1b4c6c7578 | dummy                | Dummy goal           |
| cb10ae8f-a1f5-41e4-ac6a-2e2dfbe63648 | hardware_maintenance | Hardware Maintenance |
| 6f676623-71b8-4eaa-a36b-fb133120db42 | noisy_neighbor       | Noisy Neighbor       |
| 6c0ae27a-d978-46e9-9562-67ef7ee00e65 | saving_energy        | Saving Energy        |
| 916bb6dc-84df-495e-8b40-1bfa868d93e1 | server_consolidation | Server Consolidation |
| 5aed3f2b-7d5d-48af-b69c-35afc886bc10 | thermal_optimization | Thermal Optimization |
| debf193e-50a8-4c90-a0b6-d82fb78b6d98 | unclassified         | Unclassified         |
| fb940ef6-47bd-4c82-8e3a-caf9de813b03 | workload_balancing   | Workload Balancing   |
+--------------------------------------+----------------------+----------------------+
This example makes use of the Server Consolidation goal available
from the above list. Note that the following command line examples
reference this goal as server_consolidation.
Step 2: List Strategies Available for a Goal
Next, obtain a list of available strategies for the Server Consolidation goal, using:
openstack optimize strategy list --goal <goal-uuid-or-name>
Replace <goal-uuid-or-name> with the appropriate goal.
For example:
# openstack optimize strategy list --goal server_consolidation
+--------------------------------------+-----------------------------+--------------------------------------+----------------------+
| UUID                                 | Name                        | Display name                         | Goal                 |
+--------------------------------------+-----------------------------+--------------------------------------+----------------------+
| eae7ae0f-1498-45ac-a226-248739a79785 | basic                       | Basic offline consolidation          | server_consolidation |
| b0f2838e-0eb2-4baf-8976-62744897827b | node_resource_consolidation | Node Resource Consolidation strategy | server_consolidation |
| 4ad7dbdb-9c90-4208-8dc0-e476c803519c | vm_workload_consolidation   | VM Workload Consolidation Strategy   | server_consolidation |
+--------------------------------------+-----------------------------+--------------------------------------+----------------------+
Here, we can see the Server Consolidation has three strategies that
can be used to accomplish the goal. For this case, we are using the
vm_workload_consolidation strategy.
Step 3: Create Audit Template
Next, create an audit template based on the previously selected goal and strategy using:
openstack optimize audittemplate create <template-name> <goal> \
    --strategy <strategy>
<template-name>: Specify a name for the audit template<goal>: Specify a goal<strategy>: Specify a strategy
For example, the following creates an audit template called
server_consolidation-template based on the goal
server_consolidation and strategy vm_workload_consolidation:
# openstack optimize audittemplate create server_consolidation-template server_consolidation --strategy vm_workload_consolidation
+-------------+--------------------------------------+
| Field       | Value                                |
+-------------+--------------------------------------+
| UUID        | 234069e4-d03a-4a63-af54-02763056ac55 |
| Created At  | 2022-01-21T18:22:09.385581+00:00     |
| Updated At  | None                                 |
| Deleted At  | None                                 |
| Description | None                                 |
| Name        | server_consolidation-template        |
| Goal        | server_consolidation                 |
| Strategy    | vm_workload_consolidation            |
| Audit Scope | []                                   |
+-------------+--------------------------------------+
Step 4: Execute Audit
Run an audit based on the audit template to generate an action plan:
openstack optimize audit create -a server_consolidation-template
For example:
# openstack optimize audit create -a server_consolidation-template
+---------------+------------------------------------------------------+
| Field         | Value                                                |
+---------------+------------------------------------------------------+
| UUID          | 50b571c6-faff-4b0e-803d-558708bc5ec5                 |
| Name          | vm_workload_consolidation-2022-01-21T18:23:37.360815 |
| Created At    | 2022-01-21T18:23:37.387673+00:00                     |
| Updated At    | None                                                 |
| Deleted At    | None                                                 |
| State         | PENDING                                              |
| Audit Type    | ONESHOT                                              |
| Parameters    | {'period': 3600, 'granularity': 300}                 |
| Interval      | None                                                 |
| Goal          | server_consolidation                                 |
| Strategy      | vm_workload_consolidation                            |
| Audit Scope   | []                                                   |
| Auto Trigger  | False                                                |
| Next Run Time | None                                                 |
| Hostname      | None                                                 |
| Start Time    | None                                                 |
| End Time      | None                                                 |
| Force         | False                                                |
+---------------+------------------------------------------------------+
This step may take some time to complete. You can use
openstack optimize audit show <audit-uuid> to get the status of the audit.
For example:
# openstack optimize audit show 50b571c6-faff-4b0e-803d-558708bc5ec5
+---------------+------------------------------------------------------+
| Field         | Value                                                |
+---------------+------------------------------------------------------+
| UUID          | 50b571c6-faff-4b0e-803d-558708bc5ec5                 |
| Name          | vm_workload_consolidation-2022-01-21T18:23:37.360815 |
| Created At    | 2022-01-21T18:23:37+00:00                            |
| Updated At    | 2022-01-21T18:55:15+00:00                            |
| Deleted At    | None                                                 |
| State         | SUCCEEDED                                            |
| Audit Type    | ONESHOT                                              |
| Parameters    | {'period': 3600, 'granularity': 300}                 |
| Interval      | None                                                 |
| Goal          | server_consolidation                                 |
| Strategy      | vm_workload_consolidation                            |
| Audit Scope   | []                                                   |
| Auto Trigger  | False                                                |
| Next Run Time | None                                                 |
| Hostname      | focused-capybara.local                               |
| Start Time    | None                                                 |
| End Time      | None                                                 |
| Force         | False                                                |
+---------------+------------------------------------------------------+
The audit is complete when the State field reflects SUCCEEDED.
Step 5: Retrieve Action Plan
Retrieve the action plan generated by the audit:
openstack optimize actionplan list --audit <audit-uuid>
Replace <audit-uuid> with the UUID of the of audit.
For example:
# openstack optimize actionplan list --audit 50b571c6-faff-4b0e-803d-558708bc5ec5
+--------------------------------------+--------------------------------------+-------------+------------+-------------------------------+
| UUID                                 | Audit                                | State       | Updated At | Global efficacy               |
+--------------------------------------+--------------------------------------+-------------+------------+-------------------------------+
| 2abb3cae-99e2-4339-b952-0f52db59155d | 50b571c6-faff-4b0e-803d-558708bc5ec5 | RECOMMENDED | None       | Released_nodes_ratio: 25.00 % |
|                                      |                                      |             |            |                               |
+--------------------------------------+--------------------------------------+-------------+------------+-------------------------------+
Step 6: Review Action Plan
Review the actions recommended by the audit:
openstack optimize action list --action-plan <action-plan-uuid>
Replace <action-plan-uuid> with the UUID of the action plan.
For example:
# openstack optimize action list --action-plan 2abb3cae-99e2-4339-b952-0f52db59155d
+--------------------------------------+----------------------------------------------------------------------------------+---------+--------------------------------------+---------------------------+
| UUID                                 | Parents                                                                          | State   | Action Plan                          | Action                    |
+--------------------------------------+----------------------------------------------------------------------------------+---------+--------------------------------------+---------------------------+
| 7caa5e76-0815-467d-8073-c1b1213e5e70 | []                                                                               | PENDING | 2abb3cae-99e2-4339-b952-0f52db59155d | change_nova_service_state |
| 29c3a118-3aa7-4445-a5c0-ddc74d58a609 | ['7caa5e76-0815-467d-8073-c1b1213e5e70']                                         | PENDING | 2abb3cae-99e2-4339-b952-0f52db59155d | migrate                   |
| 75cfa548-7679-4271-8d10-d8583beb7f54 | ['7caa5e76-0815-467d-8073-c1b1213e5e70']                                         | PENDING | 2abb3cae-99e2-4339-b952-0f52db59155d | migrate                   |
| 47ae3e44-8bcb-4272-8582-1a24640c5f97 | ['29c3a118-3aa7-4445-a5c0-ddc74d58a609', '75cfa548-7679-4271-8d10-d8583beb7f54'] | PENDING | 2abb3cae-99e2-4339-b952-0f52db59155d | migrate                   |
| 29a12a53-cd2d-4d39-8284-4273d07a92ee | ['29c3a118-3aa7-4445-a5c0-ddc74d58a609', '75cfa548-7679-4271-8d10-d8583beb7f54'] | PENDING | 2abb3cae-99e2-4339-b952-0f52db59155d | migrate                   |
+--------------------------------------+----------------------------------------------------------------------------------+---------+--------------------------------------+---------------------------+
This action plan indicates the Nova service's state will be adjusted and that a number of instances are to be migrated. Note that some of the actions listed in the above output have been truncated for brevity.
Step 7: Execute Action Plan
If all actions presented in the action plan are reasonable, you can have Watcher execute the action plan for you.
To execute the actions:
openstack optimize actionplan start <action-plan-uuid>
Replace <action-plan-uuid> with the UUID of the action plan.
For example:
# openstack optimize actionplan start 2abb3cae-99e2-4339-b952-0f52db59155d
+---------------------+---------------------------------------------------------------------------------------------------------------------------------------------------------------------------------------------------------------------------------------------------------------------------------------------------------------------------------------------------------------------------------------------------+
| Field               | Value                                                                                                                                                                                                                                                                                                                                                                                             |
+---------------------+---------------------------------------------------------------------------------------------------------------------------------------------------------------------------------------------------------------------------------------------------------------------------------------------------------------------------------------------------------------------------------------------------+
| UUID                | 2abb3cae-99e2-4339-b952-0f52db59155d                                                                                                                                                                                                                                                                                                                                                              |
| Created At          | 2022-01-21T18:55:15+00:00                                                                                                                                                                                                                                                                                                                                                                         |
| Updated At          | 2022-01-21T19:46:00+00:00                                                                                                                                                                                                                                                                                                                                                                         |
| Deleted At          | None                                                                                                                                                                                                                                                                                                                                                                                              |
| Audit               | 50b571c6-faff-4b0e-803d-558708bc5ec5                                                                                                                                                                                                                                                                                                                                                              |
| Strategy            | vm_workload_consolidation                                                                                                                                                                                                                                                                                                                                                                         |
| State               | PENDING                                                                                                                                                                                                                                                                                                                                                                                           |
| Efficacy indicators | [{'name': 'compute_nodes_count', 'description': 'The total number of enabled compute nodes.', 'unit': None, 'value': 4.0}, {'name': 'released_compute_nodes_count', 'description': 'The number of compute nodes to be released.', 'unit': None, 'value': 1.0}, {'name': 'instance_migrations_count', 'description': 'The number of VM migrations to be performed.', 'unit': None, 'value': 35.0}] |
| Global efficacy     | [{'name': 'released_nodes_ratio', 'description': 'Ratio of released compute nodes divided by the total number of enabled compute nodes.', 'unit': '%', 'value': 25.0}]                                                                                                                                                                                                                            |
| Hostname            | None                                                                                                                                                                                                                                                                                                                                                                                              |
+---------------------+---------------------------------------------------------------------------------------------------------------------------------------------------------------------------------------------------------------------------------------------------------------------------------------------------------------------------------------------------------------------------------------------------+
Get status of the action plan using
openstack optimize actionplan show <action-plan-uuid>.
For example:
# openstack optimize actionplan show 2abb3cae-99e2-4339-b952-0f52db59155d
+---------------------+-------------------------------------------------------------+
| Field               | Value                                                       |
+---------------------+-------------------------------------------------------------+
| UUID                | 2abb3cae-99e2-4339-b952-0f52db59155d                        |
| Created At          | 2022-01-21T18:55:15+00:00                                   |
| Updated At          | 2022-01-21T19:46:00+00:00                                   |
| Deleted At          | None                                                        |
| Audit               | 50b571c6-faff-4b0e-803d-558708bc5ec5                        |
| Strategy            | vm_workload_consolidation                                   |
| State               | ONGOING                                                     |
| Efficacy indicators | - Description: The total number of enabled compute nodes.   |
|                     |   Name: compute_nodes_count                                 |
|                     |   Unit: null                                                |
|                     |   Value: 4.0                                                |
|                     | - Description: The number of compute nodes to be released.  |
|                     |   Name: released_compute_nodes_count                        |
|                     |   Unit: null                                                |
|                     |   Value: 1.0                                                |
|                     | - Description: The number of VM migrations to be performed. |
|                     |   Name: instance_migrations_count                           |
|                     |   Unit: null                                                |
|                     |   Value: 35.0                                               |
|                     |                                                             |
| Global efficacy     | Released_nodes_ratio: 25.00 %                               |
|                     |                                                             |
| Hostname            | lovely-ladybug.local                                        |
+---------------------+-------------------------------------------------------------+
Here is the output of the action plan after it has finished executing:
# openstack optimize actionplan show 2abb3cae-99e2-4339-b952-0f52db59155d
+---------------------+-------------------------------------------------------------+
| Field               | Value                                                       |
+---------------------+-------------------------------------------------------------+
| UUID                | 2abb3cae-99e2-4339-b952-0f52db59155d                        |
| Created At          | 2022-01-21T18:55:15+00:00                                   |
| Updated At          | 2022-01-21T22:09:49+00:00                                   |
| Deleted At          | None                                                        |
| Audit               | 50b571c6-faff-4b0e-803d-558708bc5ec5                        |
| Strategy            | vm_workload_consolidation                                   |
| State               | SUCCEEDED                                                   |
| Efficacy indicators | - Description: The total number of enabled compute nodes.   |
|                     |   Name: compute_nodes_count                                 |
|                     |   Unit: null                                                |
|                     |   Value: 4.0                                                |
|                     | - Description: The number of compute nodes to be released.  |
|                     |   Name: released_compute_nodes_count                        |
|                     |   Unit: null                                                |
|                     |   Value: 1.0                                                |
|                     | - Description: The number of VM migrations to be performed. |
|                     |   Name: instance_migrations_count                           |
|                     |   Unit: null                                                |
|                     |   Value: 35.0                                               |
|                     |                                                             |
| Global efficacy     | Released_nodes_ratio: 25.00 %                               |
|                     |                                                             |
| Hostname            | lovely-ladybug.local                                        |
+---------------------+-------------------------------------------------------------+
Cloud State After Watcher is Applied
The following screenshot shows the spread of this cloud's instances after Watcher's VM Workload Consolidation Strategy has been applied.
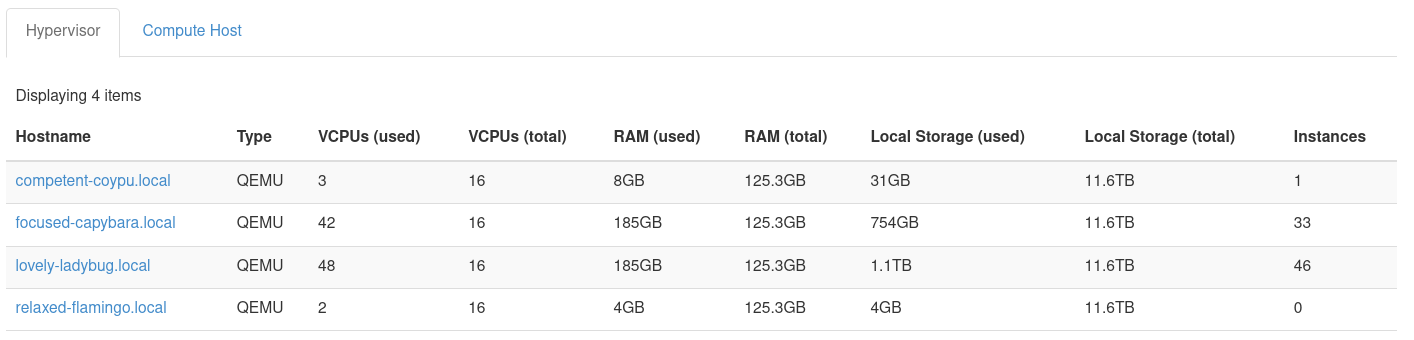
Figure 2: Hypervisor list and instance count after Watcher has been applied
For this case, Watcher determined it could run the same compute workload with three hypervisors instead of four. Instances were live migrated to free up a single compute host. Then, Watcher disabled the compute service for the freed node.