How to Install and Use OpenStack's CLI
Introduction
Your OpenMetal Private Cloud can not only be managed through a web browser, but also through the command line using OpenStack's CLI called OpenStackClient. Using the command line to manage your cloud introduces more flexibility in automation tasks and can generally make an administrator's life simpler. In this guide, we introduce you to the command line method of managing your cloud by explaining how to install and use OpenStackClient.
How to Install OpenStackClient
Prerequisites
- A Linux machine in which you can install OpenStackClient. This can be your own machine, the cloud's hardware nodes, or an instance running in the cloud.
- Python 3.8 or greater
- OpenStack RC file
clouds.yamlfile
Install OpenStackClient
In this section, we demonstrate the initial preparation and installation of OpenStackClient on CentOS 9 Stream instance.
Initial Preparation
Before installing OpenStackClient, you must obtain two files from
Horizon, which are required to prepare your shell environment. Those two
files are clouds.yaml and the OpenStack RC file.
clouds.yaml: Used as a source of configuration for how to connect to a cloud- OpenStack RC file: Used as a source of authentication for your user and project
To collect these files, log in to Horizon as your user. Navigate to
Project -> API Access to download the OpenStack clouds.yaml and
the OpenStack RC files to your machine. When you navigate to Project
-> API Access and collect these files, they are associated with the
current user and project that user is in.
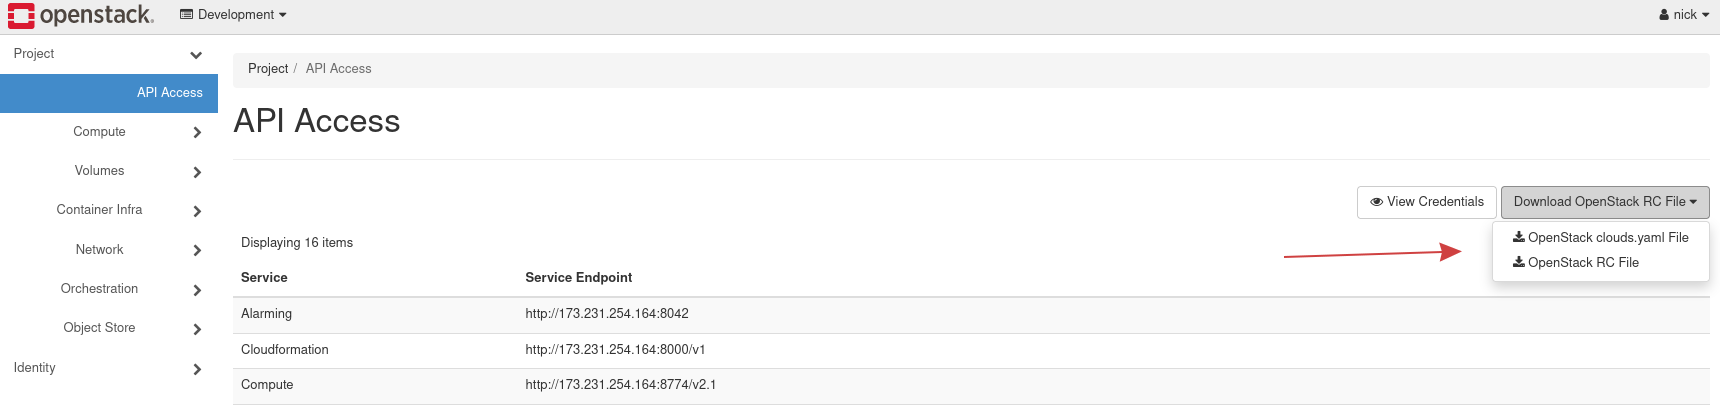
Figure 1: API Access
This example acquires the clouds.yaml and OpenStack RC file for the
user nick and that user's primary project, Development.
Prepare and Install OpenStackClient
Next, use SSH to log in to the instance created previously. If you created your instance by following the guide, How to Create an Instance in OpenStack Horizon, then this instance can only be accessed from one of your control plane nodes.
Step 1: Prepare clouds.yaml and OpenStack RC files
The clouds.yaml file obtained previously must be prepared in this
instance. For this demonstration, clouds.yaml is located as
~/.config/openstack/clouds.yaml in this instance. Copy the contents of
clouds.yaml obtained from Horizon and store it as
~/.config/openstack/clouds.yaml.
For example:
# Create the following directory
$ mkdir -p ~/.config/openstack

# Copy clouds.yaml into this file
$ vi ~/.config/openstack/clouds.yaml
Note -- The clouds.yaml file can be placed in several locations.
For more see the Configuration Files
heading of OpenStack's documentation.
Next, copy the contents of your OpenStack RC file, in our case called
~/Development-openrc.sh, into the instance. This file can be placed
anywhere and in this example, the file is stored in the centos user's
home directory.
For example:
vi ~/Development-openrc.sh
Step 2: Create a Python virtual environment
This environment is created so as to not interfere with the system's Python version.
The python default module is venv which supports creating lightweight
“virtual environments”, each with their own independent set of Python
packages installed in their site directories.
Use python -m venv /path/to/new/virtual/environment to create a virtual
environment in path /opt.
For example:
python3 -m venv /opt/omi-cli
Step 3: Activate the Python virtual environment
Use source /opt/omi-cli/bin/activate to activate the virtual environment.
For example:
source /opt/omi-cli/bin/activate
Step 4: Upgrade pip
Before installing OpenStackClient and to aid in a smooth installation,
upgrade pip. Upgrade pip by using pip install --upgrade pip.
For example:
pip install --upgrade pip
Step 5: Install OpenStackClient
With everything prepared, install OpenStackClient with:
pip install python-openstackclient
Step 6: Activate User Authentication
The previously created openrc file is now used to set environment variables related to authentication.
For example:
$ source ~/Development-openrc.sh
Please enter your OpenStack Password for project Development as user dev-user:
Step 7: List servers associated with your project
For an initial command, list the servers associated with your project by
running openstack server list.
If your cloud is configured with a Self Signed certificate (our default)
you will need to pass the --insecure flag with your commands, otherwise
you will get a SSL Verify error due to the self signed certficiate.
For example:
$ openstack --insecure server list
+--------------------------------------+-------------+--------+----------------------------------------+--------------------------+----------+
| ID                                   | Name        | Status | Networks                               | Image                    | Flavor   |
+--------------------------------------+-------------+--------+----------------------------------------+--------------------------+----------+
| 3bb6f079-90d3-4233-9400-94ef49c34a34 | Jumpstation | ACTIVE | Private=173.231.217.202, 192.168.0.200 | N/A (booted from volume) | m1.small |
+--------------------------------------+-------------+--------+----------------------------------------+--------------------------+----------+
Here, we can see the server created in the previous guide.
Per Project Source File
In certain situations, you might be required to run an OpenStack command in a project other than the default admin project provided by your openrc file.
This can be accomplished by editing the openrc file and changing the project UUID to the project required. You would then source the file as normal.
For example:
(omi-cli) [root@silly-manatee ~]# cat /etc/kolla/admin-openrc.sh
# Clear any old environment that may conflict.
for key in $( set | awk '{FS="="}  /^OS_/ {print $1}' ); do unset $key ; done
export OS_PROJECT_DOMAIN_NAME=Default
export OS_USER_DOMAIN_NAME=Default
export OS_PROJECT_NAME=admin <------------ These would be changed to the desired project
export OS_TENANT_NAME=admin <----------- These would be changed to the desired project
export OS_USERNAME=admin
export OS_PASSWORD=<Password>
export OS_AUTH_URL=http://192.168.3.254:5000
export OS_INTERFACE=internal
export OS_ENDPOINT_TYPE=internalURL
export OS_IDENTITY_API_VERSION=3
export OS_REGION_NAME=IAD3
export OS_AUTH_PLUGIN=password
export OS_INSECURE=true
export OS_VERIFY=false
To verify you are running commands from the correct project, run the env command and confirm the OS_PROJECT variable
For example:
(omi-cli) [root@silly-manatee ~]# env | grep test
OS_TENANT_NAME=test
OS_PROJECT_NAME=test
Command Structure
When using OpenStackClient, there is typically a common command pattern
for what you want to accomplish. All openstack commands begin with
openstack. You can execute openstack by itself to enter into a
shell, where commands no longer need to be prefixed by openstack:
(venv) [root@lovely-ladybug ~]# openstack
(openstack)
List all Available Subcommands
Use openstack --help to list all available subcommands. You initially
see all the flags you can pass, but after scrolling a bit, the
subcommand list starts:
Commands:
  access rule delete  Delete access rule(s)
  access rule list  List access rules
  access rule show  Display access rule details
  access token create  Create an access token
  acl delete  Delete ACLs for a secret or container as identified by its href. (py
thon-barbicanclient)
[...output truncated...]
Learn more about a Subcommand
After seeing available commands, learn more about a command by using
openstack help <command>.
For example, to learn more about the openstack server command, use
openstack help server:
$ openstack help server
Command "server" matches:
  server add fixed ip
  server add floating ip
  server add network
  server add port
  server add security group
[...output truncated...]
List Items and Show Details
It is very common when using OpenStackClient to list items and the
command form is typically openstack <subcommand> list. For example,
openstack server list, lists all servers for the currently configured
project.
Furthermore, more information about an item can be found by typically
running openstack <subcommand> show <item>. For example, openstack
server show Jumpstation shows the details about the instance named
Jumpstation.
Enable Bash Autocompletion
Note The required bash-completion package is not included in the CentOS 9 Stream image resulting in an errors like the following:
-bash: _get_comp_words_by_ref: command not found
We can install the missing package from the default repositories.:
sudo dnf install bash-completion
By default, shell autocompletion is not enabled for the
python-openstackclient package. To view the autocompletion Bash
script, use openstack complete. To make the autocompletion persist,
store the output of openstack complete into
/etc/bash_completion.d/osc.bash_completion and reload your shell.
For example, we print the autocomplete configuration and redirect its
output to /etc/bash_completion.d/osc.bash_completion using tee:
openstack complete | sudo tee /etc/bash_completion.d/osc.bash_completion > /dev/null
Next, either log out and back in to your shell or use source to load
the autocompletion script for your current shell.
For example:
source /etc/bash_completion.d/osc.bash_completion