Persistent Port VM Multiple Interface Configurations
Written by Ramon Grullon
A default gateway is a network device or node in a computer network that serves as an entry and exit point for data traffic flowing to and from other networks. It is a routing device that enables communication between devices within the same local network and devices on external networks, such as the internet.
The Right Way to Do It (Private with Gateway) Floating for (NAT/SNAT)
Configure a private interface with a gateway.
Launch an Instance:
- Navigate to "Compute" > "Instances" in the left menu.
Click on the "Launch Instance" button.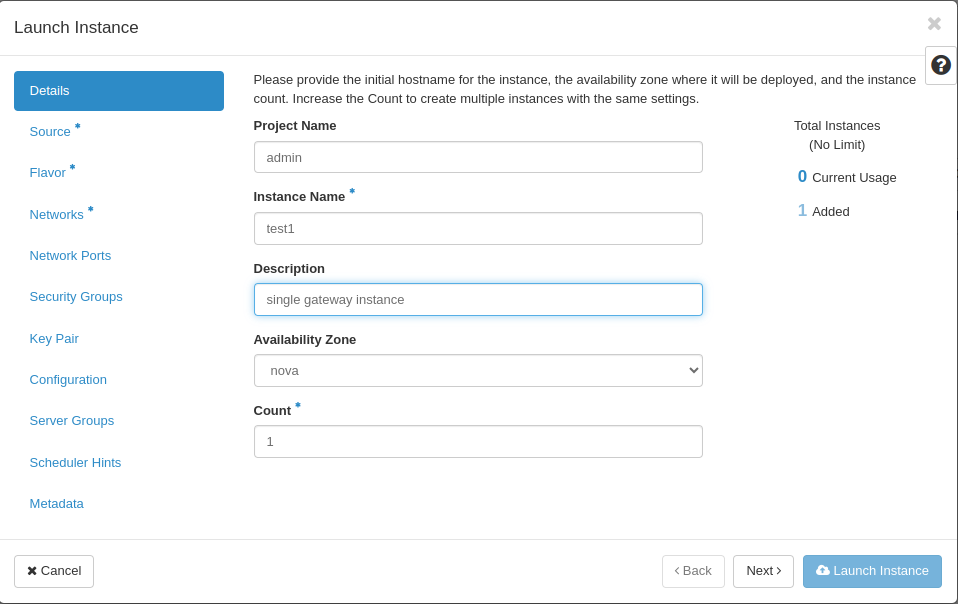
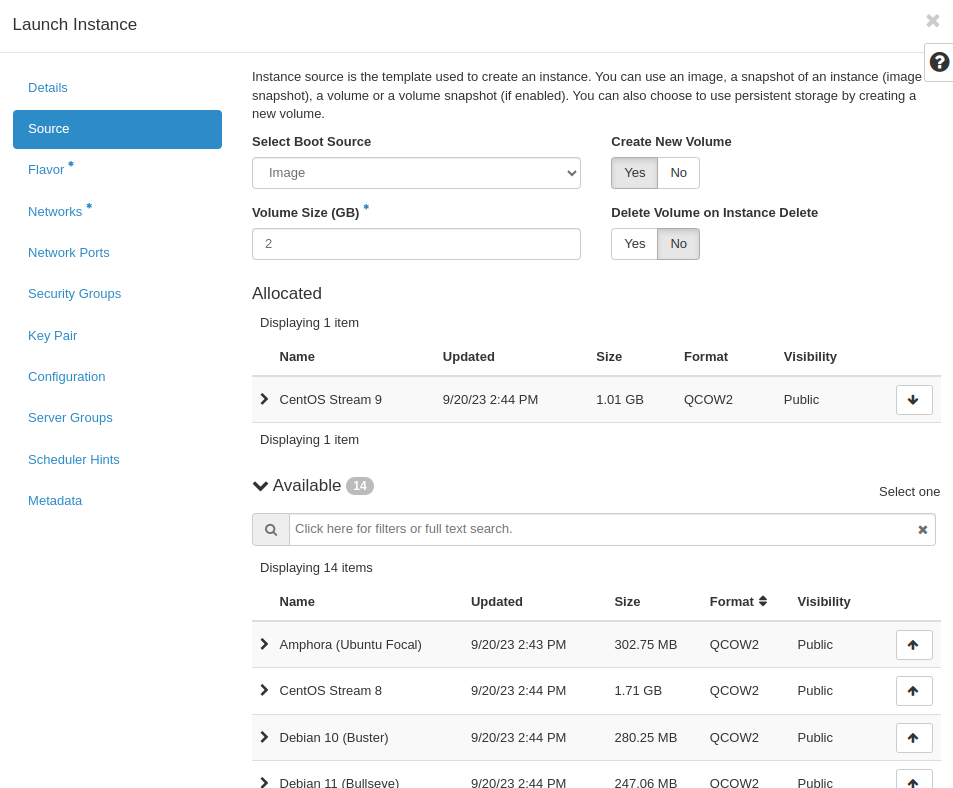
Instance Details:
Fill in the basic details for your instance:
Name: Enter a name for your instance.
Source: Choose your desired image.
Flavor: Choose an appropriate flavor.
Instance Count: Set the number of instances you want to launch to 1.
Instance Boot Source: Choose "Boot from image."
Access & Security:
Configure security settings:
Key Pair: Select a key pair if you have one.
Security Groups: Choose appropriate security groups.
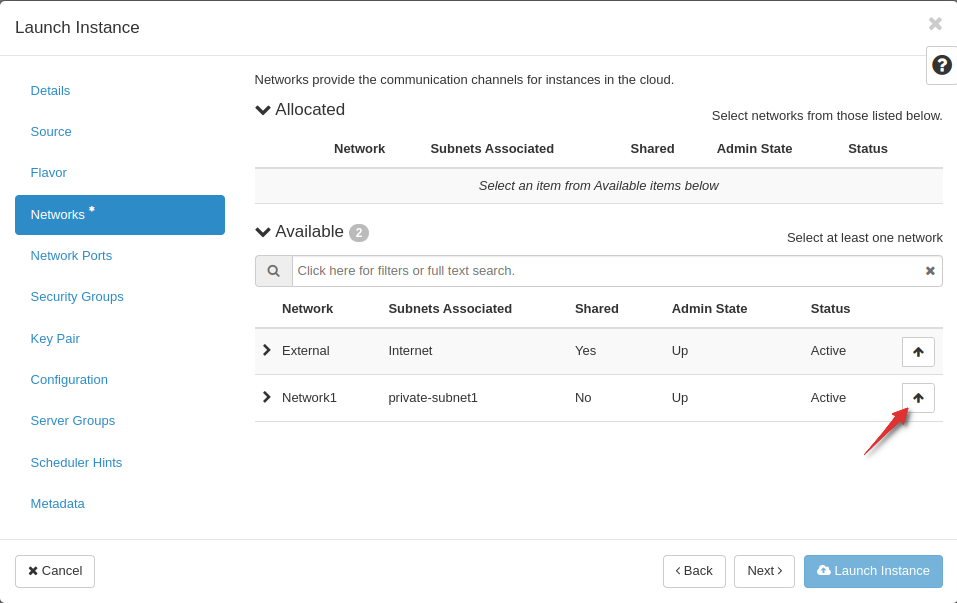
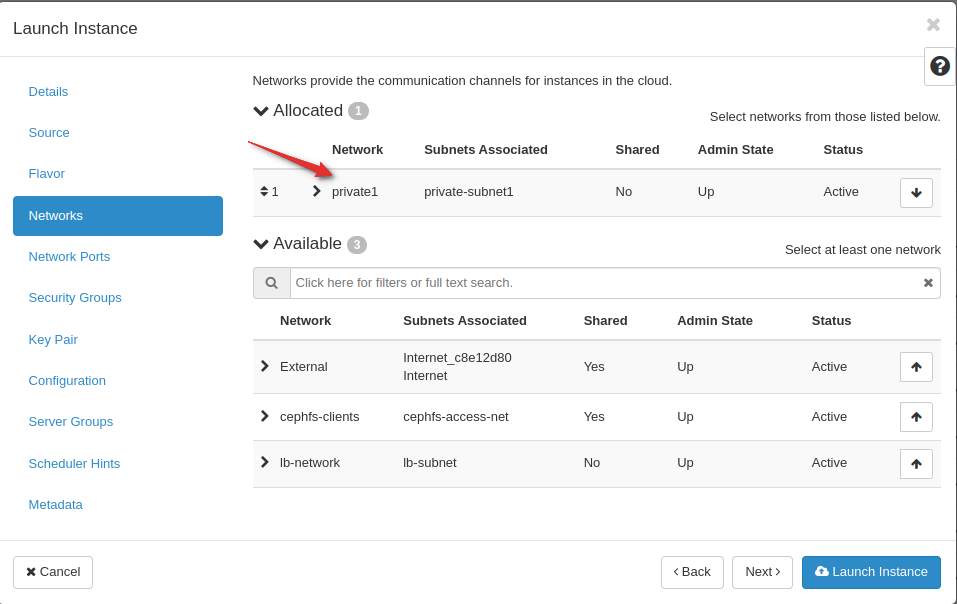
Networking:
- Under "Network Interfaces," select the network where you want to attach the instance.
Review and Launch:
Review your configuration on the summary page.
Click "Launch" to create the instance.
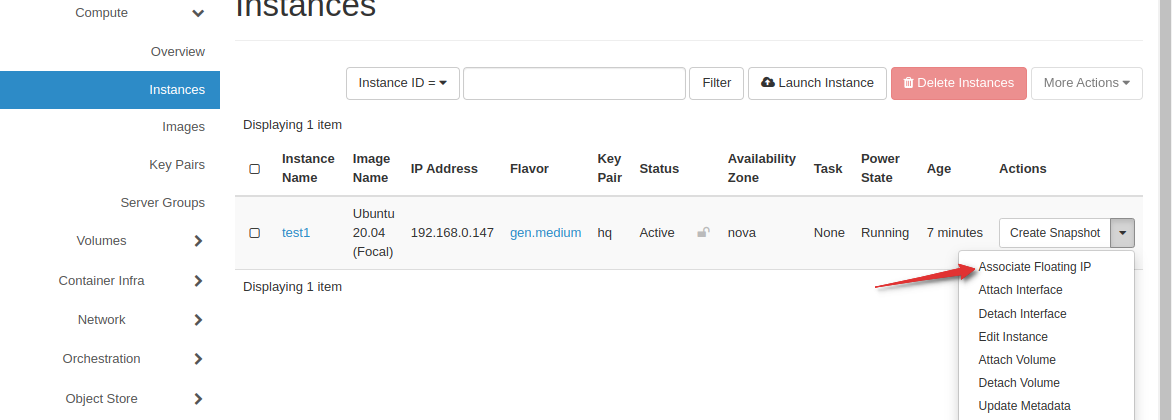
Instance Status:
Once the instance is launched, navigate to "Compute" > "Instances" to see the status of your instance.
Verify that the instance has a single port attached to the selected network.
Access the Console (Optional):
- If needed, access the console of the instance to configure networking setting
Add a floating IP for external access
 SSH into the instance with the public floating IP and run IP route.
ubuntu@test1:~$ ip route
default via 192.168.0.1 dev ens3 proto dhcp src 192.168.0.147 metric 100
169.254.169.254 via 192.168.0.101 dev ens3 proto dhcp src 192.168.0.147 metric 100
192.168.0.0/24 dev ens3 proto kernel scope link src 192.168.0.147
The private interface with its associated gateway facilitates controlled communication between internal and external networks, enabling internet access and centralized management. Simultaneously, keeping additional ports/networks without a gateway is crucial for network isolation, security, and flexibility in designing custom network configurations. Both aspects contribute to creating a well-architected and secure network environment.
Direct External (No Floating IP) + Private with No Gateway
Secondary Network without Gateway
Configure a direct external interface on 1 instance
Configure a private interface without a gateway and without a gateway on multiple networks on 2 separate instances
Create a Network:
Navigate to "Network" > "Networks" in the left menu.
Click on the "Create Network" button.
Network Details:
Fill in the details for your network:
Name: Enter a name for your network.
Project: Choose the project for which you want to create the network.
Network Address: Specify the network address in CIDR notation (e.g., 192.168.1.0/24).
Enable DHCP: Disable DHCP as you won't have a gateway.
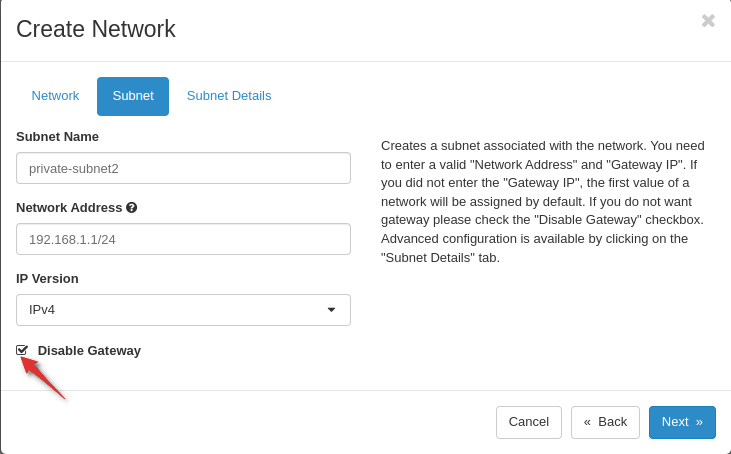
Subnet Details:
Click on "Subnet" to add a subnet to the network.
Name: Enter a name for your subnet.
Network Address: Specify the subnet address in CIDR notation (e.g., 192.168.1.0/24).
Gateway IP: Leave this field blank since you don't want a gateway.
Disable DHCP: Disable DHCP for this subnet.
 Review and Create
Review your configuration on the summary page.
Click "Create" to create the network.
Verify the Network:
Navigate to "Network" > "Networks" to see the newly created network.
Ensure that the network does not have a gateway IP associated.
First to explain how these two approaches work and their differences
Multi-port address pairs and multi-port policy-based routing are two different concepts in networking, each serving specific purposes. Let's discuss each concept.
Comparison between Multi-Port Address Pairs and Multi-port Policy-Based Routing
Multi-Port Address Pairs
Definition of Address Pairs
- Address Pairs: In networking, an address pair refers to associating multiple IP addresses with a single network interface.
Use Case for Address Pairs
Floating IPs: In OpenStack a floating IP is an IP address that can be dynamically reassigned to different instances, providing high availability and failover capabilities.
Benefits of Address Pairs
High Availability: Enables instances to quickly recover from failure by associating a new IP address.
Load Balancing: Allows for distributing traffic across multiple instances.
Multi-Port Policy-Based Routing
Definition of PBR
- Policy-Based Routing (PBR): A technique in networking where routing decisions are based on policies defined by administrators rather than the traditional routing table.
Use Case for PBR
- Custom Routing Decisions: Policy-based routing allows administrators to define rules or policies that determine the route traffic takes based on specific criteria, such as source IP, destination IP, or type of service.
Benefits of PBR
Flexible Routing Decisions: Provides flexibility in determining how traffic is routed based on various criteria.
Traffic Engineering: Enables optimization of network paths based on specific requirements.
Comparison
Purpose:
Address Pairs: Primarily used for high availability and load balancing, especially in cloud environments.
Policy-Based Routing: Used to customize routing decisions based on policies defined by administrators.
Scope:
Address Pairs: Generally associated with a specific network interface on an individual device.
Policy-Based Routing: Affects the entire routing decision process on a device.
Granularity:
Address Pairs: Operates at the level of individual IP addresses associated with a network interface.
Policy-Based Routing: Allows for complex routing decisions based on various criteria.
Example Scenarios:
Address Pairs: Floating IP scenarios in cloud environments where IP addresses can be dynamically reassigned.
Policy-Based Routing: Implementing specific routing policies, such as sending traffic from a particular source through a specific gateway.
In summary, multi-port address pairs are focused on associating multiple IP addresses with a single network interface for specific use cases like floating IPs, while multi-port policy-based routing allows administrators to customize routing decisions based on defined policies. The choice between them depends on the specific networking requirements and goals of a given scenario.
Multi-IP Single Port (Address Pairs) Solution
Cloud Admin
Allocated 2 Floating IPs to desired Project.
Cloud Tenant
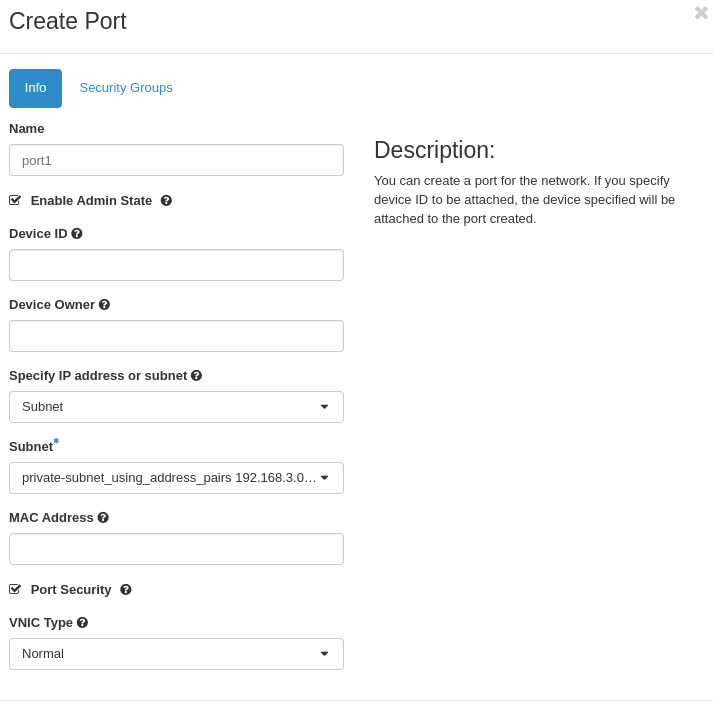
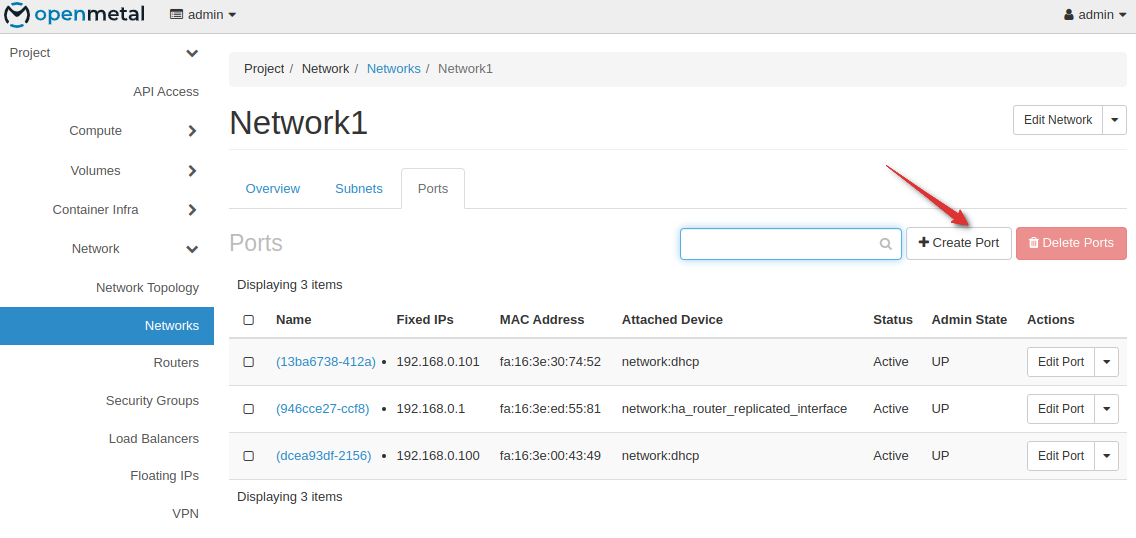
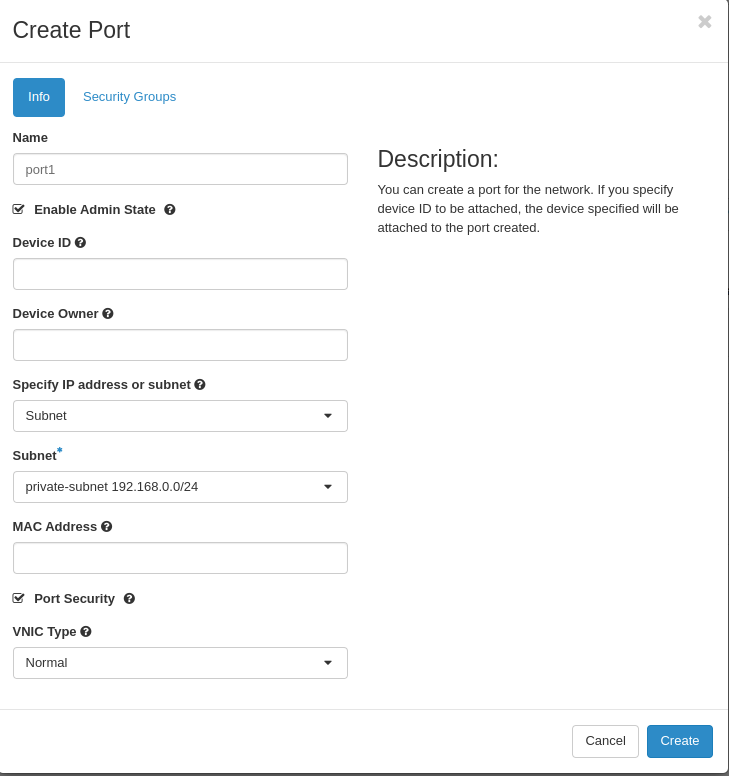
Create 2 ports prior to the creation of your instance.
In Horizon, Go to Network - Networks - Ports and Create a port

Configure 2 ports with distinct names and set them to the subnet and security group desired
(Keep in mind, you must have your network and subnet configured prior to this step.)
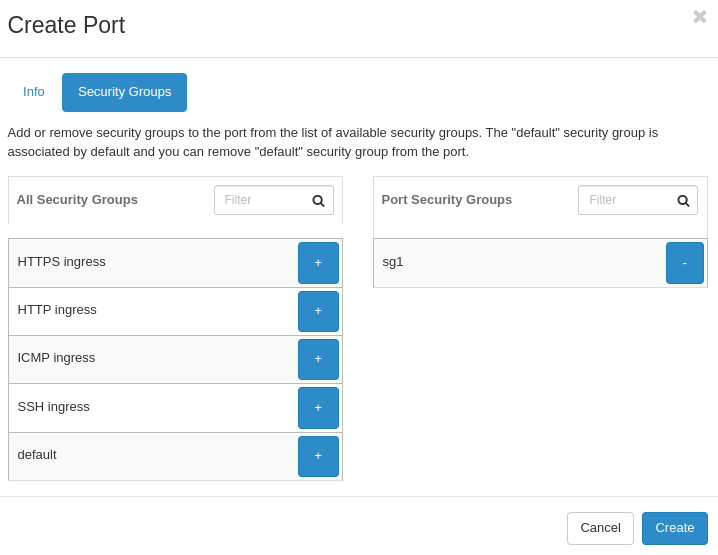
Note: This is necessary to allow
When creating a port, allocate the correct Security Groups to the port.
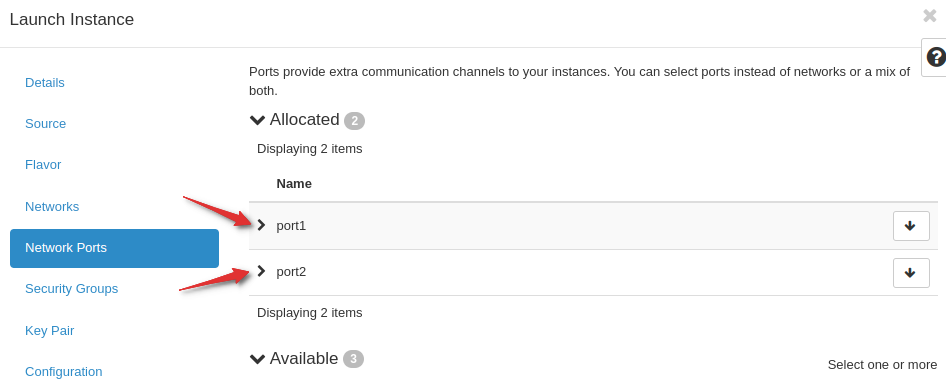
Create an instance making sure to select the correct network ports.
Select all the ports you previously created.
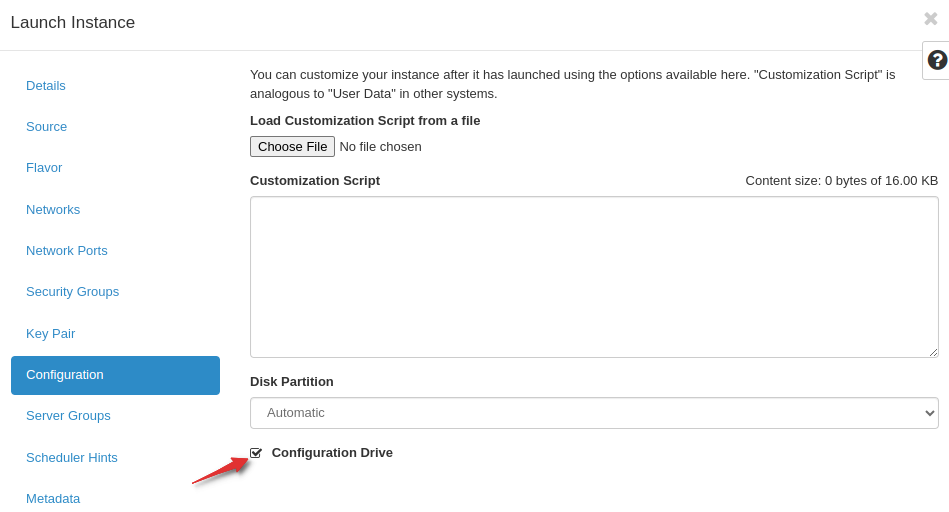
Due to issues with ip routing during creation caused by the multiple ports, cloud-init is unable to inject your SSH key. You must select the configuration drive to enable OpenStack to add your SSH key.
In order to configure multi-port networking, you must identify which port is designated as the default route interface. You can view the console log on Horizon and look at the routing table configuration as the instance is created.
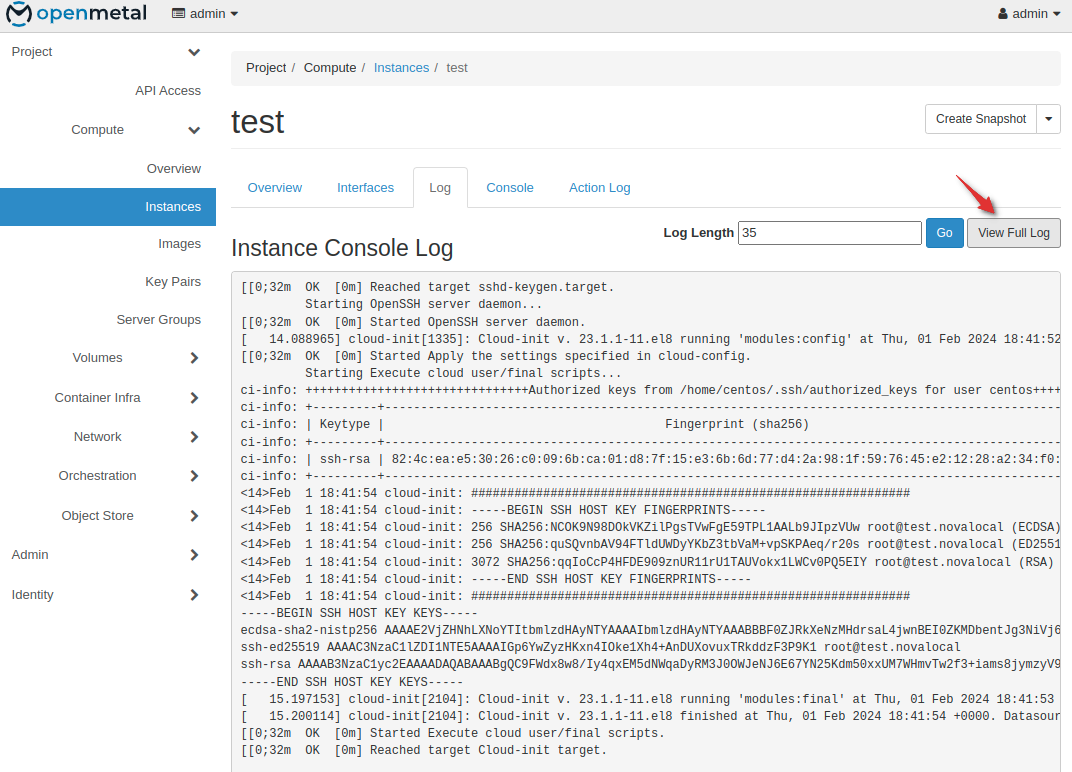
The console log will display a network device table which you will use to correlate the interface that is the default gateway to its IP address.

The console log will display a routing table where the interface representing Route 0 is the default gateway. In this example, eth0 is the default gateway. Looking at the network device table from above, its IP address is 192.168.3.170

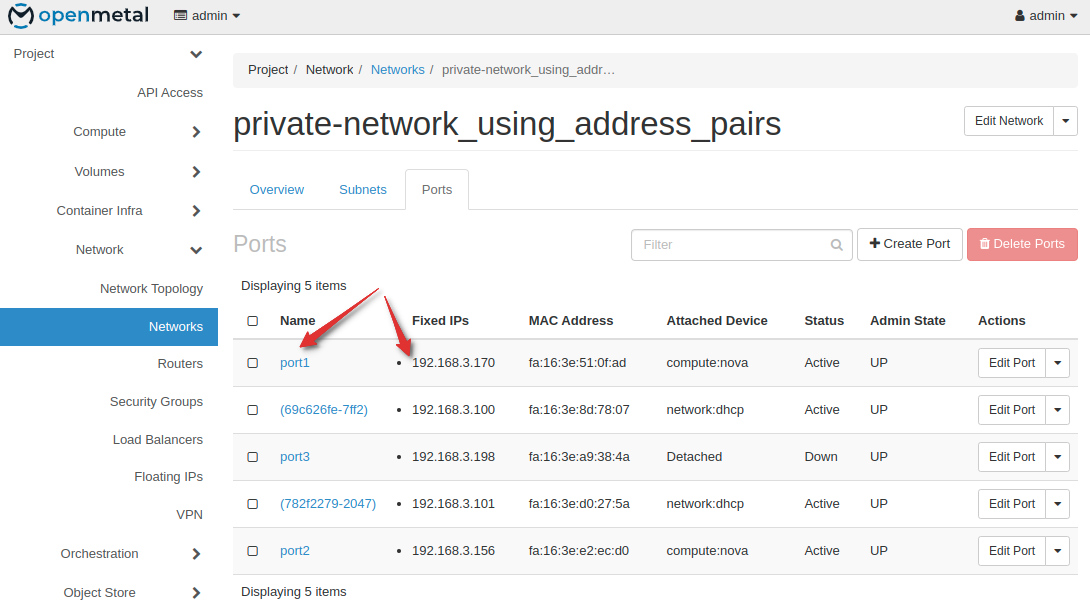
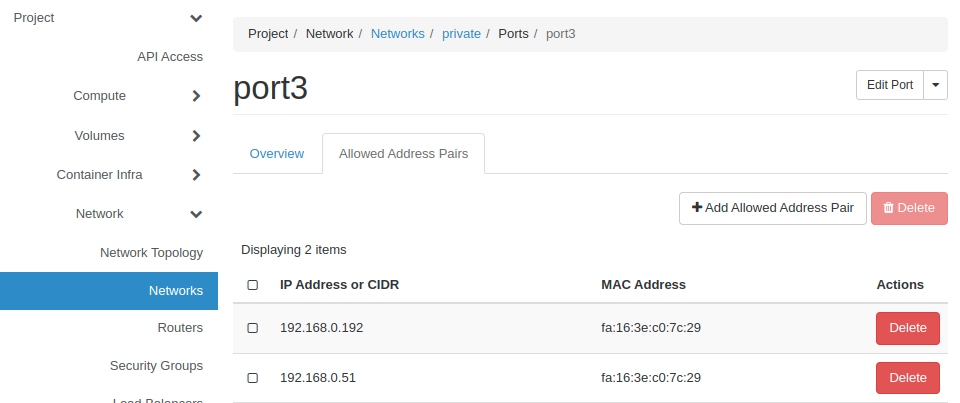
Go to Network - Networks - Your Subnet - Ports
Identify the port associated with the IP address of the default gateway identified earlier. In this case, it’s port1
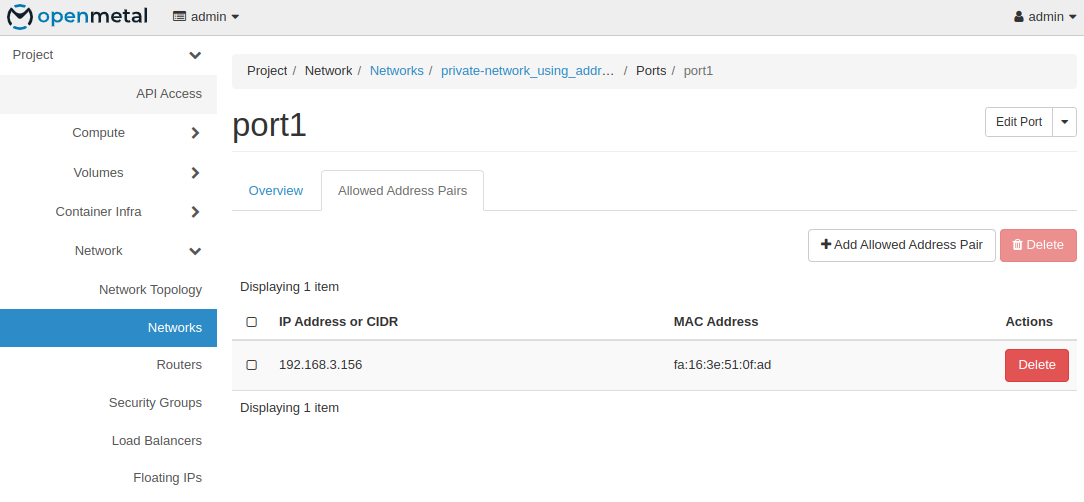
Click on the port - “Allowed Address Pairs” tab - Add Allowed Address Pair
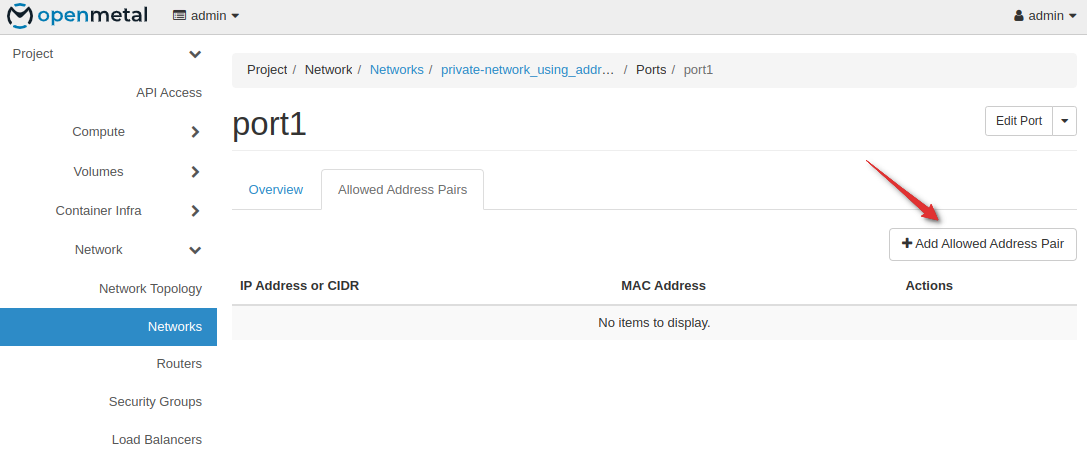
The corresponding IP addresses of the other 2 ports to the allowed addresses. In this case, 192.168.3.156
In order to test this, I will add floating IPs to each of the two ports and confirm I can SSH into the instance through all 2 IPs.
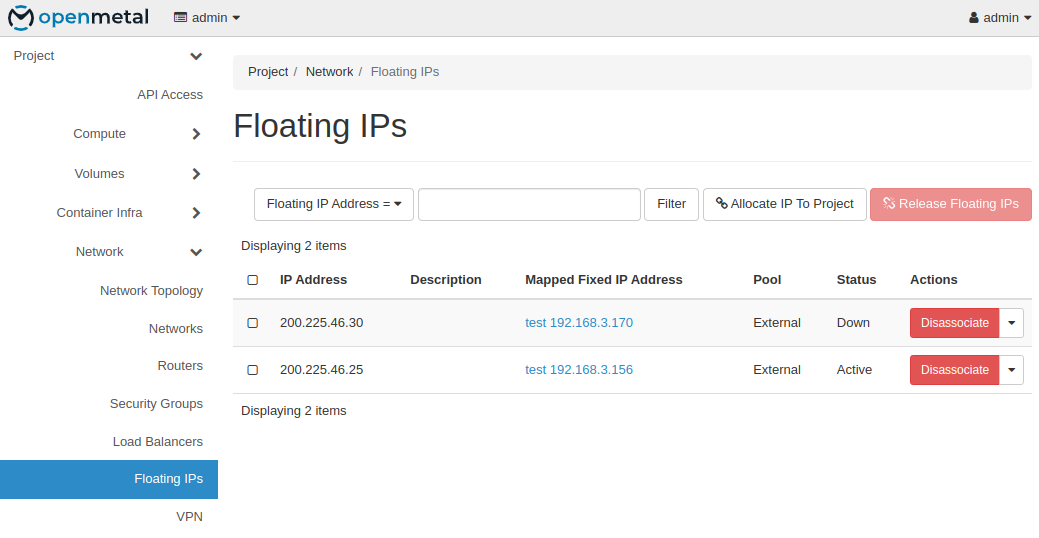
You can run the following curl command from inside your instance to confirm successful completion of your multi-port setup. This will curl through each port to https://ifconfig.me and return your publicly accessible IP address.
curl --interface eth0 ifconfig.me; echo

curl --interface eth1 ifconfig.me; echo
Multiple Internal Interfaces with Gateways & Floating IPs & Policy-Based
Table Reconfiguration
Cloud Admin Pre-Req
Allocated 2 Floating IPs to desired Project.
Cloud Tenant Pre-Req
VM creation
Create a VM attaching the desired subnet. (In this example we are using 192.168.0.0/24)
Attach a floating IP and confirm you can access the VM through SSH.
Port Creation
Create a new port in the same subnet.
In Horizon, Go to Network - Networks - Select your network - Ports and Create a port
Configure a secondary port with a distinct name and set the port to the subnet and security group desired.
*Note: The below step is not required in RHEL distributions
dhclient, provides a means for configuring one or more network interfaces using the DHCP to request an IP from a DHCP server.
When creating a port, allocate the correct Security Groups to the port.
Note: Security Groups must be set for each port to allow external access.
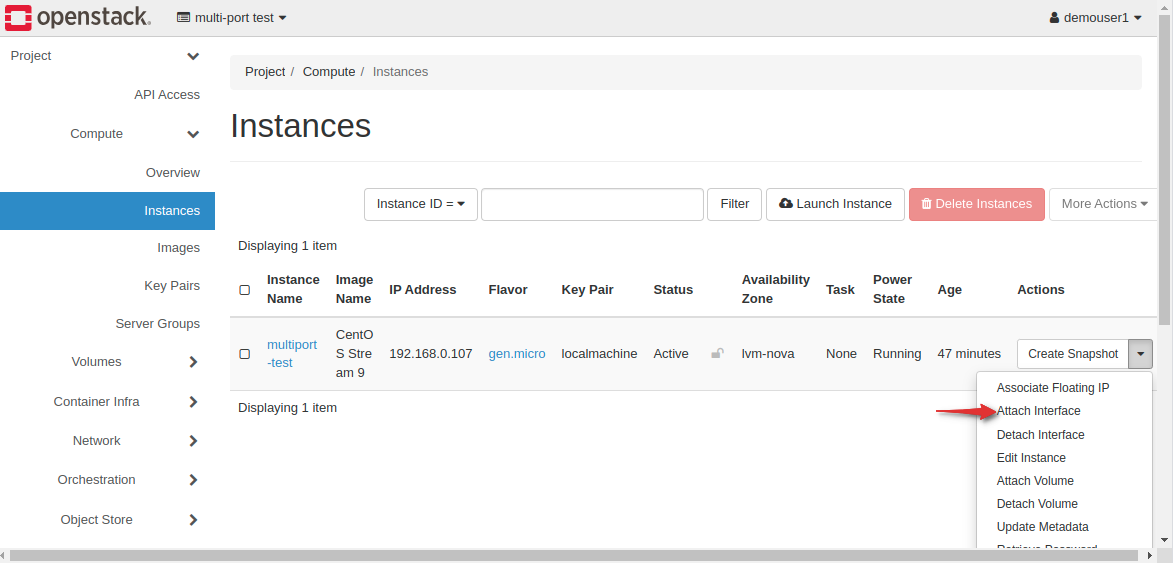
Attach Port
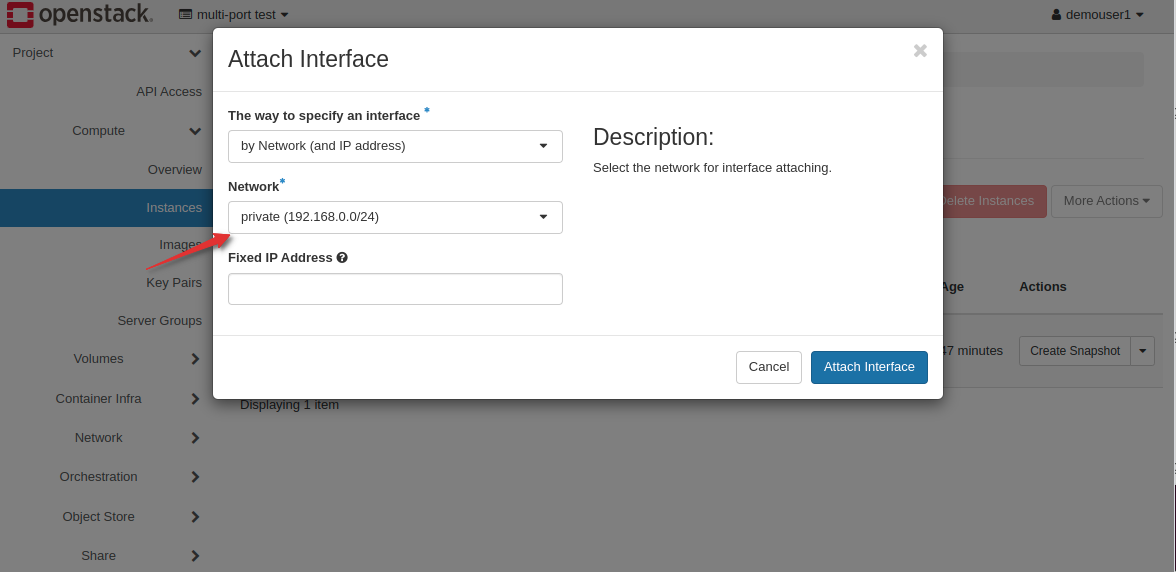
Go to Instances - and attach the new port to the instance you created initially.
Note: Make sure by Port on the option on how to specify an interface.
Attach a floating IP to this new port. Your instance will now have 4 distinct IPs

Configure Policy Based Routing
SSH to your instance
For context, every machine can only have 1 default gateway out of the box but since we have 2 separate interfaces which by design have a default gateway defined in IP route, the interface with the lower metric is assigned by the system to send all traffic out. This means any traffic meant for the secondary interface will fail such as ICMP pings.
Sending traffic to 1st interface created
External packet (ICMP Ping) - Floating IP - Internal IP (eth0) - Pong - Check IPRoute - This IP route has the lowest metric and is used
default via 192.168.0.1 dev eth0 proto dhcp src 192.168.0.107 metric 100
Then you send traffic out dev eth0 - Floating IP - External IP (Success)
Sending traffic to Secondary interface created
External packet (ICMP Ping) - Floating IP - Internal IP (eth1) - Pong - Check IPRoute - This IP route has the lowest metric and is used
default via 192.168.0.1 dev eth0 proto dhcp src 192.168.0.107 metric 100
Then you send traffic out dev eth0 - Floating IP (No route to host) - External IP (Failure)
[cloud-user@multiport-test ~]$ ip route
default via 192.168.0.1 dev eth0 proto dhcp src 192.168.0.107 metric 100
default via 192.168.0.1 dev eth1 proto dhcp src 192.168.0.112 metric 101
169.254.169.254 via 192.168.0.100 dev eth0 proto dhcp src 192.168.0.107 metric 100
169.254.169.254 via 192.168.0.100 dev eth1 proto dhcp src 192.168.0.112 metric 101
192.168.0.0/24 dev eth0 proto kernel scope link src 192.168.0.107 metric 100
192.168.0.0/24 dev eth1 proto kernel scope link src 192.168.0.112 metric 101
To assign each interface to utilize a specific default gateway, we must create a secondary IP route table with rules for our secondary
Create a new IP route table
cloud-user@multiport-test ~]$sudo bash
cloud-user@multiport-test ~]$echo "1 port2" >> /etc/iproute2/rt_tables
Add IP routes to the new IP route table “port2” and delete secondary interface routes from the primary IP route table. Run IP route and copy, paste the entries with eth1(secondary interface) for ease of use during this process.
ADD ROUTES TO NEW TABLE
[root@multiport-test cloud-user]# ip route add default via 192.168.0.1 dev eth1 proto dhcp src 192.168.0.112 metric 101 table port2
[root@multiport-test cloud-user]# ip route add 169.254.169.254 via 192.168.0.100 dev eth1 proto dhcp src 192.168.0.112 metric 101 table port2
[root@multiport-test cloud-user]# ip route add 192.168.0.0/24 dev eth1 proto kernel scope link src 192.168.0.112 metric 101 table port2
DELETE THE ENTRIES FROM YOUR MAIN IP ROUTING TABLE
[root@multiport-test cloud-user]# ip route del default via 192.168.0.1 dev eth1 proto dhcp src 192.168.0.112 metric 101
[root@multiport-test cloud-user]# ip route del 169.254.169.254 via 192.168.0.100 dev eth1 proto dhcp src 192.168.0.112 metric 101
[root@multiport-test cloud-user]# ip route del 192.168.0.0/24 dev eth1 proto kernel scope link src 192.168.0.112 metric 101
YOUR 2 ROUTING TABLES SHOULD LOOK SIMILAR TO THIS
[root@multiport-test cloud-user]# ip route
default via 192.168.0.1 dev eth0 proto dhcp src 192.168.0.107 metric 100
169.254.169.254 via 192.168.0.100 dev eth0 proto dhcp src 192.168.0.107 metric 100
192.168.0.0/24 dev eth0 proto kernel scope link src 192.168.0.107 metric 100
[root@multiport-test cloud-user]# ip route list table port2
default via 192.168.0.1 dev eth1 proto dhcp src 192.168.0.112 metric 101
169.254.169.254 via 192.168.0.100 dev eth1 proto dhcp src 192.168.0.112 metric 101
192.168.0.0/24 dev eth1 proto kernel scope link src 192.168.0.112 metric 101
Add rules for new IP routing table
In our example we have both interfaces utilizing the same subnet, therefore we must set a static IP(This is .112 which we assigned to eth1) in our rules to use our secondary routing table anytime traffic is entering or exiting the VM for our secondary interface.
Add these rules to your secondary table specifying your specific IP
ip rule add from 192.168.0.112/32 lookup port2
ip rule add oif eth1 table port2
ip rule add iif eth1 table port2
Testing configuration
Ping test
ping -I eth0 192.168.0.1
ping -I eth1 192.168.0.1
Confirm with tcpdump - Run the ping command and open a new session with tcpdump installed and the output expected -
[cloud-user@multiport-test ~]$ sudo tcpdump -nni eth1 icmp
dropped privs to tcpdump
tcpdump: verbose output suppressed, use -v[v]... for full protocol decode
listening on eth1, link-type EN10MB (Ethernet), snapshot length 262144 bytes
17:56:27.898382 IP 192.168.0.112 > 192.168.0.1: ICMP echo request, id 3, seq 1, length 64
17:56:27.898992 IP 192.168.0.1 > 192.168.0.112: ICMP echo reply, id 3, seq 1, length 64
17:56:28.949107 IP 192.168.0.112 > 192.168.0.1: ICMP echo request, id 3, seq 2, length 64
17:56:28.949344 IP 192.168.0.1 > 192.168.0.112: ICMP echo reply, id 3, seq 2, length 64
17:56:29.973112 IP 192.168.0.112 > 192.168.0.1: ICMP echo request, id 3, seq 3, length 64
17:56:29.973245 IP 192.168.0.1 > 192.168.0.112: ICMP echo reply, id 3, seq 3, length 64
17:56:30.997126 IP 192.168.0.112 > 192.168.0.1: ICMP echo request, id 3, seq 4, length 64
17:56:30.997264 IP 192.168.0.1 > 192.168.0.112: ICMP echo reply, id 3, seq 4, length 64
17:56:32.021131 IP 192.168.0.112 > 192.168.0.1: ICMP echo request, id 3, seq 5, length 64
17:56:32.021314 IP 192.168.0.1 > 192.168.0.112: ICMP echo reply, id 3, seq 5, length 64
^C
10 packets captured
11 packets received by filter
0 packets dropped by kernel
Run curl command against ifconfig.me to confirm each interface is using itself as its gateway
[cloud-user@multiport-test ~]$ curl --interface eth1 http://ifconfig.me; echo
173.231.253.221
[cloud-user@multiport-test ~]$ curl --interface eth0 http://ifconfig.me; echo
200.225.45.137
(Bonus) Persistence - Ubuntu/RHEL
Provide instructions for making network configurations persistent on Ubuntu.
Provide instructions for making network configurations persistent on RHEL/CentOS.
In this process we will implement policy-based routing using systemd by creating a systemd service unit that executes a script responsible for setting up the required IP routes.
Persistent policy-based routing is often desirable in scenarios where specific routing decisions need to persist across reboots or network restarts. Here are some reasons why someone might want to implement persistent policy-based routing:
Customized Routing Policies:
- When there is a need for custom routing policies based on specific criteria such as source IP, destination IP, or type of service.
Traffic Engineering:
- To optimize network paths and direct traffic in a way that aligns with specific performance or security requirements.
Multi-Homed Systems:
- In situations where a system has multiple network interfaces connected to different networks, and the administrator wants to control how traffic flows through each interface.
Load Balancing:
- For load balancing scenarios where multiple paths exist, and administrators want to distribute traffic across those paths.
High Availability and Failover:
- In setups where there are redundant network paths, administrators can use persistent policy-based routing to implement failover mechanisms for improved network availability.
Security and Isolation:
- To create network segmentation and isolate traffic between different parts of a network, enhancing security.
Specialized Services:
- When a system provides specialized services and needs to route specific types of traffic through dedicated network paths.
Consistent Network Configuration:
- To maintain consistent network configurations across reboots, ensuring that the system operates with the desired routing behavior.
Pre-requisites
2 interfaces configured with IPs address and floating IPs
Secondary route table created in /etc/iproute2/rt_tables (Refer to VM Multiple Interface Configuration with Policy Based Routing for further guidance)
Context
Our initial ip route looks like this. We will be working with 2 interfaces with 2 IPs -
eth0 - 192.168.0.107 & eth1 - 192.168.0.112
[cloud-user@multiport-test ~]$ ip route
default via 192.168.0.1 dev eth0 proto dhcp src 192.168.0.107 metric 100
default via 192.168.0.1 dev eth1 proto dhcp src 192.168.0.112 metric 101
169.254.169.254 via 192.168.0.100 dev eth0 proto dhcp src 192.168.0.107 metric 100
169.254.169.254 via 192.168.0.100 dev eth1 proto dhcp src 192.168.0.112 metric 101
192.168.0.0/24 dev eth0 proto kernel scope link src 192.168.0.107 metric 100
192.168.0.0/24 dev eth1 proto kernel scope link src 192.168.0.112 metric 101
Procedure
Create a script (let's call it policy-routing.sh): I located my file in /usr/bin/policy-routing.sh and make the file executable - chmod +x policy-routing.sh
#!/bin/bash
ip route add default via 192.168.0.1 dev eth1 proto dhcp src 192.168.0.112 metric 101 table port2
ip route add 169.254.169.254 via 192.168.0.100 dev eth1 proto dhcp src 192.168.0.112 metric 101 table port2
ip route add 192.168.0.0/24 dev eth1 proto kernel scope link src 192.168.0.112 metric 101 table port2
ip route del default via 192.168.0.1 dev eth1 proto dhcp src 192.168.0.112 metric 101
ip route del 169.254.169.254 via 192.168.0.100 dev eth1 proto dhcp src 192.168.0.112 metric 101
ip route del 192.168.0.0/24 dev eth1 proto kernel scope link src 192.168.0.112 metric 101
ip rule add from 192.168.0.112/32 lookup port2
ip rule add oif eth1 table port2
ip rule add iif eth1 table port2
This file will include the IP routes for your secondary routing table(in this example called port2).
You will also remove the secondary interface eth1 IP routes from the main routing table.
To finalize, you will add the IP rules for your routing table.
Create a systemd service unit file (e.g., /etc/systemd/system/policy-routing.service):
Unit]
Description=Policy-Based Routing Setup
After=network-online.target
Wants=network-online.target

[Service]
ExecStart=/bin/bash /usr/bin/policy-routing.sh

[Install]
WantedBy=multi-user.target
Make the script executable:
Reload systemd to pick up the changes:
dynamically enable and start the service for a specific interface, i.e. to
configure policy-based routing for eth0 -
systemctl enable --now pbr@eth0.service
This will execute the script with the specified interface name and configure policy-based routing accordingly.
Repeat the process for each interface you want to configure. Adjust the routing commands in the script based on your specific requirements.
This file will execute the policy.sh script upon startup making sure to run after the networking service has started.
After creating the unit file, reload systemd to pick up the changes:
systemctl daemon-reload
You can then enable and start the service:
systemctl enable policy-routing.service
systemctl start policy-routing.service