Manage Node Firewall Using iptables
Use Case
In cases where access restriction and attack surface reduction is key, your project landscape may require assets and management be accessible only to select IPs or networks (such as a company VPN). Such a restriction can be handled on the Hardware Node level, allowing access to be easily managed separately without interference from or with Docker or OpenStack internal communication.
Goal
Use iptables and ipset to restrict access to local (eg. SSH) and/or
Cloud services (HAProxy) on an OpenStack node without interfering with
Docker.
Prerequisites
- Root SSH access to node
- Knowledge of OS package management
- OpenVSwitch Firewall Driver
- Kolla Ansible (if driver reconfigure required)
Identify Active Firewall Driver
You will first need to identify the driver actively in use by Neutron
port security. This is defined in openvswitch_agent.ini. This can be
confirmed using the grep command:
grep firewall_driver /etc/kolla/neutron-openvswitch-agent/openvswitch_agent.ini
If the firewall_driver is defined as openvswitch, proceed to
Setup.
[root@splendid-lamprey ~]# grep firewall_driver /etc/kolla/neutron-openvswitch-agent/openvswitch_agent.ini
firewall_driver = openvswitch
If the firewall_driver value differs from what is referenced in this guide,
update it to the required
driver before continuing.
[root@exhilarated-firefly ~]# grep firewall_driver /etc/kolla/neutron-openvswitch-agent/openvswitch_agent.ini
firewall_driver = neutron.agent.linux.iptables_firewall.OVSHybridIptablesFirewallDriver
Reconfigure Firewall Driver with Kolla Ansible
If the default Hybrid driver is in use you will need to update the
Kolla Ansible
configuration at /etc/kolla/config/neutron/openvswitch_agent.ini.
If the openvswitch_agent.ini file does not exist, create it with the
following contents:
# Ensures firewall rules are fully-managed in OVS instead of using
# host iptables
[securitygroup]
firewall_driver = openvswitch
[root@exhilarated-firefly ~]# cat /etc/kolla/config/neutron/openvswitch_agent.ini

# Ensures firewall rules are fully-managed in OVS instead of using
# host iptables
[securitygroup]
firewall_driver = openvswitch
Once in place, reconfigure the cloud with kolla-ansible reconfigure
you can target just the changed services with --tags
neutron,openvswitch:
(.kolla-admin) [root@exhilarated-firefly kolla-ansible]# kolla-ansible -i /opt/kolla-ansible-cli/inventory.yml -i /opt/kolla-ansible-cli/ansible/inventory/multinode reconfigure --tags neutron,openvswitch
Reconfigure OpenStack service : ansible-playbook -i /opt/kolla-ansible-cli/inventory.yml -i /opt/kolla-ansible-cli/ansible/inventory/multinode -e @/etc/kolla/globals.yml  -e @/etc/kolla/passwords.yml -e CONFIG_DIR=/etc/kolla  --tags neutron,openvswitch -e kolla_action=reconfigure -e kolla_serial=0 /opt/kolla-ansible/.kolla-admin/share/kolla-ansible/ansible/site.yml
[WARNING]: Invalid characters were found in group names but not replaced, use -vvvv to see details
[WARNING]: Could not match supplied host pattern, ignoring: enable_nova_True

--- OUTPUT TRUNCATED ---

PLAY RECAP *********************************************************************************************************************************************************************************************************
exhilarated-firefly        : ok=33   changed=5    unreachable=0    failed=0    skipped=18   rescued=0    ignored=0
gifted-wildcat             : ok=43   changed=6    unreachable=0    failed=0    skipped=19   rescued=0    ignored=0
localhost                  : ok=4    changed=2    unreachable=0    failed=0    skipped=0    rescued=0    ignored=0
upbeat-peacock             : ok=33   changed=5    unreachable=0    failed=0    skipped=18   rescued=0    ignored=0
Confirm your change is now reflected:
[root@exhilarated-firefly kolla-ansible]# grep firewall_driver /etc/kolla/neutron-openvswitch-agent/openvswitch_agent.ini
firewall_driver = openvswitch
Proceed to installation.
Install and Configure Firewall
CAUTION! This process can potentially result in loss of access to your cloud. Perform these steps on one node at a time to limit the possibility of total loss of access.
Install ipset and iptables
Begin by installing the required packages with dnf:
dnf install iptables-services ipset ipset-service -y
-- OUTPUT TRUNCATED ---
Installed:
  ipset-7.11-11.el9.x86_64                     ipset-libs-7.11-11.el9.x86_64     ipset-service-7.11-11.el9.noarch     iptables-nft-1.8.10-11.el9.x86_64     iptables-nft-services-1.8.10-11.el9.noarch
  iptables-services-1.8.10-11.1.el9.noarch     libnftnl-1.2.6-4.el9.x86_64

Complete!
Configure Services
Identify the nodes VLAN bond devices with ip command:
ip -br a | awk -F'@bond0' '/bond0\./{print$1}'
The output should look similar to the following:
[root@splendid-lamprey ~]# ip -br a | awk -F'@bond0' '/bond0\./{print$1}'
bond0.8
bond0.311
bond0.312
bond0.313
bond0.314
bond0.315
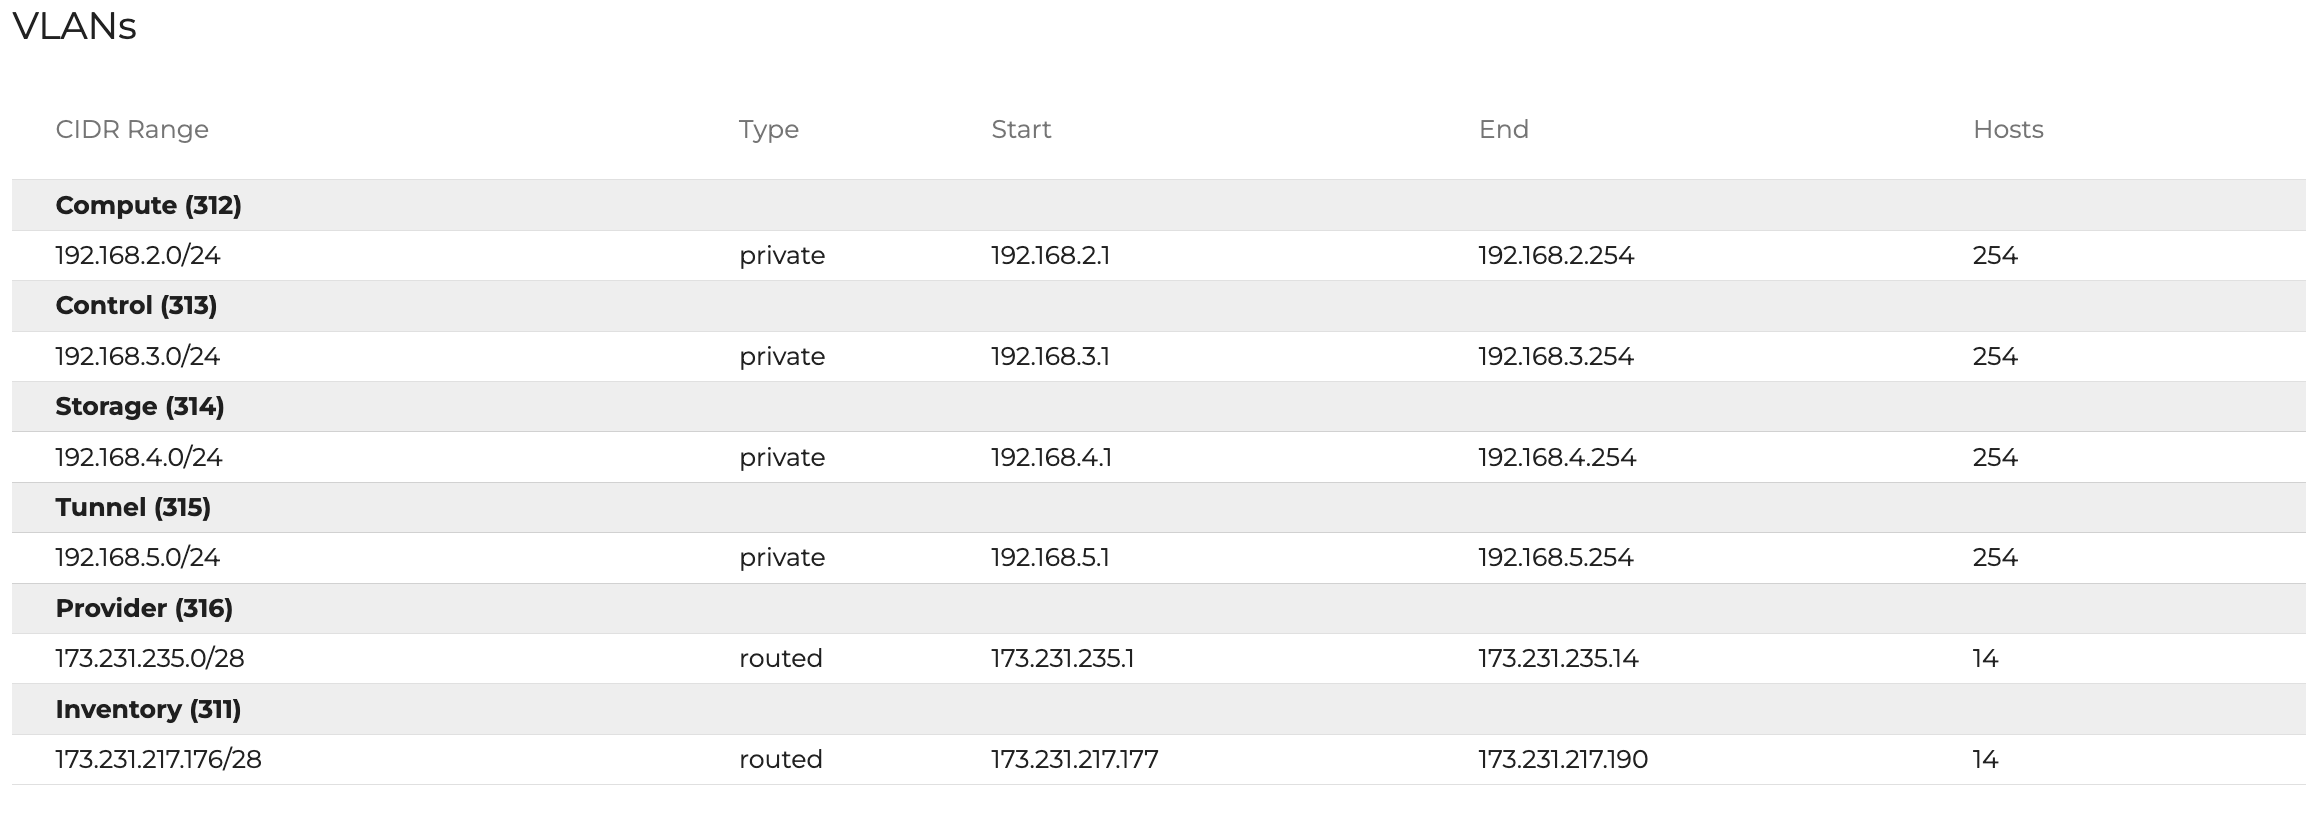
For more information on your VLANs, refer to the Assets > Networking tab in your Central page:
Create a new iptables configuration at /etc/sysconfig/iptables.
To ensure all VLAN traffic is accepted, special attention must be paid to the ACCEPT rules (eg. bond0.312 etc). Be sure to update the Local VLAN rules with the nodes identified interface names.
*filter
:INPUT ACCEPT [0:0]
:FORWARD ACCEPT [0:0]
:OUTPUT ACCEPT [0:0]
-A INPUT -i lo -j ACCEPT -m comment --comment "localhost"
-A OUTPUT -o lo -j ACCEPT -m comment --comment "localhost"
-A INPUT  -j ACCEPT -m pkttype --pkt-type multicast -m comment --comment "multicast"
-A OUTPUT -j ACCEPT -m pkttype --pkt-type multicast -m comment --comment "multicast"
-A INPUT -j ACCEPT -m pkttype --pkt-type broadcast -m comment --comment "broadcast"
-A OUTPUT -j ACCEPT -m pkttype --pkt-type broadcast -m comment --comment "broadcast"
-A INPUT  -j DROP -m set --match-set blacklist src -m comment --comment "blacklist"
-A OUTPUT -j DROP -m set --match-set blacklist dst -m comment --comment "blacklist"
-A INPUT -p icmp -j ACCEPT -m comment --comment "allow icmp"
-A INPUT  -m state --state RELATED,ESTABLISHED -j ACCEPT -m comment --comment "connection tracking"
-A INPUT -i bond0.312 -j ACCEPT -m comment --comment "Local VLAN - compute"
-A INPUT -i bond0.313 -j ACCEPT -m comment --comment "Local VLAN - control"
-A INPUT -i bond0.314 -j ACCEPT -m comment --comment "Local VLAN - storage"
-A INPUT -i bond0.315 -j ACCEPT -m comment --comment "Local VLAN - tunnel"
-A INPUT -i o-hm0 -j ACCEPT -m comment --comment "Octavia management"
-A INPUT -p vrrp -j ACCEPT
-A INPUT -p tcp -s 10.204.0.1 -m comment --comment "OMI Pod VLAN 8 management" -j ACCEPT
-A INPUT -p udp -s 10.204.0.1 -m comment --comment "OMI Pod VLAN 8 management" -j ACCEPT
-A INPUT -p tcp -s 173.231.217.0/28 -m comment --comment "OMI Pod Management and Support" -j ACCEPT
-A INPUT  -j ACCEPT -m set --match-set whitelist src -m comment --comment "whitelist"
-A INPUT -p tcp -m tcp --dport 22 -m state --state NEW -m comment --comment "ssh" -j ACCEPT
-A INPUT -p tcp -m tcp --dport 80 -m state --state NEW -m comment --comment "http/haproxy" -j ACCEPT
-A INPUT -p tcp -m tcp --dport 443 -m state --state NEW -m comment --comment "https/haproxy" -j ACCEPT
-A INPUT -j DROP
COMMIT
Create a new ipset configuration at /etc/sysconfig/ipset
###
# ipset IP lists
#
# To reload: systemctl restart ipset
##

create whitelist hash:net family inet hashsize 1024 maxelem 65536
create blacklist hash:net family inet hashsize 1024 maxelem 65536
create multicast hash:net family inet hashsize 1024 maxelem 65536

## Multicast/Broadcast IPs required for VRRP, DHCP, other protocols
add multicast 224.0.0.0/4
add multicast 255.255.255.255

## Whitelisted IPs

# OMI VPN IP (support)
add whitelist 173.231.218.25
add whitelist 173.231.218.12
add whitelist 173.231.254.253

# Add your additional IPs here...
#add whitelist W.X.Y.Z
The services now need to be restarted for the changes to take effect. Do NOT enable auto-start yet, in case something goes wrong.
[root@splendid-lamprey ~]# systemctl restart ipset
[root@splendid-lamprey ~]# systemctl restart iptables
[root@splendid-lamprey ~]#
Confirm that the firewall is working as expected. This can be done by attempting to access services (SSH etc) from both a whitelisted IP and an undefined network.
Once confirmed, enable auto-start for both services.
[root@splendid-lamprey ~]# systemctl enable ipset
Created symlink /etc/systemd/system/basic.target.wants/ipset.service → /usr/lib/systemd/system/ipset.service.
[root@splendid-lamprey ~]# systemctl enable iptables
Created symlink /etc/systemd/system/multi-user.target.wants/iptables.service → /usr/lib/systemd/system/iptables.service.
[root@splendid-lamprey ~]#
Copy the newly created files to the root users home folder across
the rest of the nodes. Replace $SSH_KEY with the SSH key that is used to
connect to each node
[root@splendid-lamprey ~]# for node in $(awk '!/localhost/&&/local/{print$NF}' /etc/hosts| grep -v $(hostname -s)); do echo "scp -i $SSH_KEY /etc/sysconfig/ipset $node:~/new-ipset && scp -i $SSH_KEY /etc/sysconfig/iptables $node:~/new-iptables"; done
scp -i  /etc/sysconfig/ipset convincing-guanaco:~/new-ipset && scp -i  /etc/sysconfig/iptables convincing-guanaco:~/new-iptables
scp -i  /etc/sysconfig/ipset charming-shark:~/new-ipset && scp -i  /etc/sysconfig/iptables charming-shark:~/new-iptables
Deploy to the remaining nodes.