





















In this article
This walkthrough follows a new server from the moment you order it to the moment it’s running VMs in your Private Cloud Core v4: how it gets networked and configured, what happens to Ceph storage, which security defaults it picks up, and what to plan before you add capacity.
Every private cloud eventually needs more room. A new customer signs, a team launches a service, or a workload outgrows its share of the cluster. In Private Cloud Core v4, adding a node runs through the same Ansible playbook suite that deployed the cloud in the first place. The new server is built, networked, secured, and joined to OpenStack and Ceph the same way the original nodes were.
The problem this solves is drift. In many self-managed clouds, the initial build is automated but expansion isn’t. The first three servers come out of a tested process. The fourth gets added months later by whoever is on call, following a runbook that may or may not match how the cloud was actually built. A year in, nodes that should be identical aren’t, and troubleshooting turns into figuring out which one is different and why.
When deployment and expansion share one process, that gap closes. A node added today is configured the same way as a node deployed on day one.
Here’s what actually happens, step by step, and what to think about before you click “Add Hardware.”
Why One Process for Deploying and Expanding Matters
Earlier Private Cloud Core versions used separate flows for the initial deployment and for adding nodes later. In v4, a single Ansible playbook suite handles both. That has a few practical effects.
- New nodes match existing nodes. The same configuration that built your Cloud Core configures every node you add after it.
- Fixes and improvements apply to both. Anything improved in the deployment process also improves expansion, since they’re the same code.
- Runs are faster. v4 enables the Mitogen strategy plugin for Ansible across the Private Cloud Core repositories, which speeds up playbook runs by roughly 1.25x to 1.5x.
That consistency matters most for teams that grow often. If you add capacity every time you onboard a large customer, you want the tenth expansion to behave exactly like the first.
The Ways to Add Capacity
Before the step-by-step, a quick note on what you’re adding. Private Cloud Cores grow with a few types of expansion hardware, covered in detail on our cloud expansion page and in our guide to scaling your private cloud from proof of concept to production:
- Converged nodes add both compute and storage. Their drives join your existing Ceph cluster, so each node grows your VM capacity and your network storage at the same time.
- Compute nodes add processing power without matching your Cloud Core’s hardware. VMs on compute nodes can still use the network storage your cloud provides.
- Converged clusters are standalone groups of three or more servers that provide their own compute and network storage, for workloads with needs different from your Cloud Core.
Most of what follows applies to every type. Where Ceph is involved, it applies to converged nodes.
What Happens, Step by Step
Step 1: You Order the Hardware
You add hardware through OpenMetal Central or the API.
In Central, clicking “Add Hardware” on your cloud takes you through the standard checkout flow, with your cloud already selected. Servers that have been reserved for your organization appear in the node selection, so you can use hardware set aside for you.
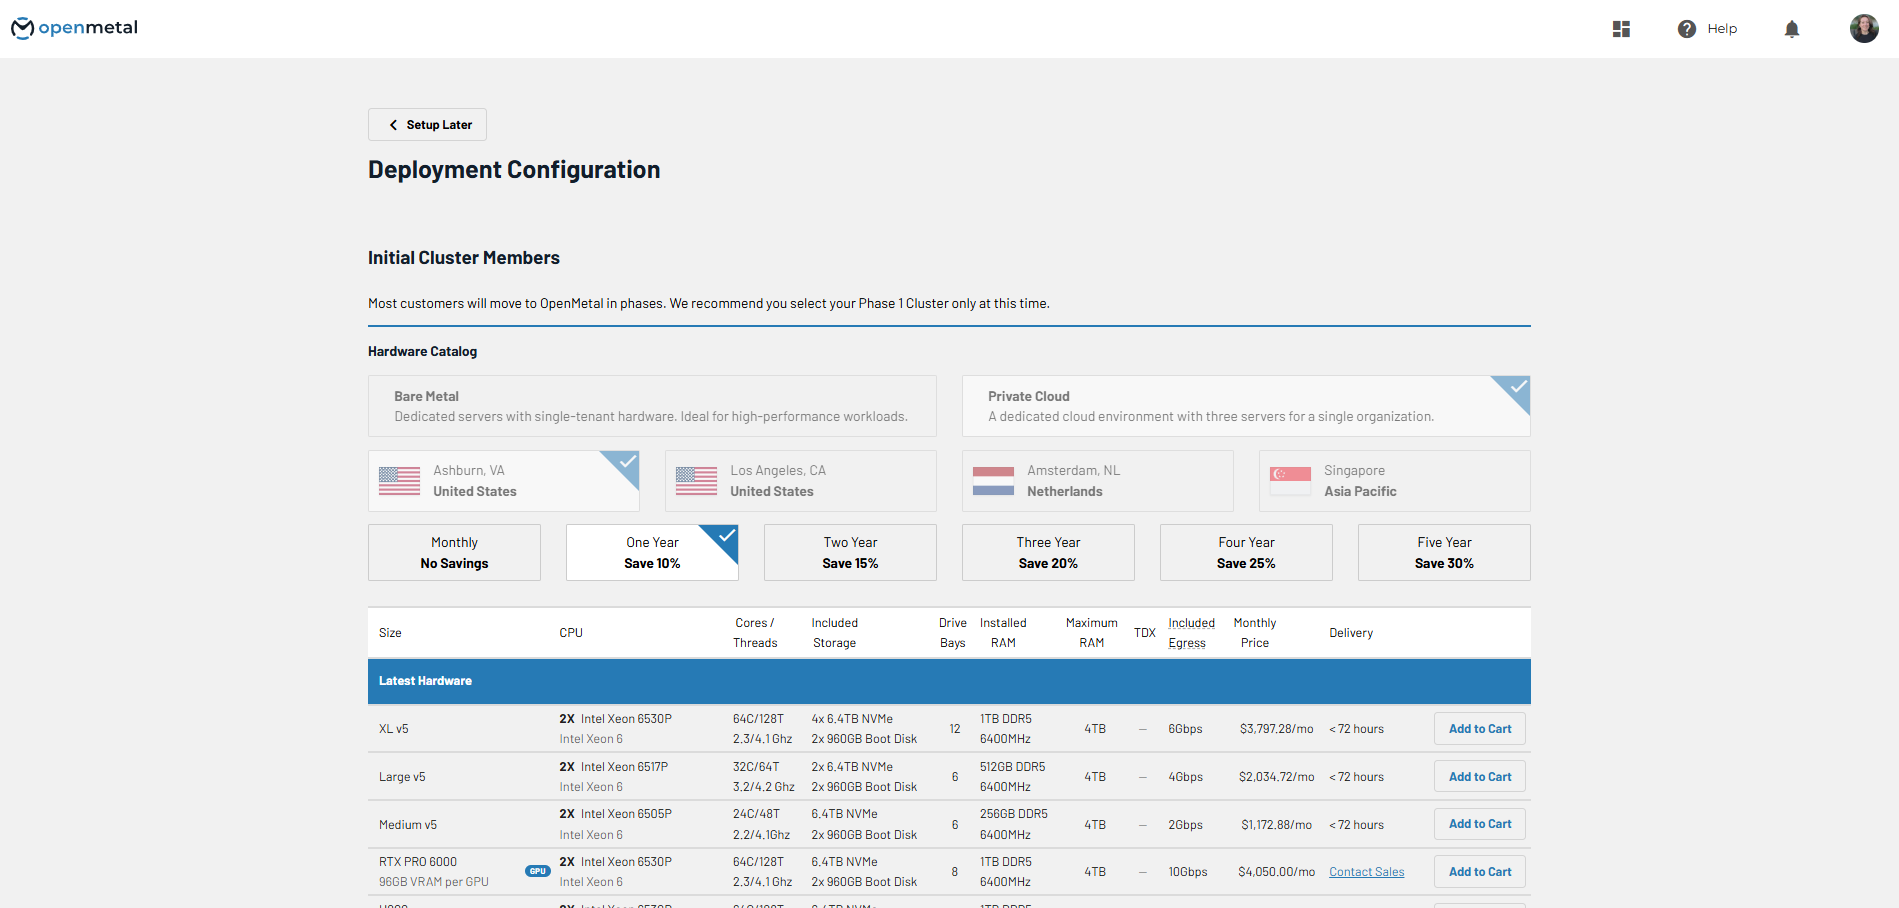
Through the OpenMetal API, you place an order with your existing cloud’s ID on the order item. A few conditions apply:
- The cloud must belong to your organization.
- The location must match the cloud’s location.
- The hardware type must match the cloud’s type.
- The cloud must be fully provisioned before you add nodes to it.
Billing for the new hardware attaches to your existing cloud. If you automate capacity changes from a pipeline, our article on provisioning bare metal through an API without opening a ticket covers the order workflow in detail, including how to poll provisioning status.
Step 2: The Server Is Provisioned and Networked
The physical server is assigned to your cloud and brought up with its base operating system. In v4, network configuration on Private Cloud Core nodes is handled by cloud-init, the same standard tool most cloud images use for first-boot setup.
The new node joins your cloud’s existing private networks. Every OpenMetal customer has dedicated VLANs, and the node’s bonded network interfaces connect to the same VLANs your other nodes use, with 20 Gbps of private bandwidth per server by default. Traffic between your nodes on those private networks is unmetered. Our network architecture explainer covers how those networks are laid out.
Step 3: The Same Playbooks Configure the Node
Next, the Private Cloud Core playbook suite configures the node. OpenStack services in a Private Cloud Core run as containers deployed with Kolla-Ansible, so adding a node means deploying the right set of containers to it based on its role.
For a node that’s adding compute capacity, that includes the services Nova needs to run VMs on the host and the networking services that connect those VMs to your cloud’s virtual networks. Because the node is configured from the same definitions as the rest of your cloud, it picks up the same settings your existing compute hosts use.
Step 4: Storage Joins Ceph
For converged nodes, the new server’s drives are added to your existing Ceph cluster. Private Cloud Core v4 manages Ceph through cephadm, Ceph’s own orchestration tool.
Once the new drives join, Ceph starts rebalancing. The Ceph architecture documentation explains how this works: when a new OSD (the daemon that manages each drive) is added, the cluster map updates and Ceph’s CRUSH algorithm moves a share of the placement groups onto it. Most placement groups stay where they are. Each drive in the cluster gets some added capacity, and the new drives don’t get hit with a load spike once rebalancing finishes.
Rebalancing does move real data across your private network while it runs. That’s worth knowing for timing, which we cover in the planning section below.
Compute nodes work differently. Their drives aren’t joined to your Ceph cluster by default, but VMs running on them can still use the network storage your cloud provides.
Step 5: Security Defaults Apply
Every Private Cloud Core v4 node runs a host-level firewall that denies inbound traffic on its external interface by default, with only rate-limited SSH open. A new node gets the same policy as the rest of your cloud. The trusted networks you manage in Central are rebuilt from their managed source when the deployment runs, so the new node allows the same sources your other nodes do, without anyone editing firewall rules by hand.
SSH keys you manage in Central also sync to the cloud after deployment.
Step 6: New Capacity Shows Up in OpenStack
Once configuration finishes, the new compute host registers with Nova and becomes available to the scheduler. New VMs can land on it right away. For converged nodes, the added Ceph capacity becomes available to your volumes and images as rebalancing proceeds.
You have full root and admin access, so you can confirm the result yourself:
openstack compute service list --service nova-compute
openstack hypervisor list
ceph -s
The first two commands show the new host and its state. ceph -s shows overall cluster health, and placement groups returning to active+clean tells you rebalancing has finished.
How Long It Takes
For Private Cloud Cores, adding a server to an existing cluster typically takes about 20 minutes once the hardware is assigned. That’s the time for the node to be configured and joined to the cloud. Ceph rebalancing on converged nodes continues in the background afterward, and how long it takes depends on how much data your cluster holds.
What to Plan Before You Add a Node
Adding a node is routine, but a little planning makes it smoother.
Don’t Wait for Ceph to Fill Up
The Ceph documentation on adding OSDs is direct about this: add capacity as the cluster approaches its near-full ratio, and don’t let it reach its full ratio first. Expanding a cluster that’s already near full leaves less room for rebalancing to work. If storage growth is predictable, add converged nodes before you need them.
Time Large Expansions Around Busy Periods
Rebalancing moves data over your private network and adds disk activity while it runs. Ceph runs this backfill work at a lower priority than client reads and writes, but on a cluster holding a lot of data, it’s still sensible to add storage-heavy nodes outside your busiest hours.
Match Hardware Where It Matters
Compute nodes don’t need to match your Cloud Core. For converged nodes, similar drive sizes keep Ceph’s data distribution even. Ceph can handle drives of different sizes by adjusting weights, but uniform hardware is simpler to reason about. Our team can help you pick hardware that fits your existing cluster, and you can compare configurations on our hardware details page.
Raise Project Quotas If Needed
OpenStack project quotas are separate from physical capacity. If a project was already at its quota, adding a node won’t let that project launch more VMs until you raise the quota.
Check Your Trusted Networks First
If you’re about to add trusted networks in Central, do it before the expansion runs, so the new node comes up with the full list. Our article on what the Private Cloud Core v4 host firewall blocks by default covers how trusted networks work.
What Adding a Node Costs
Expansion hardware is billed at a fixed monthly price per server, the same model as your Cloud Core. There’s no per-VM licensing, so a new node’s cost doesn’t change based on how many VMs you run on it. That makes capacity planning a straightforward calculation: decide how many VMs or how much storage you need, pick the hardware that fits, and the monthly cost is known before you order.
You can size an expansion with our private cloud pricing calculator.
Who This Fits
This expansion model fits teams that:
- Add capacity in steps, such as when onboarding a large customer or launching a new service
- Want every node in the cloud configured the same way, no matter when it was added
- Automate infrastructure changes and want expansion available through an API
- Prefer a known monthly cost per server over usage-based billing
Plan around it if you:
- Need capacity for minutes or hours at a time; dedicated hardware is billed monthly
- Run a Ceph cluster that’s already close to full; expand before you reach that point
- Need hardware in a location your existing cloud isn’t in; expansion nodes join a cloud in the same location
The Short Version
In Private Cloud Core v4, the tenth node you add is built by the same process as the first three. Growth becomes a repeatable step instead of a one-off project, and the cost of each step is known before you take it.
If you want to see how expansion works with your own workloads, apply for a proof of concept or talk with our team about your capacity plans.
Frequently Asked Questions
How do I add a node to my OpenMetal private cloud?
Click “Add Hardware” on your cloud in OpenMetal Central, which takes you through checkout with your cloud already selected. You can also place an order through the OpenMetal API with your existing cloud’s ID. The cloud must be fully provisioned, and the new hardware must be in the same location.
How long does it take to add a node to a Private Cloud Core?
Adding a server to an existing cluster typically takes about 20 minutes once the hardware is assigned. For converged nodes, Ceph continues rebalancing data onto the new drives in the background afterward.
What happens to Ceph when I add a converged node?
The node’s drives join your existing Ceph cluster, and Ceph rebalances by moving a share of placement groups onto the new drives. Most data stays where it is. You can watch progress with ceph -s until placement groups return to active+clean.
Do compute nodes join my Ceph cluster?
Not by default. Compute nodes add processing capacity, and VMs running on them can still use the network storage your cloud provides.
Does a new node get the same firewall rules as my other nodes?
Yes. Every Private Cloud Core v4 node runs the same host-level firewall, and the trusted networks you manage in Central are applied when the deployment runs.
Does adding a node increase my per-VM costs?
No. Expansion hardware is billed at a fixed monthly price per server, with no per-VM licensing.
Schedule a Consultation
Get a deeper assessment and discuss your unique requirements.
Read More on the OpenMetal Blog