


In this video and accompanying article OpenMetal’s Principal Engineer, Jacob Hipps, discusses various use-cases and considerations for utilizing vGPUs effectively in OpenStack Nova. This session was recorded at OpenInfra Summit 2023 in Vancouver, British Columbia, Canada.
OpenStack Nova is an open-source cloud computing platform that provides the foundation for building and managing virtual machines (VMs) in a cloud environment. It offers flexible and scalable VM provisioning, resource management, and access control, making it a fundamental component of the OpenStack ecosystem for cloud infrastructure.
This session covers example use-cases (and when not to use vGPUs), as well as specific hardware requirements, server and software configuration, and spinning up your first vGPU-enabled virtual machine
Overall, the educational session provides a comprehensive overview of vGPUs with OpenStack Nova, enabling participants to understand the use-cases, hardware requirements, configuration steps, and considerations involved in effectively utilizing vGPUs for various tasks.
The below article is a transcription of the video content, edited minimally for clarity.
View and follow along with the presentation slides here.
My name is Jacob and I’m the principal engineer for OpenMetal. At OpenMetal, we primarily are an infrastructure services company and so our goal is to lower the barrier of entry for any size companies to start using OpenStack, Ceph, and any other open source cloud systems. And that includes using GPUs and any other services they need to use.
What is a vGPU?
So quickly, what is vGPU? It’s a virtualized portion of a physical GPU, similar to a vCPU, but you can’t oversubscribe them like you can for vCPUs. So it allows one or more virtual machines to share a single physical GPU as well as easier to manage shared resources.
This talk is primarily going to focus on the Nvidia side of things. It’s the most mature, the most well supported. I think AMD and Intel will be coming out with something soon, but [Nvidia’s are] primarily the ones that this is going to be focused on for now.
We’re going to cover a couple of use cases and examples and when you probably don’t want to use vGPUs or they might not make sense, as well as some hardware requirements, how to actually configure the BIOS to make things work, as well as on the kernel and OS side of things. And then we’re going to be setting up the host node, making sure the drivers are set up, and then go into actually configuring Nova, and then finally actually spinning up a vGPU.
vGPU Use Cases
Quickly, some use cases. Number one would be CI or transient tests where you can spin up an instance from a pre-built image using something that requires maybe CUDA or OptiX. And then you can potentially have multiple persistent workers and then go back through, and once it’s torn down those resources will be available to use again.
The second example will be like rendering or graphical tasks. One thing to keep in mind about this is that depending on the GPU that you use there are different capabilities. So there’s a matrix on the Nvidia website that goes through which ones can support rendering workloads, which ones are compute only. For OpenMetal we primarily went with the A100 which is compute only for now, so that’s what we’re primarily going to cover here.
When Not to Use vGPUs
And then, when you may not want to use vGPUs. Anything that requires a high amount of VRAM, like a large machine learning training task or other long-lived applications where you can control everything inside of your application easier, as well as video transcoding.
Some of the different flavors that you can use with vGPUs don’t include a lot of the actual encoding cores. Something to keep in mind when you’re looking through if you’re trying to implement this yourself.
Hardware Setup
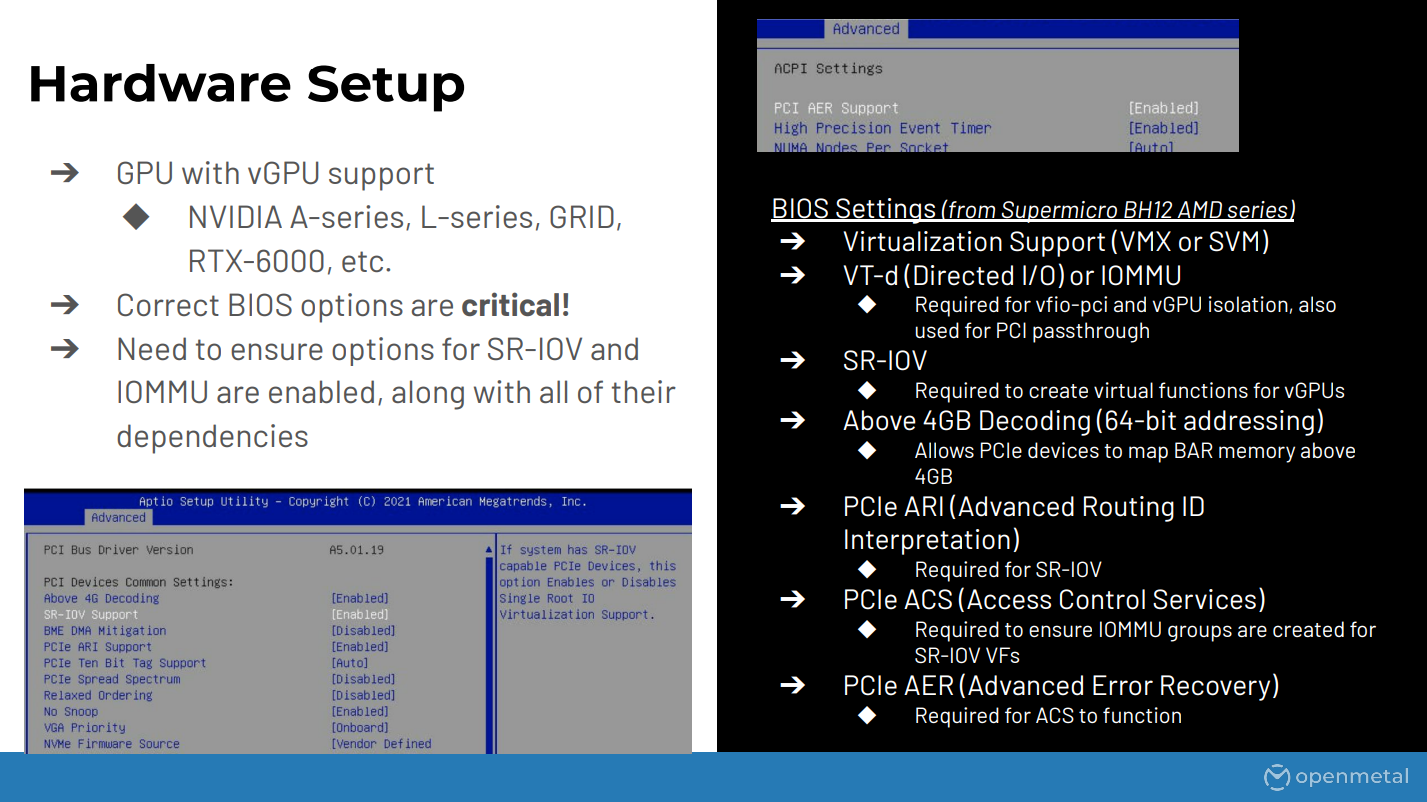
For hardware setup we’ll need a GPU that has support for vGPUs. This is primarily the Nvidia Enterprise series like the Ampere, the L Series grid, and some of the RTX 6000 and 8000 GPUs.
The BIOS settings are pretty critical here; so this is something that caused me a lot of pain when I was trying to set things up. There’s a list on the right hand side here of things that we had to do, at least on ours; this is on a Supermicro server so basically everything that’s related to SR-IOV and IOMMU as well as all the supporting options there like ACS, AER.
One of the issues I had is if the AER wasn’t enabled I would still get most of the stuff to work but it would give me very confusing errors like the IOMMU groups not incrementing. So just keep that in mind to make sure all the options are enabled if you’re going to try this.
GPU Setup
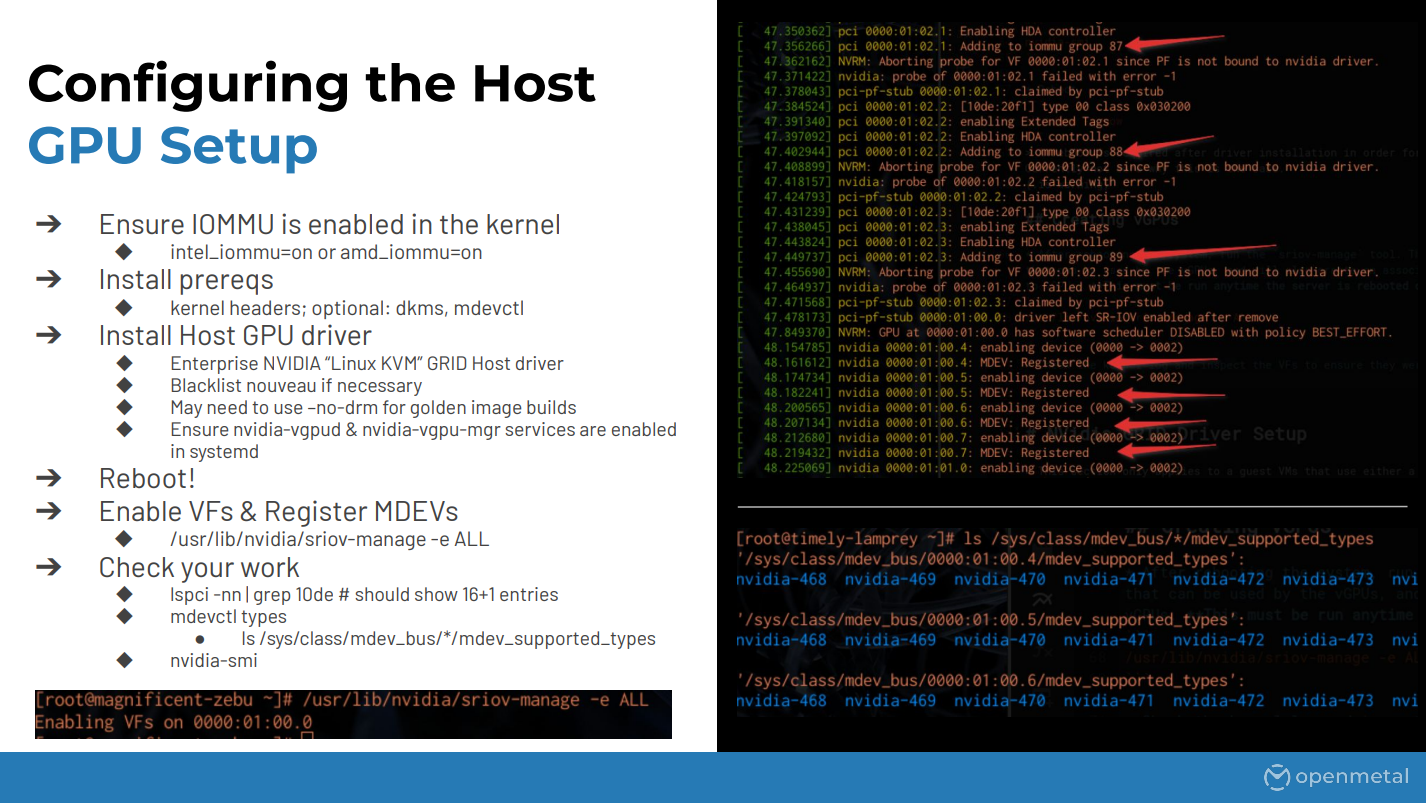
Next the actual setting up the GPU portion, the driver. On the kernel side of things you want to make sure IOMMU is enabled; this is usually done through a kernel boot flag for Intel or AMD. You don’t have to use DKMS but it definitely makes things easier.
And then of course you need to actually install the host driver. So on the Nvidia side this is done through logging into their portal and grabbing the Linux KVM package which includes all the different drivers for hosts and guests. You may also need to blacklist the Nuevo driver.
If you’re building golden images, at least for us, we had to use the no DRM flag. This doesn’t really matter for instances that aren’t going to be using rendering but it makes our build process a lot easier. And then just make sure that the associated services are enabled and running once you reboot. And then reboot so you can enable all of your options for IOMMU and the drivers.
After that, once you come back up, there is this command – the SR-IOV manage. The way that we do it for our customers is we just put this inside of a systemd one-time service that starts up on boot so it handles that for them. What this does is it spawns all of the virtual functions through SR-IOV. You can see in the screenshot over there where it shows all the devices being registered and then the Nvidia driver actually enabling them.
So once that’s done you should be able to check it. You should see 16 or 32 depending on the GPU, different virtual functions that pop up in your PCI device list, and you’ll see all of those messages through dmesg or wherever your kernel log is going.
And then finally you can look through the mdev types over there and you can see the different types. This will come up later because these “Nvidia dash whatever numbers” are what we’re going to be using with Nova to actually spawn up the vGPUs.
vGPU Profiles
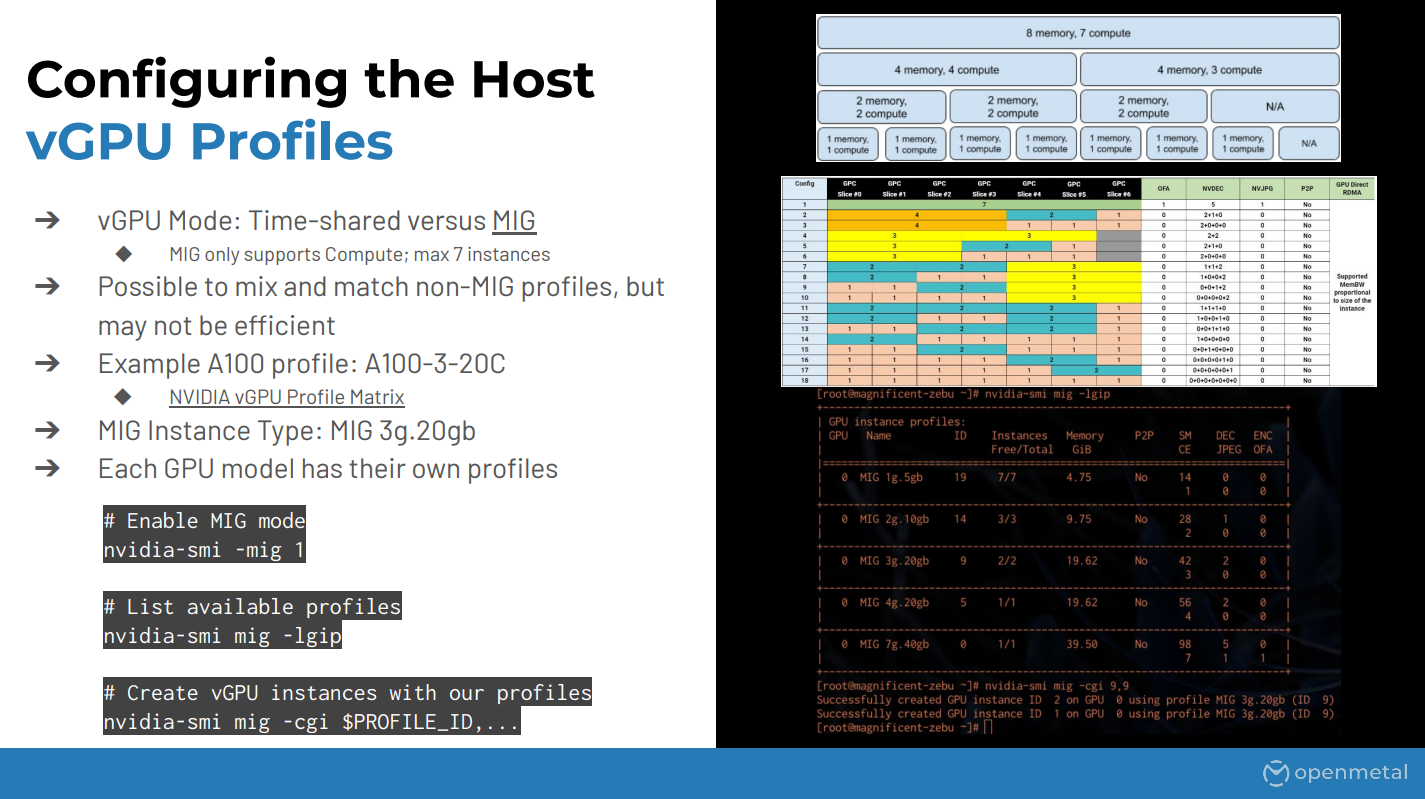 We’ll quickly cover some of the vGPU profiles. So there’s primarily two types: the temporal or time-shared as well as MIG. Time-shared has a slight benefit in that it can support more different types of workloads, so it supports rendering, as well as compute, and a few other things.
The downside though is that if you have multiple users using that system they could potentially see differing amounts; it’s not going to be a consistent experience for them. Whereas MIG they get dedicated resources as well as dedicated pass on the hardware. So there are different profiles for each depending on what you want to use.
The right hand side of the screen has this huge matrix, I think this is just for the A100. So it can be pretty daunting to try and figure out which profile you want to use. You can see some of it through the Nvidia SMI tool by listing the different profiles, or you can go on the Nvidia site and they have a huge PDF with all the different profiles for all the different physical GPUs and it differs depending on which GPU you’re using.
So in our example here we’re going to use a A100-3-20 which I believe is three gigs and then 20 compute units. These are just the commands to enable MIG, which you have to do every time the machine starts up or the GPU is reset, so it’s something to take into account. And then just some commands to list out the profiles and create them.
Configure Nova
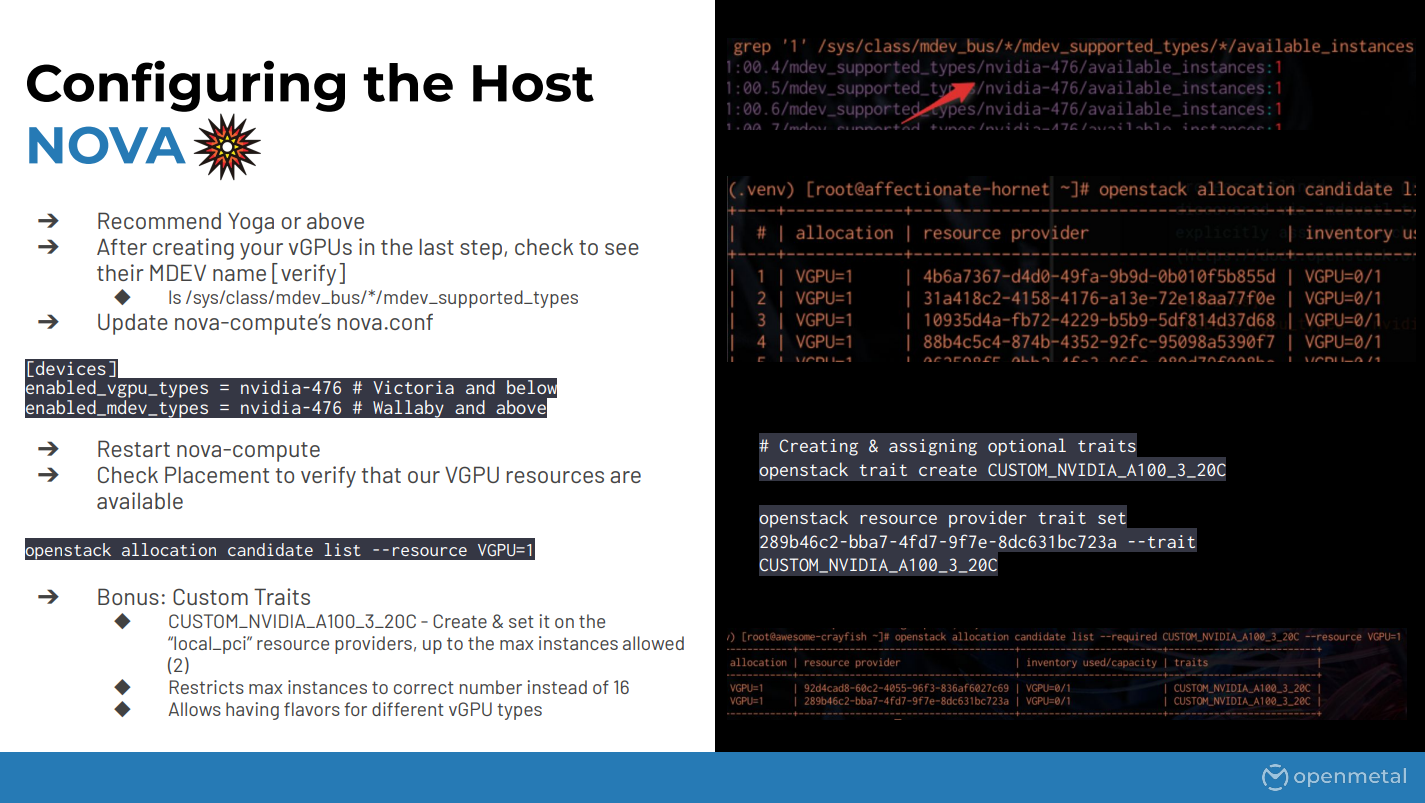 Finally, configuring Nova. This step is pretty straightforward once everything else is set up. So I mentioned the mdev pass earlier; the easiest way is just to look through there and find or grep through there and find which types have the available instances equals one. There’s a grab command that you can do. You can also use the mdev CTL tool which makes it a little bit easier. But basically what you want to do is figure out which one of those “Nvidia dash four whatever numbers” has your vGPUs and then you can put that into Nova.
Depending on which release of OpenStack you’re running, Wallaby and newer will be using the enable mdev types, and then Victoria and below will use the vGPU types. So something to keep in mind depending on which release you’re running. And then, of course, once you make those changes restart Nova compute.
Once that’s done if Nova has detected everything correctly you should be able to use placement to see any of the different candidates. Typically what I see this do is it’ll list out 16 different candidates, I believe, for each of the different virtual functions even though you can’t actually use all of those. I’m not sure if this is an issue or not, at least when we tested it on Yoga. One way around this is to just set custom traits on the different providers which is the example that I showed here; we just created a custom trait type and this is also one way you could potentially have different vGPU types on different servers and still create instance flavors with them and have them provisioned in the correct place.
Provision Virtual Machine
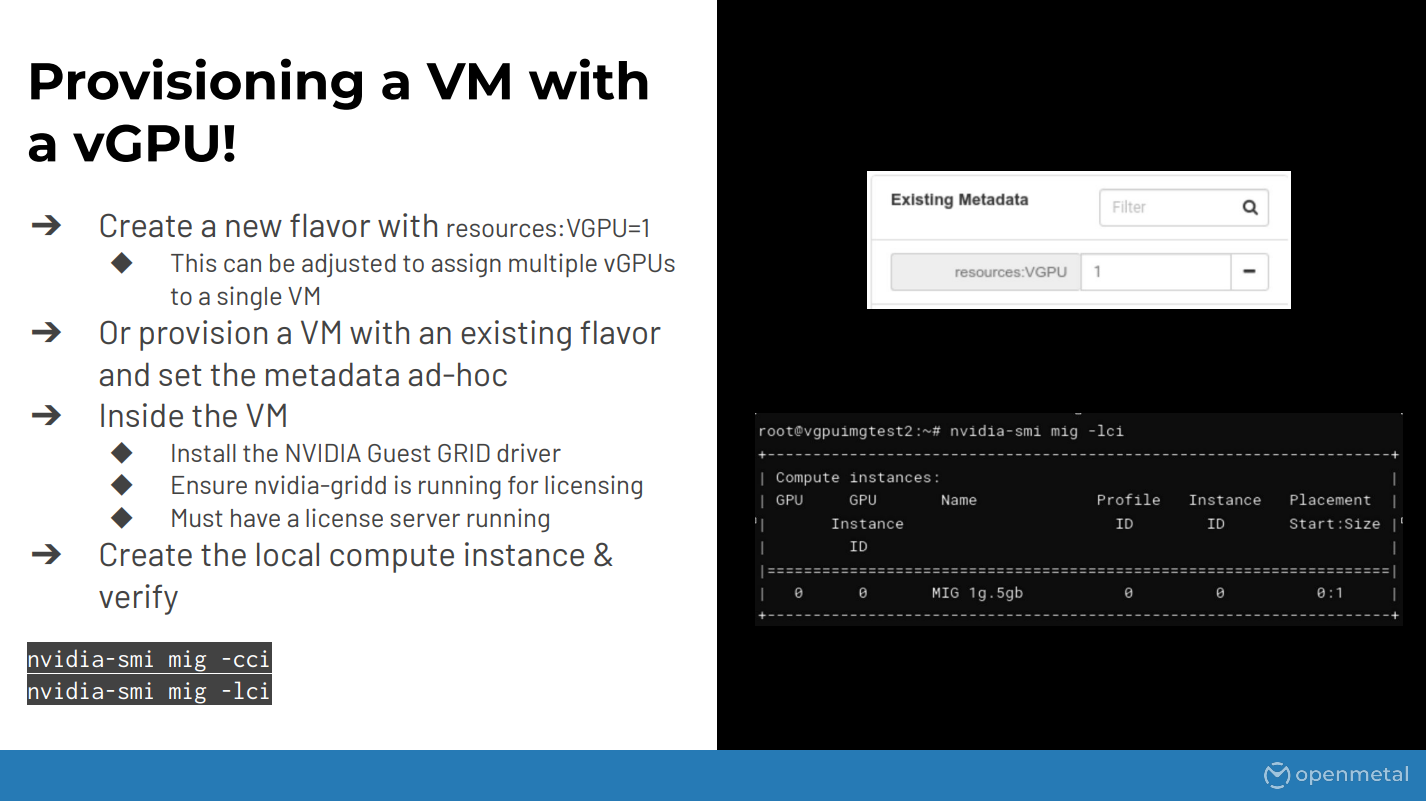 Once your flavors are done, hopefully everything is working inside of a placement with giving you actual candidates for provisioning. You can finally provision an instance with vGPU resource. This is done with the resources:VGPU. I haven’t tested it with multiple of each GPUs, I’m not actually sure if that works, but typically we’d use one. You can do this through your images, through your flavors, or just ad hoc which is being shown here.
Once that’s done, once your VM is up, you would need to install the actual guest driver. This is a special driver similar to the other one that you get from the enterprise portal at Nvidia. Also make sure there’s a special daemon that needs to be running for licensing, which I’m not going to cover here, but essentially there needs to be a license for the type of work that you’re running – compute, etc. – and then essentially that’s just configuring a file to point to the web endpoint that it’s using.
So basically, once that’s done, you need to, inside of the guest, create the compute instance and then verify it’s working. After that you should be able to run your CUDA or OptiX or whatever workloads that you need to.
This screenshot on the right is just showing the inside of the guest container. So typically at OpenMetal what we do is we pre-create these images for the customers and then they can choose that image inside of OpenStack and it’ll have the driver and everything else pre-configured for them so it’s ready to go.
Powered by OpenStack
OpenMetal is a Silver Member of the OpenInfra Foundation. The OpenMetal Cloud platform is powered by OpenStack, one of the most supported and industry-accepted open source technologies for cloud infrastructure and infrastructure as a service.