


In this article
Learn how to implement GitOps for OpenStack infrastructure using tools like Atlantis and Flux, including repository structure, multi-environment management, rollback strategies, and real-world patterns for handling secrets, drift detection, and emergency changes.
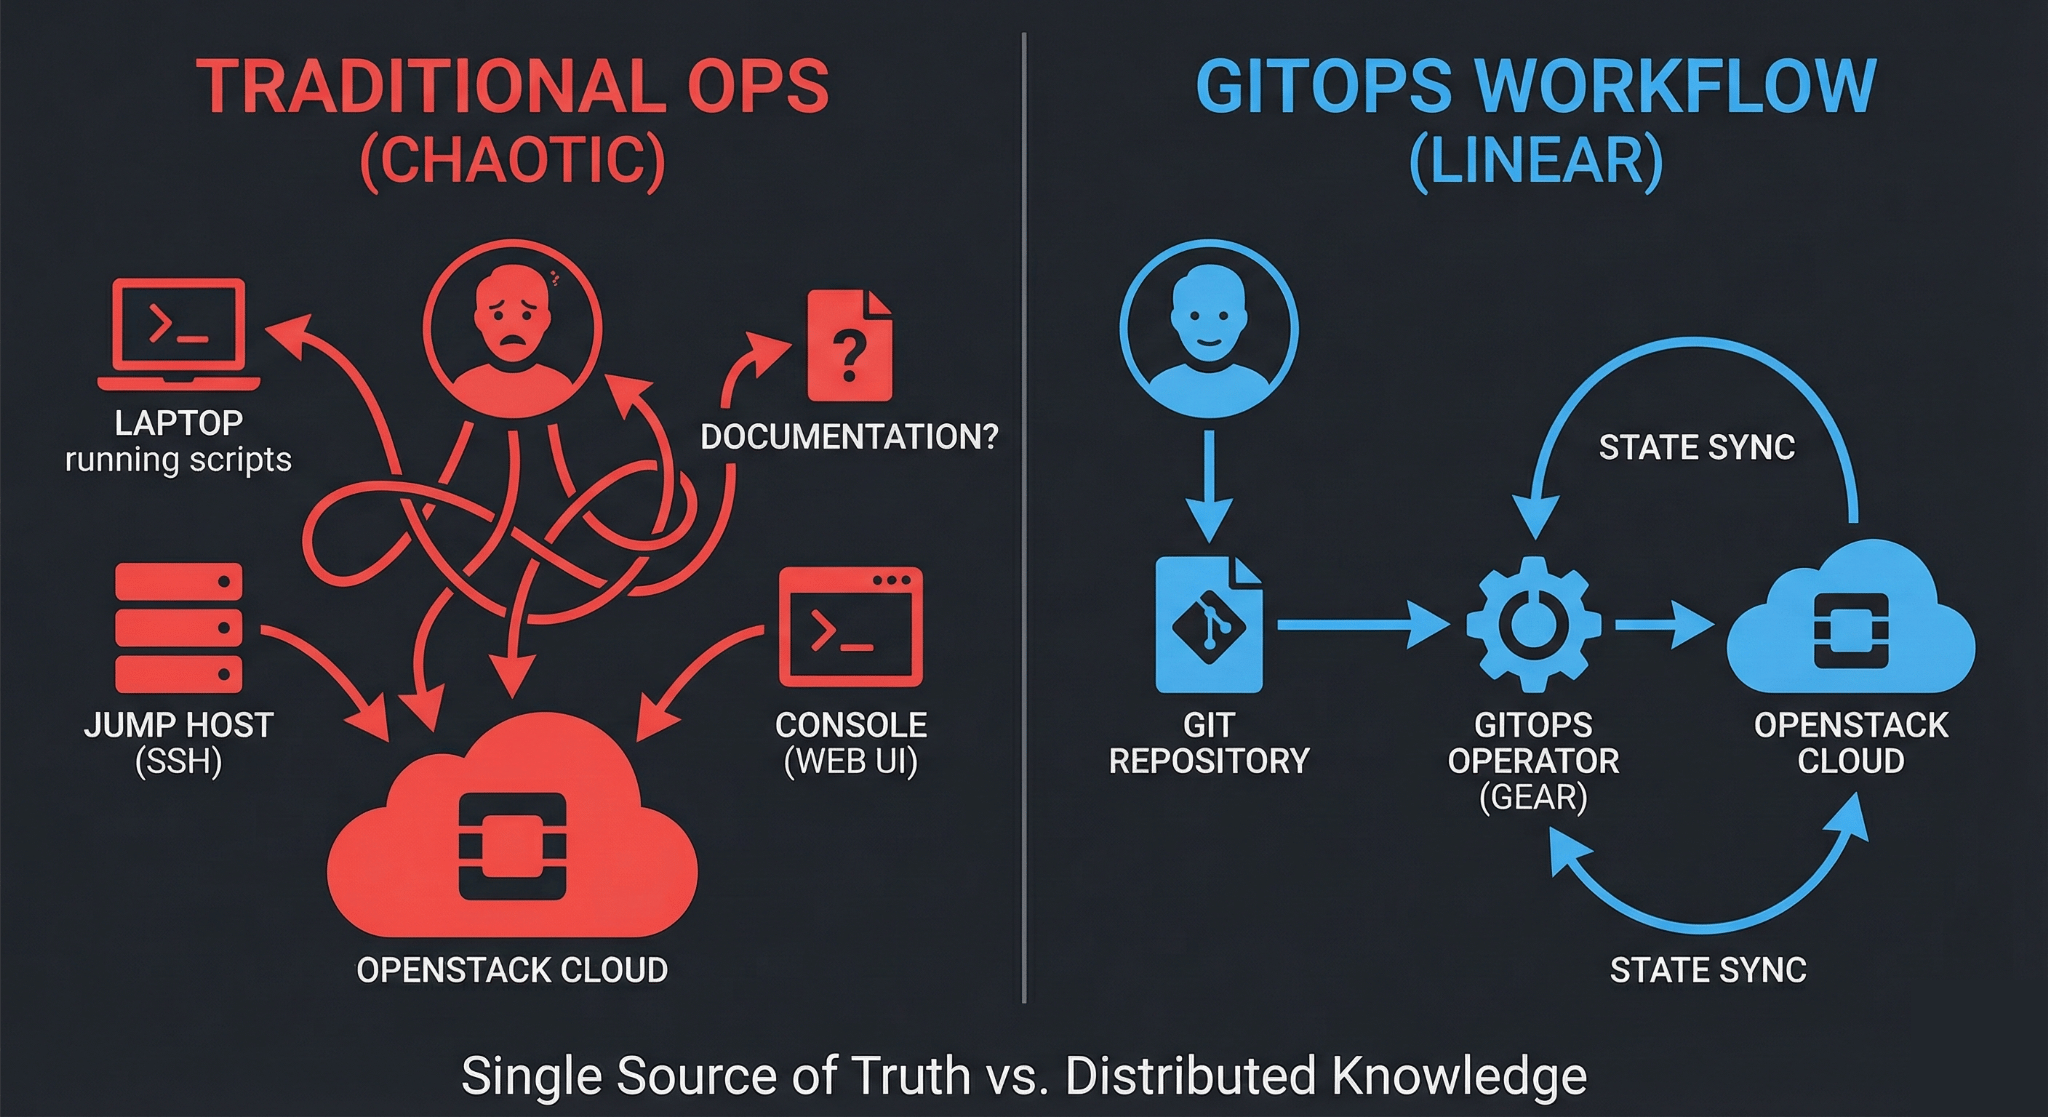
Most platform teams are already using GitOps for Kubernetes deployments. ArgoCD and Flux have become standard tools for managing containerized applications. But what about the cloud infrastructure underneath those containers? Your OpenStack VMs, networks, storage volumes, and security groups still get managed through a mix of manual changes, custom scripts, and hopefully some Terraform runs.
There’s a better way. GitOps workflows that revolutionized Kubernetes operations work just as well for OpenStack infrastructure. The difference is significant: instead of SSH-ing into jump hosts to run Terraform manually or hoping your CI/CD pipeline catches errors before they hit production, your infrastructure changes flow through Git with the same review, approval, and automation processes your development team already uses.
This guide walks through building production-grade GitOps workflows for OpenStack. We’ll cover the tools that work (and which ones create more problems than they solve), how to handle the tricky parts like secrets and state management, and patterns that scale from small deployments to multi-region infrastructure.
Why GitOps Makes Sense for OpenStack Infrastructure
If you’re managing OpenStack infrastructure today, you probably have something that works. Maybe it’s Terraform runs from a CI/CD pipeline, maybe it’s automated Ansible playbooks for multinode OpenStack deployment, or maybe it’s a combination of both. The question isn’t whether your current approach functions but whether it gives you what you need. That means confidence in changes, clear audit trails, and the ability to roll back when things go wrong.
GitOps provides three specific improvements:
Single source of truth: Your Git repository becomes the definitive record of what your infrastructure should look like. Not what someone deployed last week, not what’s in Terraform state, but what’s actually specified in version control. This matters when you’re troubleshooting issues at 2 AM or trying to understand why production and staging environments diverged.
Declarative configuration: You declare the desired state, not the steps to get there. This is the core principle that makes GitOps work. With OpenStack resources defined declaratively in Terraform or OpenTofu, you describe “I want three VMs with these specs” rather than “create VM1, wait, create VM2, configure networking”.
Automated reconciliation: Tools watch your Git repository and automatically apply changes when they detect drift between what’s in Git and what’s running. This eliminates the manual step of remembering to run terraform apply after merging a pull request.
The workflow difference is practical. Without GitOps, deploying a new OpenStack network typically means: checkout the repo, make changes, run terraform plan locally, review the output, run terraform apply, hope nothing breaks, update documentation somewhere. With GitOps: open a pull request, automated validation runs, teammate reviews the declarative config, merge, automated deployment happens, state syncs automatically.
The GitOps Tool Landscape for Infrastructure
GitOps tools evolved primarily for Kubernetes. ArgoCD and Flux both handle Helm charts and Kubernetes manifests beautifully. But OpenStack infrastructure typically gets managed with Terraform, and Terraform isn’t a native fit for these tools.
You have several approaches:
Flux with tf-controller: Flux doesn’t natively understand Terraform, but the Weave GitOps Terraform Controller (tf-controller) adds this capability. It’s a Kubernetes operator that watches for Terraform resource definitions in your Git repository and runs terraform plan and terraform apply inside your cluster. This approach works well if you’re already running Kubernetes infrastructure management clusters.
ArgoCD with Terraform integration: ArgoCD doesn’t support Terraform out of the box either, but you can integrate it through several methods. The most common is using ArgoCD’s pre-sync and post-sync hooks to run Terraform as part of the deployment process. Alternatively, tools like Atlantis can bridge ArgoCD and Terraform by handling the Terraform execution while ArgoCD manages the Git workflow.
Atlantis for pull request automation: Atlantis specifically designed itself for Terraform GitOps. It listens for pull requests in your Git repository, automatically runs terraform plan, posts the output as a comment, and runs terraform apply when you approve. Atlantis works well with GitLab and GitHub, and handles Terraform-specific concerns like state locking and workspace management naturally.
GitLab CI/CD with Terraform: GitLab has built-in support for managing Terraform state and can orchestrate Terraform runs through its CI/CD pipelines. This is often the simplest starting point for teams already using GitLab, though it requires more manual pipeline configuration than dedicated GitOps tools.
For OpenStack infrastructure specifically, the choice often comes down to whether you already have a Kubernetes cluster to run GitOps tooling. If yes, Flux with tf-controller provides the most Kubernetes-native experience. If no, Atlantis or GitLab CI/CD workflows typically require less infrastructure overhead.
Setting Up Terraform for OpenStack GitOps
Before implementing GitOps workflows, your Terraform code needs proper structure. GitOps assumes declarative configuration stored in Git, which means your Terraform setup must follow certain patterns.
Repository Structure
Organize infrastructure code to support GitOps workflows:
infrastructure/
├── environments/
│   ├── production/
│   │   ├── main.tf
│   │   ├── variables.tf
│   │   └── terraform.tfvars
│   ├── staging/
│   │   ├── main.tf
│   │   ├── variables.tf
│   │   └── terraform.tfvars
│   └── development/
│       ├── main.tf
│       ├── variables.tf
│       └── terraform.tfvars
├── modules/
│   ├── compute/
│   │   ├── main.tf
│   │   ├── variables.tf
│   │   └── outputs.tf
│   ├── networking/
│   │   ├── main.tf
│   │   ├── variables.tf
│   │   └── outputs.tf
│   └── storage/
│       ├── main.tf
│       ├── variables.tf
│       └── outputs.tf
└── backend.tf
This structure separates reusable modules from environment-specific configurations. GitOps tools can watch specific directories (like environments/production/) and automatically apply changes when those directories update.
Remote State Backend
Terraform state must be stored remotely for GitOps to work reliably. Local state files don’t work when automated systems need to run Terraform. OpenStack users typically have several backend options:
OpenStack Swift: If you’re running OpenStack infrastructure, using Swift for state storage makes sense. The S3 backend works with Swift when configured properly:
terraform {
  backend "s3" {
    bucket = "terraform-state"
    key    = "production/openstack.tfstate"
    region = "RegionOne"

    endpoint = "https://swift.yourcloud.com"

    skip_credentials_validation = true
    skip_region_validation      = true
    skip_metadata_api_check     = true
    force_path_style            = true
  }
}
The skip_* options are necessary because Swift isn’t actually AWS S3, even though it speaks the S3 API. OpenStack credentials get picked up from environment variables or clouds.yaml.
GitLab managed state: GitLab can store Terraform state directly, which simplifies setup if you’re using GitLab for GitOps:
terraform {
  backend "http" {
    address        = "https://gitlab.com/api/v4/projects/<project-id>/terraform/state/production"
    lock_address   = "https://gitlab.com/api/v4/projects/<project-id>/terraform/state/production/lock"
    unlock_address = "https://gitlab.com/api/v4/projects/<project-id>/terraform/state/production/lock"
    lock_method    = "POST"
    unlock_method  = "DELETE"
    retry_wait_min = 5
  }
}
Authentication happens through GitLab access tokens, and state locking prevents concurrent modifications automatically.
Terraform Cloud: HashiCorp’s managed service handles state, locking, and provides a collaboration layer. This works well for teams that want to offload state management entirely, though it adds an external dependency.
Provider Configuration
The OpenStack Terraform provider needs credentials. In GitOps workflows, these credentials should never be in Git. Instead, use environment variables or external secrets management:
terraform {
  required_version = ">= 1.0"
  required_providers {
    openstack = {
      source  = "terraform-provider-openstack/openstack"
      version = "~> 1.50"
    }
  }
}

provider "openstack" {
  # Credentials from environment variables:
  # OS_AUTH_URL, OS_USERNAME, OS_PASSWORD, OS_TENANT_NAME, OS_REGION_NAME
  # Or from clouds.yaml
}
GitOps tools will inject these credentials at runtime from their secret stores.
Implementing GitOps with Atlantis
Atlantis provides the most straightforward GitOps workflow for Terraform on OpenStack. It runs as a service that listens for pull requests and automates Terraform operations.
Basic Atlantis Setup
Atlantis needs access to your Git repository and your OpenStack credentials. If you’re running on OpenMetal hosted private cloud, you can deploy Atlantis as a VM:
resource "openstack_compute_instance_v2" "atlantis" {
  name            = "atlantis-server"
  flavor_name     = "m.medium"
  image_name      = "Ubuntu-22.04"
  key_pair        = var.key_pair_name
  security_groups = ["default", "atlantis-sg"]

  network {
    name = var.management_network
  }

  user_data = templatefile("atlantis-init.sh", {
    github_token     = var.github_token
    github_secret    = var.github_webhook_secret
    openstack_config = base64encode(file("${path.module}/clouds.yaml"))
  })
}
The initialization script installs Atlantis and configures it to watch your infrastructure repository:
# atlantis.yaml
version: 3
projects:
- name: production
  dir: environments/production
  workspace: production
  terraform_version: v1.5.0
  autoplan:
    when_modified: ["*.tf", "*.tfvars"]
    enabled: true
  apply_requirements: ["approved", "mergeable"]

- name: staging
  dir: environments/staging
  workspace: staging
  terraform_version: v1.5.0
  autoplan:
    when_modified: ["*.tf", "*.tfvars"]
    enabled: true
  apply_requirements: ["mergeable"]
This configuration tells Atlantis to automatically run terraform plan when pull requests modify Terraform files in the production or staging directories. Production changes require approval before Atlantis will apply them.
Pull Request Workflow
With Atlantis configured, infrastructure changes follow a standard Git workflow:
- Developer creates a branch and modifies Terraform configuration
- Developer opens a pull request
- Atlantis automatically runs
terraform planand comments with the output - Team reviews both the code changes and the Terraform plan
- After approval, someone comments
atlantis applyon the pull request - Atlantis runs
terraform applyand reports results - If successful, the pull request can be merged
This workflow makes infrastructure changes visible and reviewable. The Terraform plan output shows exactly what will change before anyone approves it.
Handling Secrets
OpenStack credentials and other secrets should never be in Git. Atlantis supports several secret management approaches:
Environment variables: The simplest method is passing secrets as environment variables when launching Atlantis. This works for small deployments but doesn’t scale well:
atlantis server \
  --gh-user=atlantis-bot \
  --gh-token="${GITHUB_TOKEN}" \
  --gh-webhook-secret="${GITHUB_SECRET}" \
  --repo-allowlist="github.com/yourorg/*"
Atlantis will pass these environment variables to Terraform runs, where the OpenStack provider can read them.
HashiCorp Vault integration: For production deployments, integrate Atlantis with Vault to fetch secrets dynamically:
# atlantis.yaml
workflows:
  default:
    plan:
      steps:
      - init
      - run: vault kv get -field=clouds_yaml secret/openstack > clouds.yaml
      - plan
    apply:
      steps:
      - run: vault kv get -field=clouds_yaml secret/openstack > clouds.yaml
      - apply
This approach keeps secrets out of configuration files while making them available when Terraform needs them.
GitOps with Flux and tf-controller
If you’re running Kubernetes infrastructure management clusters (sometimes called “platform clusters”), Flux with tf-controller provides a Kubernetes-native approach to GitOps for OpenStack infrastructure.
Installing tf-controller
The tf-controller runs inside Kubernetes and watches for Terraform resource definitions:
flux install

kubectl apply -f https://raw.githubusercontent.com/weaveworks/tf-controller/main/docs/release.yaml
This installs both Flux and the Terraform controller. Flux handles Git synchronization while tf-controller executes Terraform operations.
Defining Infrastructure as Kubernetes Resources
With tf-controller, OpenStack infrastructure gets defined as Kubernetes custom resources:
apiVersion: source.toolkit.fluxcd.io/v1beta1
kind: GitRepository
metadata:
  name: openstack-infra
  namespace: flux-system
spec:
  interval: 1m
  url: https://github.com/yourorg/openstack-infrastructure
  ref:
    branch: main
---
apiVersion: infra.contrib.fluxcd.io/v1alpha1
kind: Terraform
metadata:
  name: production-compute
  namespace: flux-system
spec:
  approvePlan: auto
  interval: 10m
  path: ./environments/production
  sourceRef:
    kind: GitRepository
    name: openstack-infra
  writeOutputsToSecret:
    name: production-outputs
  varsFrom:
  - kind: Secret
    name: openstack-credentials
This resource tells tf-controller to:
- Watch the Git repository for changes
- Run Terraform from the
environments/productiondirectory - Automatically approve and apply plans
- Store outputs in a Kubernetes secret
- Use OpenStack credentials from another secret
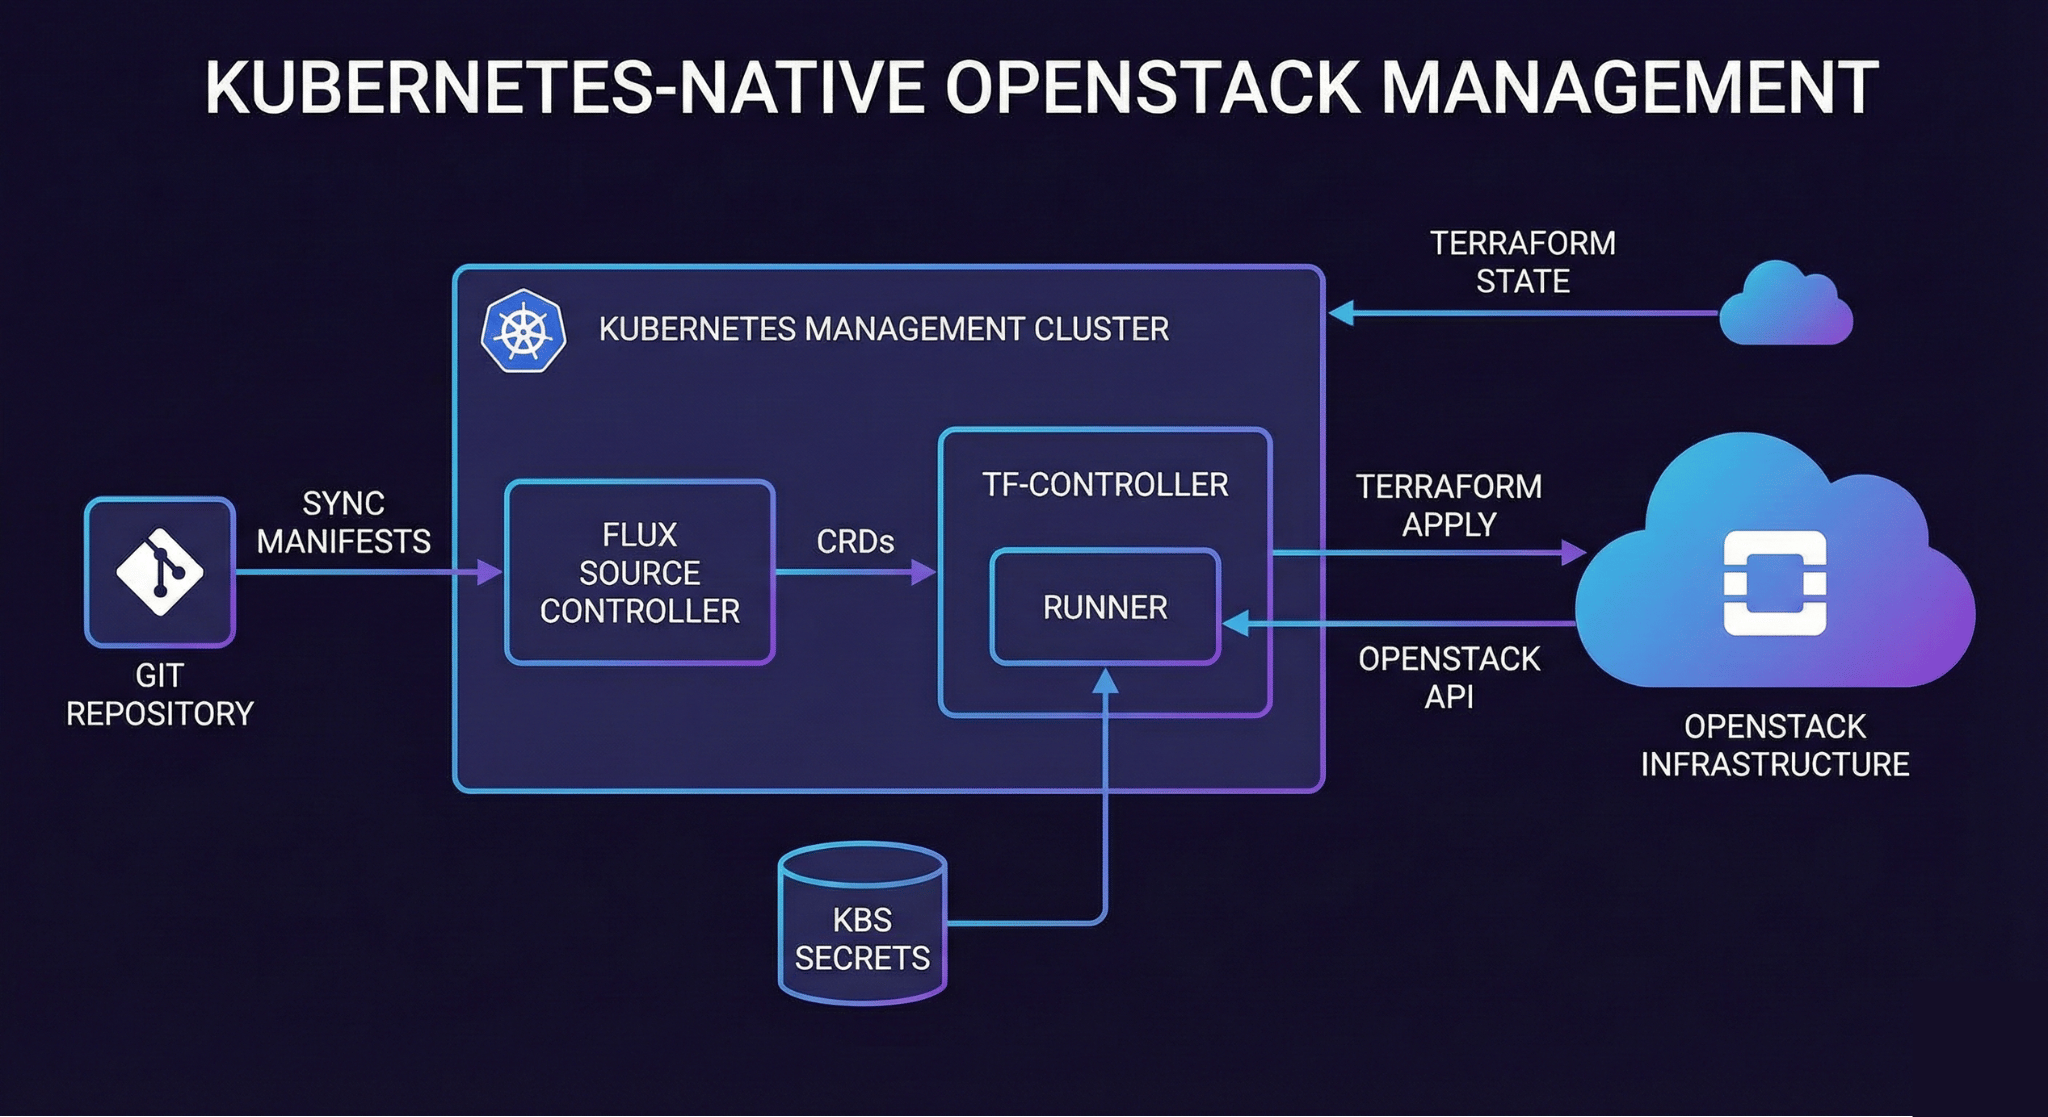
Storing OpenStack Credentials
OpenStack credentials get stored as Kubernetes secrets that tf-controller can reference:
kubectl create secret generic openstack-credentials \
  --from-literal=OS_AUTH_URL=https://your-cloud.com:5000/v3 \
  --from-literal=OS_USERNAME=terraform \
  --from-literal=OS_PASSWORD=${OS_PASSWORD} \
  --from-literal=OS_PROJECT_NAME=infrastructure \
  --from-literal=OS_REGION_NAME=RegionOne \
  --namespace=flux-system
The tf-controller injects these as environment variables when running Terraform.
Approval Workflows
The approvePlan: auto setting automatically applies Terraform changes. For production environments, you probably want manual approval:
apiVersion: infra.contrib.fluxcd.io/v1alpha1
kind: Terraform
metadata:
  name: production-compute
spec:
  approvePlan: "plan-main"  # Wait for manual approval
  interval: 10m
  path: ./environments/production
  # ... rest of config
With manual approval, you review the plan and then approve it:
# View the pending plan
kubectl get terraform production-compute -o yaml

# Approve the plan
kubectl annotate terraform production-compute \
  "infra.contrib.fluxcd.io/approved=plan-main-20240115"
This provides a review gate before changes apply to production infrastructure.
Managing Multi-Environment Infrastructure
Most organizations run multiple OpenStack environments (development, staging, production). GitOps workflows need to handle promotions between environments while maintaining safety controls.
Branch-Based Environments
A common pattern uses Git branches to represent environments:
main branch → production environment
staging branch → staging environment
develop branch → development environment
Changes flow through environments via pull requests: develop → staging → main. This provides natural review points where teams verify changes in lower environments before promoting to production.
However, branch-based environments create operational challenges. Your staging and production configurations inevitably diverge because they’re in different branches. Merging changes between branches requires resolving conflicts in Terraform configuration.
Directory-Based Environments
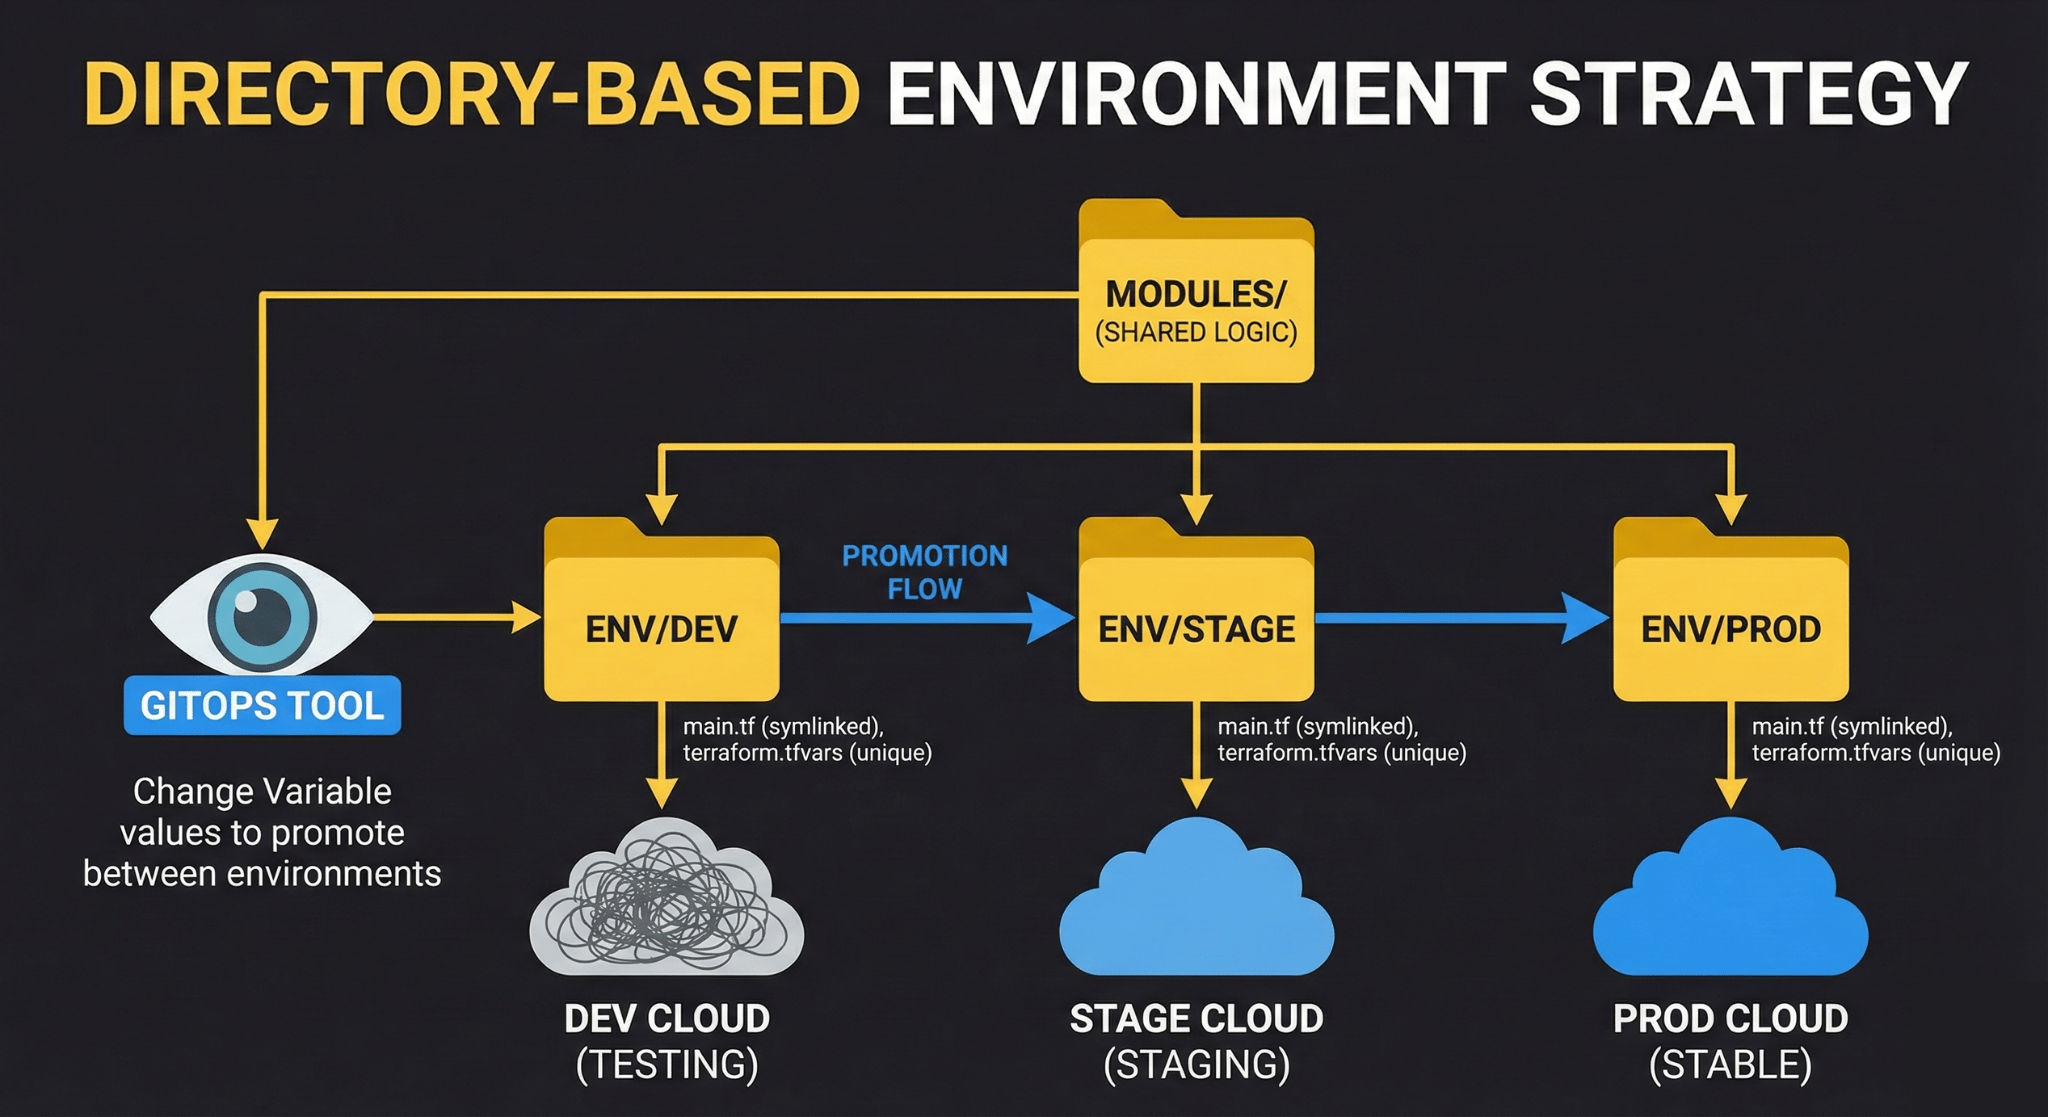
A more maintainable approach keeps all environments in the main branch but in separate directories:
environments/
├── production/
├── staging/
└── development/
With this structure, changes to shared modules automatically propagate to all environments, but environment-specific configuration stays isolated. GitOps tools watch specific directories and only apply changes affecting those directories.
For example, modifying modules/compute/main.tf triggers updates to all environments, but modifying environments/production/terraform.tfvars only affects production.
Promotion Workflow
To promote changes between environments with directory-based structure:
- Test changes in development environment
- Update staging environment configuration to match development
- Merge pull request, automated deployment to staging
- Verify staging works correctly
- Update production environment configuration
- Merge pull request after review, automated deployment to production
This workflow maintains all configuration in a single branch while still providing environment isolation and promotion gates.
Rollback Strategies
Infrastructure changes sometimes need to be rolled back. GitOps makes rollbacks straightforward because every change is tracked in Git.
Git Revert for Quick Rollbacks
The fastest rollback method is Git revert:
# Find the commit that introduced the problem
git log --oneline

# Revert that commit
git revert abc123

# Push the revert
git push origin main
GitOps tools detect the revert and automatically apply the previous infrastructure state. This works well for simple changes but can be problematic if multiple changes happened after the problematic commit.
Terraform State Rollback
Sometimes you need to roll back Terraform state itself. This requires careful handling:
# List state versions (if using Terraform Cloud or similar)
terraform state list

# Download previous state
aws s3 cp s3://terraform-state/production/openstack.tfstate.backup ./previous-state

# Manually replace state (risky, be careful)
terraform state push previous-state
State rollbacks are risky because they can cause Terraform to think resources need deletion when they don’t. Use this approach only when Git revert won’t work.
Documented Rollback Procedures
The safest rollback strategy is having documented procedures for common scenarios. Store these in your infrastructure repository:
# Rollback Procedures

## Rolling Back Compute Changes

1. Identify the last known good commit: `git log environments/production/compute.tf`
2. Revert to that commit: `git revert HEAD~1`
3. Open PR with revert, label as "rollback"
4. Review Terraform plan in PR comments
5. Merge and verify deployment
6. Monitor for 15 minutes
7. Document incident

## Rolling Back Network Changes

Network changes require additional steps because connected resources depend on network configuration...
Documented procedures reduce stress during incidents and ensure consistent rollback processes.
Monitoring and Observability
GitOps workflows generate valuable operational data. Monitoring this data helps identify problems before they affect production.
Tracking Drift
Infrastructure drift occurs when the actual state diverges from the declared state in Git. GitOps tools can detect drift by regularly running Terraform plan:
With Atlantis, schedule regular drift detection:
# .github/workflows/drift-detection.yml
name: Drift Detection
on:
  schedule:
    - cron: '0 */6 * * *'  # Every 6 hours

jobs:
  drift-check:
    runs-on: ubuntu-latest
    steps:
      - uses: actions/checkout@v2
      - name: Trigger Atlantis Plan
        run: |
          curl -X POST \
            -H "Authorization: Bearer $ATLANTIS_TOKEN" \
            https://atlantis.yourcompany.com/api/plan \
            -d '{"repo": "yourorg/infrastructure", "workspace": "production"}'
With Flux, drift detection happens automatically on the interval you configure. Check the Terraform resource status:
kubectl get terraform -AResources showing OutOfSync indicate drift between Git and actual infrastructure.
Deployment Metrics
Track GitOps deployment metrics to understand infrastructure change patterns:
- Deployment frequency: How often do infrastructure changes deploy?
- Lead time: How long from commit to deployment?
- Change failure rate: What percentage of changes require rollback?
- Mean time to recovery: How long to recover from failed changes?
These four metrics (from the DORA research) apply equally to infrastructure and application deployments.
Real-World GitOps Patterns for OpenStack
After implementing GitOps for OpenStack infrastructure, several patterns emerge that solve common operational challenges.
Handling Long-Running Resources
OpenStack resources like large volumes or complex network topologies can take minutes to provision. Long-running Terraform operations can timeout in GitOps tools that expect quick deployments.
Solution: Adjust timeout settings in your GitOps tool configuration. For Atlantis:
# atlantis.yaml
workflows:
  long-running:
    plan:
      steps:
      - init
      - plan
    apply:
      steps:
      - apply:
          extra_args: ["-parallelism=5"]
The parallelism setting controls how many resources Terraform creates concurrently. Lower values (5-10) work better for resource-constrained OpenStack environments.
For Flux tf-controller, increase the timeout directly:
spec:
  writeOutputsToSecret:
    name: outputs
  interval: 10m
  retryInterval: 20s
  timeout: 30m  # Increase for large deployments
Staging Parallel to Production
Some teams run staging environments that mirror production configuration exactly. This is easy with directory-based environments and symlinks:
environments/
├── production/
│   ├── main.tf -> ../../modules/standard-environment/main.tf
│   └── terraform.tfvars
├── staging/
│   ├── main.tf -> ../../modules/standard-environment/main.tf
│   └── terraform.tfvars
└── modules/
    └── standard-environment/
        └── main.tf
Both environments use the same Terraform code but different variable files. Changes to the shared module affect both environments automatically, while variable changes remain isolated.
Handling Emergency Changes
GitOps assumes all changes flow through Git. But what about emergencies when you need to fix production immediately?
Pattern: Support “break glass” procedures that allow direct Terraform execution while maintaining audit trails:
# Emergency fix script
#!/bin/bash
set -e

echo "=== EMERGENCY INFRASTRUCTURE CHANGE ==="
echo "This bypasses normal GitOps workflow"
echo "Changes must be committed to Git within 24 hours"
echo ""
read -p "Describe the emergency: " DESCRIPTION
read -p "Your name: " OPERATOR

# Make the change
cd environments/production
terraform apply

# Log the emergency change
git add .
git commit -m "EMERGENCY: $DESCRIPTION (by $OPERATOR)"
git push origin emergency-$(date +%Y%m%d-%H%M%S)

echo "Emergency change applied. Create PR to merge emergency branch to main."
This script allows bypassing normal workflows while ensuring changes get documented and eventually merged back to main branch.
Common Pitfalls and How to Avoid Them
Provider Version Drift
Different environments running different Terraform provider versions cause inconsistent behavior. Lock provider versions explicitly:
terraform {
  required_providers {
    openstack = {
      source  = "terraform-provider-openstack/openstack"
      version = "= 1.50.0"  # Exact version, not ~> 1.50
    }
  }
}
Update provider versions deliberately through pull requests that affect all environments simultaneously.
State File Conflicts
Multiple GitOps systems trying to manage the same infrastructure create state file conflicts. Ensure only one system has write access to each Terraform workspace. If you’re migrating from manual Terraform runs to GitOps, disable manual access:
# backend.tf
terraform {
  backend "s3" {
    # ... configuration ...

    # Prevent local terraform runs
    skip_credentials_validation = false  # Require valid credentials
  }
}
Secrets in Plan Output
Terraform plan output may contain sensitive values. Atlantis and other GitOps tools post plan output as PR comments, potentially exposing secrets. Use Terraform’s sensitive flag:
variable "database_password" {
  type      = string
  sensitive = true
}

output "admin_password" {
  value     = random_password.admin.result
  sensitive = true
}
Sensitive values show as (sensitive value) in plan output instead of the actual value.
Getting Started with GitOps for OpenStack
If you’re ready to implement GitOps for your OpenStack infrastructure, start small and expand:
Week 1: Prepare Terraform Code
- Move infrastructure code to Git if it’s not already there
- Configure remote state backend
- Structure code into modules and environments
- Add provider version constraints
Week 2: Deploy GitOps Tool
- Choose Atlantis, Flux, or GitLab CI based on your environment
- Deploy the tool in a non-production environment first
- Configure access to your Git repository
- Set up OpenStack credential injection
Week 3: Automate Non-production
- Configure development environment for automated deployments
- Test pull request workflow
- Verify plan and apply operations work correctly
- Document the process
Week 4: Expand to Production
- Add production environment with approval requirements
- Test emergency rollback procedures
- Train team on new workflow
- Monitor deployment metrics
OpenMetal and GitOps
OpenMetal’s hosted private cloud provides infrastructure well-suited for GitOps workflows. Dedicated hardware delivers consistent performance, which matters when Terraform operations might take several minutes. Fixed monthly costs mean you can run GitOps automation without worrying about per-API-call charges that affect usage-based cloud pricing.
The OpenStack APIs OpenMetal provides work seamlessly with Terraform and GitOps tools. You can manage compute instances, networks with VLANs and VXLANs, volumes, and security groups declaratively through the same workflows you’d use for any OpenStack deployment. Because you get root access through IPMI, you can deploy GitOps tools like Atlantis directly on your infrastructure, keeping your automation pipeline close to the resources it manages.
For teams running both bare metal and hosted private cloud, GitOps workflows can span both. A single Terraform repository can provision both bare metal servers for stateful workloads and hosted private cloud instances for elastic compute, all managed through the same pull request workflow.
Ready to implement GitOps for your infrastructure? Learn more about OpenMetal’s hosted private cloud or schedule a consultation to discuss your infrastructure automation needs.
Schedule a Consultation
Get a deeper assessment and discuss your unique requirements.
Read More on the OpenMetal Blog