


In this blog:
- What is Magnum?
- Why you Should Use a Template to Create Kubernetes Clusters?
- How to Create a Kubernetes Template on OpenStack
- How to Deploy a Kubernetes Cluster on OpenStack
Creating repeatable and automated processes, especially for creating infrastructure layers, is drastically important. It’s the make or break between creating resources at scale and clicking a bunch of buttons for 90% of your day. In the past few years, the mantra for almost every engineering team has been move faster, and the way to do that is with proper automation.
In this blog post, you’re going to learn about an important repeatable process, creating Kubernetes clusters using Magnum.
What is Magnum?
Nowadays, you can pretty much create a Kubernetes cluster anywhere. From the cloud to virtual machines in a datacenter to the computer that you may be reading this blog post on right now. There has been an incredible amount of advancement in how Kubernetes clusters can be deployed and managed across any infrastructure. However, with all of these advancements sometimes comes complexity. There’s a lot to consider when you’re deploying a Kubernetes cluster, which can include:
- Networking layers
- How many virtual machines to use for worker nodes and control planes What Linux distro or Windows OS version
- Storage considerations
- How and what Kubernetes API version to install
and a lot more that could take up an entire blog post in itself.
Because of that, organizations started to make automated solutions to create Kubernetes clusters for their respective platform. For OpenStack, it’s Magnum.
Magnum is an OpenStack API that allows you to create orchestration engine clusters. At the time of writing this, Magnum supports Kubernetes, Docker Swarm, Mesos, and DC/OS. Magnum uses Heat, which is what implements the orchestration engine to launch systems based on the Templates that you create via Magnum.
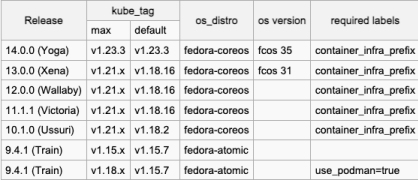
When it comes to what Kubernetes API version you can run on a cluster that’s deployed via a Template, it’ll be based on the Linux distro and version. Below is a chart that you can reference before creating a Template.
Magnum allows you to do all of the usual things with Kubernetes, including the use of CNI’s, CSI’s, Service Mesh, scaling, etc…nothing differs from a raw Kubernetes perspective. However, one thing to keep in mind is its TLS abilities which come out of the box. Because OpenStack is running in a data center, it’ll most likely need to communicate with the outside world. TLS is incorporated at a few levels:
- To communicate with the cluster API
- Worker nodes to communicate with control planes
- By end users when they programmatically interact with the cluster
Why You Should Use Templates to Create Kubernetes Clusters?
When you create a Kubernetes cluster manually, it may seem like no big deal. A couple of bash scripts and you’re good to go. But what happens when you have to create a second cluster? Or a third? Or a twentieth? Or you have to scale the cluster’s control planes or worker nodes? At that point is when running a bash script over and over again minimizes value-driven work and flexibility for how you make a process repeatable.
This is where Templates come into play – to help engineers automate the Kubernetes cluster creation in OpenStack.
By definition, a Template is what you use to define the way clusters are going to look. You can sort of think of them like a playbook or a script in a sense. It’s a declarative way to define how your orchestration engine will look, but instead of scripting it out, you’re using a UI to define components like:
- Operating system
- How much storage to give each node
- CNI
- Node count and size
- Container registry information
- TLS settings
Once you create a Template, it exists until you manually delete it. You can create as many Kubernetes clusters as you wish based on one template. It’s a great way to deploy workloads as your organization scales its Kubernetes environment.
Another great thing about Templates is you can have multiple. For example, perhaps you’re running the latest stable version of the Kubernetes API, but you want to test out the newest Kubernetes API that came out. You can create a Template with the newest Kubernetes API version and deploy a few clusters to test it out, and that Template or those clusters won’t interfere with the Template that you already have defined to deploy production workloads.
How to Create a Kubernetes Template on OpenStack:
Now that you know what Magnum is, what Templates are, and why you’d want to use them, let’s learn how to create a Template.
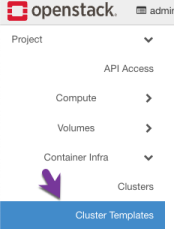
First, log into OpenStack, and under Container Infra, click on Cluster Templates
Click the + Create Cluster Template button. 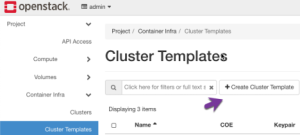
Give your cluster template a name and choose Kubernetes as the container orchestration engine.
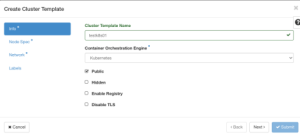
There are four options available to choose from when configuring the cluster:
Public to make the cluster template public. Templates are limited to the admin, owner, or users within the same tenant as the owners by default.
-Enable a container registry.
-Disable TLS.
Click the check box to make the cluster template public so other members of your team can use it. Once complete, click Next.
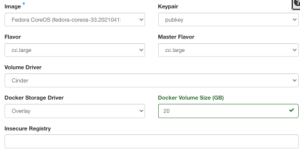
 Under Node Spec is where you’re going to configure what the control planes and worker nodes look like for your Kubernetes cluster. This will include:
- The Linux distribution that you want to run for control planes and worker nodes
- The size of the storage on each server
- The Container Storage Interface (CSI) plugin, Cinder, that’s used on OpenStack for orchestration engines like Kubernetes
- A public key for SSHing into the worker nodes and control planes
- Optional: the URL of a Docker container registry
For the purposes of this blog post, you can choose the same options as the screenshot below. Once complete, click the Next button.
 Under the Network settings, you’ll see a few options for defining:
 - The network driver (CNI) that you want to use
- Proxy information
- Subnets that you want to use, whether they’re external (public) or private DNS settings
- Master LB, which is used if control planes should have a load balancer in front of them. The default is false.
- Floating IP, which defines if the clusters should have a floating IP. The default is true.
 Under the Network settings, you’ll see a few options for defining:
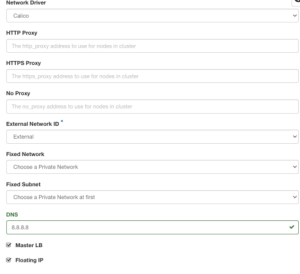 At the time of writing this, Magnum supports Calico and Flannel as a CNI. Typically engineering teams will go with Calico because it provides a few more engineering features than Flannel which include encrypted traffic by using WireGuard which can save the need for a Service Mesh right away and the heavier use of BGP for large data center fabrics.
For simplicity, you can choose the options in the below screenshot. Once complete, click the Next button.
The last step is the Labels. Labels are key configuration pieces that you would use to customize a deployment. For example, there’s a kube_tag label that allows you to define the Kubernetes API version you want to use and a ingress_controller tag to specify which type of Ingress Controller you want to use. If you’d like to learn more about all of the available tags, check out this guide.
The below screenshot is an example of tags to use. Once complete, click the Submit button.

You should now see a green box to the upper right pop up indicating that the cluster template was created along with now seeing the cluster template on the list of cluster templates. 
![]()
How to Deploy a Kubernetes Cluster On OpenStack
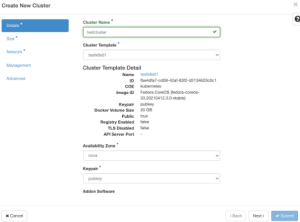
Now that the Template is created, let’s learn how to create a new Kubernetes cluster.
Next to your template, click the Create Cluster button.
Give your cluster a name and choose the cluster template that you created in the previous step. Click the Next button.
For the control plane and worker node count, it’ll all depend on the environment you’re deploying to. However, for a dev environment, one each is fine. For prod, the recommended node count to start out with is two control planes and three worker nodes.
Once you add in your options, click the Next button.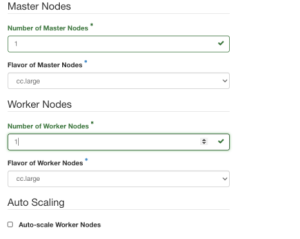
For networking, you can choose to enable a dedicated load balancer for the control planes along with creating a new network for the cluster.
Another important option, other than choosing if you want an ingress controller, is the cluster API access. A recent report indicated that over 900,000 Kubernetes clusters were found exposed on the internet. This is no small number nor is it proper in a production environment. The recommendation is to ensure that your prod cluster is behind a private network and is only accessible over VPN. For a dev environment, as long as no production workloads are running on it, having the API public facing is fine.
Once complete, click the Next button.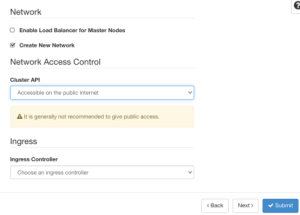
From an automation perspective, one of the biggest reasons organizations want to use Kubernetes is because a lot of heavier workloads are abstracted away and automated. For example, Kubernetes Pods utilizing the Deployment Controller have self-healing, which means you don’t have to wake up at 2:00 AM to fix an application that’s down for a basic reason. With Templates, you can do the same thing, but for control planes and worker nodes.
Once complete, click the Next button.
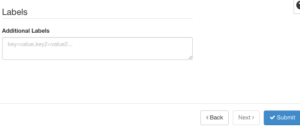
 In the last step, you can decide to add in any Labels other than the ones you already added to the cluster template. Once complete, click the Submit button.
After waiting a few minutes, you should now see your newly created Kubernetes cluster. Congrats! You have officially created a template and deployed a Kubernetes cluster.
About Our Guest Writer
Michael Levan is a consultant, researcher, and content creator with a career that has spanned countless business sectors, and includes working with companies such as Microsoft, IBM, and Pluralsight. An engineer at heart, he is passionate about enabling excellence in software development, SRE, DevOps, and actively mentors developers to help them realize their full potential. You can learn more about Michael on his website at: https://michaellevan.net
Interested in Learning More?
OpenMetal and OpenStack are the perfect fit for Kubernetes. But don’t take our word for it:
- Schedule a meeting with the OpenMetal team to discuss your unique needs or a custom Proof of Concept (PoC).
- Request an OpenMetal On-Demand Private Cloud Trial to experience the performance and benefits for yourself or your organization.
Test Drive
For eligible organizations, individuals, and Open Source Partners, Private Cloud Cores are free of charge. Qualify today.
Subscribe
Join our community! Subscribe to our newsletter to get the latest company news, product releases, partner updates, and more.
Follow Us
Follow OpenMetal and the team on LinkedIn and share our passion for OpenStack, On-Demand Private Clouds, open source, and more!