


In this article
- Installing and Setting Up Rally
- Creating and Managing Deployments in Rally
- Running Benchmark Tests with Rally
- Analyzing Test Results and Creating Reports
- Improving OpenStack Performance Using Rally Data
- Wrapping Up: Using OpenStack Rally
- FAQs
- Interested in OpenMetal’s Hosted Private Cloud Powered by OpenStack?
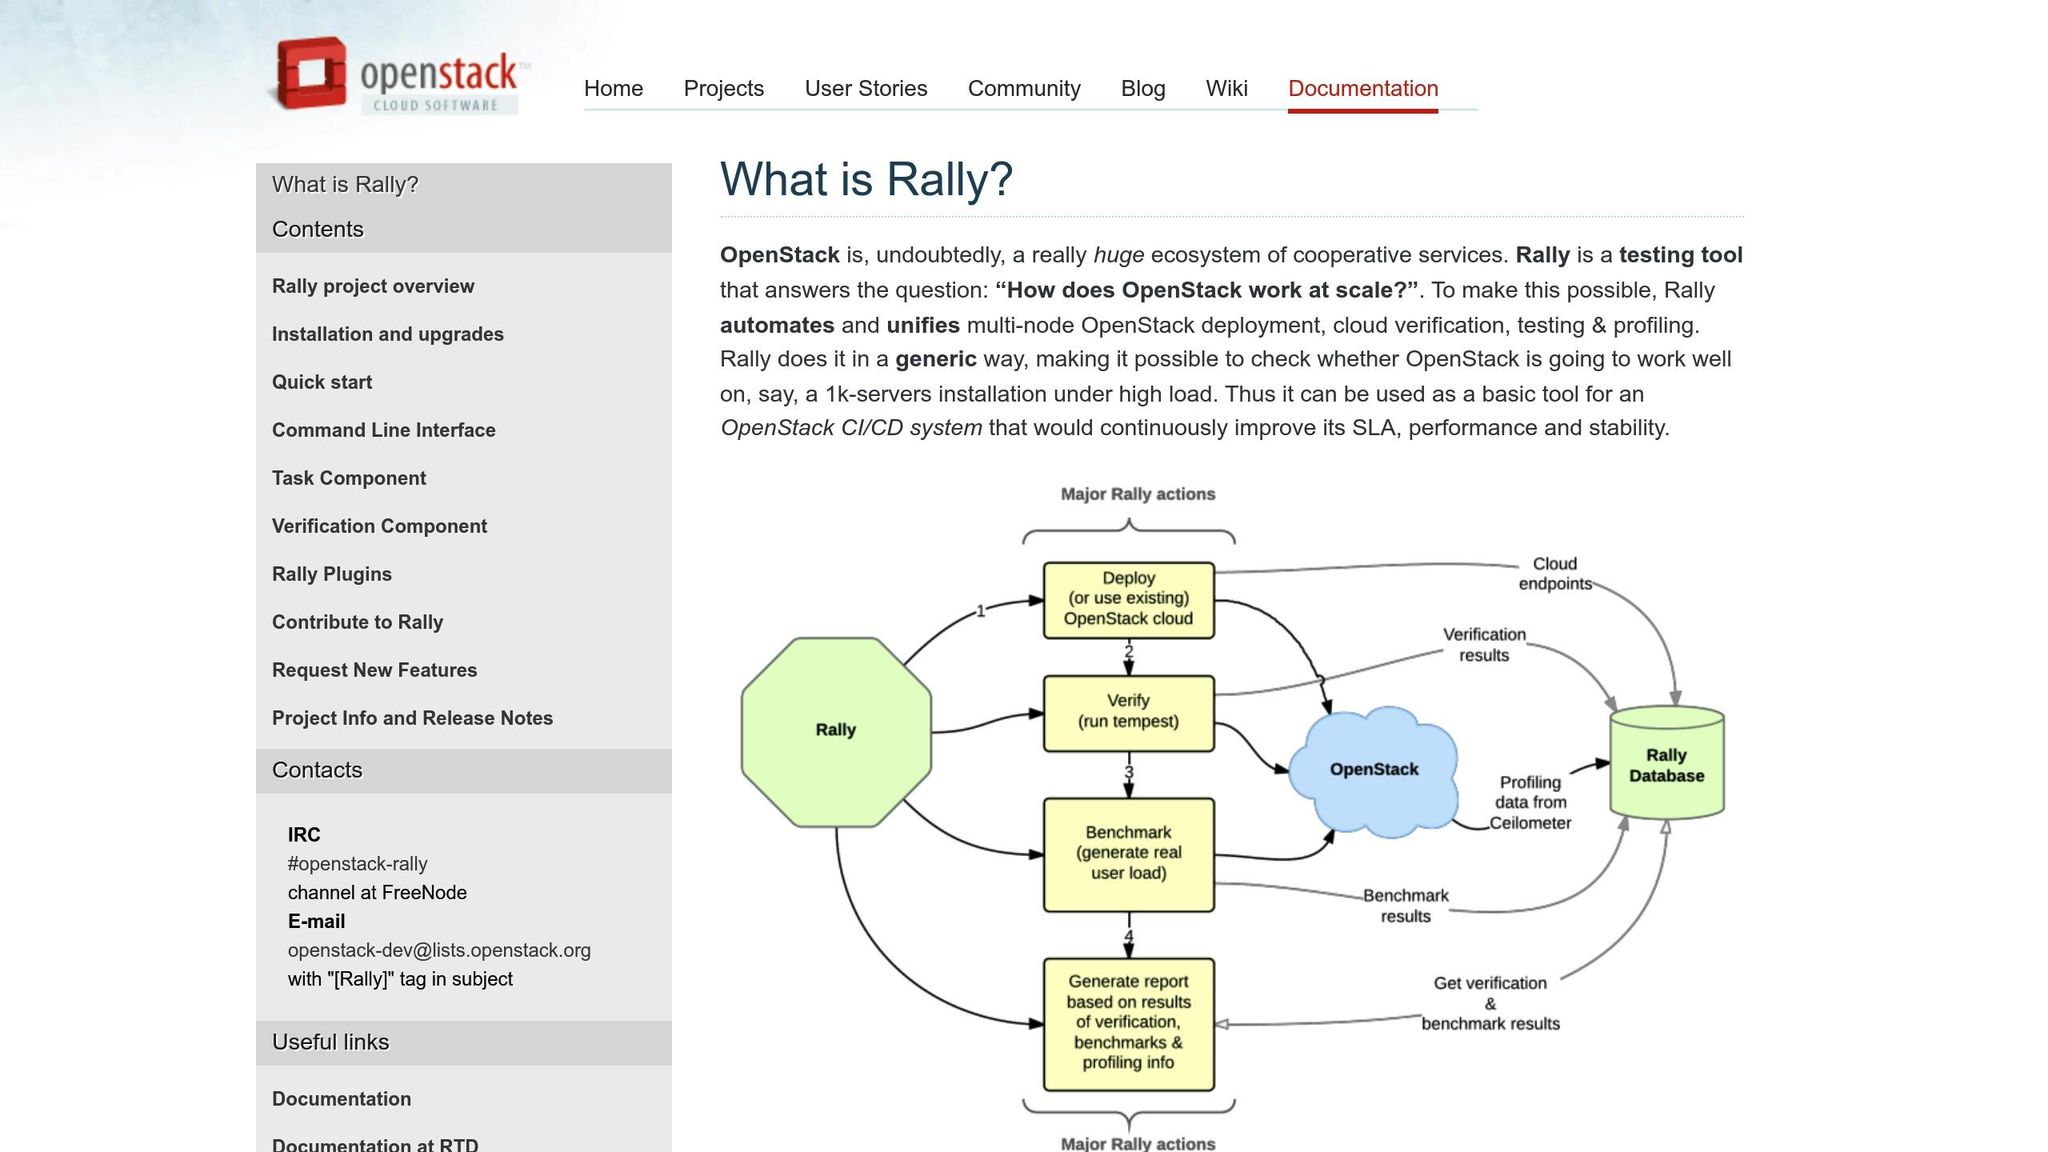
Testing OpenStack can be complex, but Rally makes it easier. Rally is an open source tool designed to test, benchmark, and validate OpenStack deployments. It helps you identify performance bottlenecks, evaluate scalability, and improve system performance.
- What Rally Does: Simulates workloads, runs performance tests, and generates detailed reports.
- Key Features: Supports large-scale testing (e.g., 1,000 servers), integrates with CI/CD pipelines, and offers customizable test scenarios.
- Why Use It: Ensures SLA compliance, detects performance issues early, and provides actionable insights for optimization.
- Setup: Install Rally via automated scripts, Docker, or DevStack. Then, configure it to connect with your OpenStack environment.
- Use Cases: Benchmarking, scalability testing, and continuous performance monitoring.
Rally is a powerful tool to help you confidently manage and optimize your OpenStack deployments. Ready to learn more? Let’s dive in.
Installing and Setting Up Rally
To get started with Rally, you’ll need to verify system requirements, choose an installation method, and configure it to work with your OpenStack setup.
System Requirements for Rally
Rally is designed to run on a dedicated server, separate from your OpenStack infrastructure. This server should have access to both the administrative and external networks to ensure smooth OpenStack testing.
The minimum recommended requirements include a 64-bit x86 processor, 4 GB of RAM, and 40 GB of disk space. You’ll also need two 1 Gbps network interface cards (NICs) and Python 3.8 or newer. Keep in mind, if you’re planning to run large-scale benchmarks or intensive tests, it’s a good idea to allocate more resources to the server.
Once your system is ready, you can move on to installing Rally.
Installation Methods
There are a few ways to install Rally, but the automated installation script is often the simplest.
- Automated Script Installation:
Use the following command to download and run the script:wget -q -O- https://raw.githubusercontent.com/openstack/rally/master/install_rally.sh | bashTo perform a system-wide installation with administrative privileges, use:
sudo ./install_rally.shFor a custom installation location, specify the target directory:
./install_rally.sh --target /foo/bar - DevStack Integration:
Clone the required repositories:git clone https://git.openstack.org/openstack-dev/devstack git clone https://github.com/openstack/rallyAdd the following to the
[[local|localrc]]section in yourlocal.conffile:enable_plugin rally https://github.com/openstack/rally masterThen, execute:
./stack.sh - Docker Installation:
Pull the Rally Docker image:docker pull rallyforge/rallyTo run it with persistent storage, use:
docker run -it -v /var/lib/rally_container:/home/rally rallyforge/rally
Once installed, you’ll need to configure Rally to connect with your OpenStack environment.
Setting Up Rally After Installation
After installation, the first step is to set up the Rally database. Use the following command:
rally db recreate
For Docker installations, you run the same command inside the container’s interactive shell. Make sure the Rally user within the container has the necessary permissions to access the mounted volume.
Make sure the Rally user within the container has the necessary permissions to access the mounted volume.
Next, register your OpenStack deployment. This can be done using OpenRC files or a JSON configuration file. For example, an organization used Ansible playbooks to install Rally and created a deployment named “secunderabad” with the command:
./rally deployment create --fromenv --name=secunderabad
This setup updated their ~/.rally/openrc file, allowing standard OpenStack clients to function without issues.
Finally, check the deployment’s health to ensure proper connectivity:
rally deployment check
This command tests the connection between Rally and your OpenStack services. Once the health check passes, Rally is ready to manage and execute deployments in your environment.
Creating and Managing Deployments in Rally
Once you’ve completed the installation and configuration steps, the next step is registering and validating your OpenStack deployments. This step connects Rally to your cloud infrastructure, allowing you to run tests and benchmarks on specific OpenStack setups.
Registering OpenStack Environments
When working with existing OpenStack installations, Rally uses the ExistingCloud deployment engine. To register your environment, you’ll need to provide your cloud credentials. The easiest way to do this is by setting OpenStack environment variables like OS_USERNAME, OS_PASSWORD, OS_AUTH_URL, and OS_PROJECT_NAME. Once these are set, you can use the --fromenv flag to create a deployment:
rally deployment create --fromenv --name=<deployment_name>
“This command will create a new deployment record in rally database. In the case of ExistingCloud deployment engine, it will use the cloud represented in the configuration.”
If you’re managing multiple environments or need a more structured setup, you can store your deployment settings in a file and use the --filename option. This method is ideal for teams that require consistent configurations across different environments or have specific authentication needs.
After creating a deployment, set it as the active one with the following command:
rally deployment use
This updates the ~/.rally/openrc file, making the deployment the default for all future Rally operations. Once the active deployment is set, the next step is to verify its configuration.
Validating Deployments
Before diving into performance tests, it’s important to ensure your deployment is properly configured and accessible. Rally supports verification tools like Tempest through its Verifier Plugin system to confirm that OpenStack services are functioning as expected.
The validation process includes three main steps:
- Create a Tempest verifier: Use the command
rally verify create-verifier --type tempest --name <verifier_name>. - Configure the verifier: Execute
rally verify configure-verifierto set it up. - Start the verification: Launch the process with
rally verify start.
You can fine-tune the tests by using options like --pattern to specify test names, --load-list or --skip-list to include or exclude tests, and --xfail-list for tests expected to fail. Adding the --detailed flag will give you more detailed error information for failed tests.
Verifier statuses move through stages such as init, installing, installed, updating, extending, and failed. Similarly, verification statuses include init, running, finished, failed, and crashed. Keeping an eye on these statuses helps you quickly identify and resolve configuration issues.
Once validation is successful, your deployment is ready for performance testing and benchmarking. Proper registration and thorough validation ensure that Rally can communicate effectively with your OpenStack environment and deliver reliable performance data.
Running Benchmark Tests with Rally
Once your deployment is validated, you can use Rally’s predefined scenarios to benchmark common OpenStack operations. Rally offers tools that mimic real-world workloads, helping you assess how your infrastructure handles various situations.
Using Predefined Scenarios
Rally includes a library of predefined scenarios that simulate typical OpenStack operations. These scenarios let you dive into testing right away without needing to set up custom configurations. They cover key tasks like launching instances, creating networks, managing volumes, and running API stress tests. The framework supports core OpenStack services and is continually updated to include benchmarks for more projects. For example, it offers scenarios for services like Zaqar and Designate, as well as projects such as Mistral. Each scenario measures overall system performance and breaks it down into individual actions.
To run a predefined scenario, you can use this command:
rally task start --task scenario-config.yaml
Rally’s scaling features allow you to simulate large numbers of concurrent users and workloads, giving you insights into how your system performs under pressure.
Here’s an example: Enabling caching improved Heat template validation times from 42.97 seconds to just 14.17 seconds – a threefold improvement.
If these predefined scenarios don’t align with your specific needs, you can create custom scenarios tailored to your workloads.
Creating Custom Scenarios
Predefined scenarios are great for general use cases, but sometimes you need to test unique workloads or configurations. In these cases, you can create custom scenarios by defining benchmark methods and configuration files specific to your requirements.
To build a custom scenario, subclass rally.benchmark.base.Scenario and implement the benchmark methods, decorating them with @classmethod. YAML task files allow you to define parameters, runners (like sequential, parallel, or ramp-up), and context configurations. You can use existing scenarios as templates and save your custom files in a directory Rally can access. For more complex setups, you can override methods like init() and cleanup() to handle custom initialization and teardown processes.
Running and Managing Tasks
Once your scenarios are ready, you can manage and monitor tasks using Rally’s command-line tools. These tools let you start tests, track their progress, and analyze results with ease.
Run tasks with detailed output by using:
rally --debug task start --task <task_file>
You can generate reports in various formats, such as HTML:
rally task report <task_id> --out report.html
Or create JUnit-compatible reports with:
rally task report <task_id> --junit --out <report-file.xml>
For raw JSON data, use:
rally task results <task_id>
To keep track of all tasks, use rally task list. You can filter tasks by deployment or status, making it easier to manage multiple tests and quickly identify completed or failed tasks.
These reporting and management features make Rally particularly useful in continuous integration workflows.
Rally’s statistical approach ensures you get reliable performance data, which can guide decisions about scaling, optimization, and resource allocation in your OpenStack environment.
Analyzing Test Results and Creating Reports
Rally transforms raw benchmark data into actionable insights, making it easier to fine-tune your OpenStack environment. Let’s get into how to interpret key performance metrics in Rally’s dashboard and create reports that effectively communicate your findings.
Understanding Performance Data
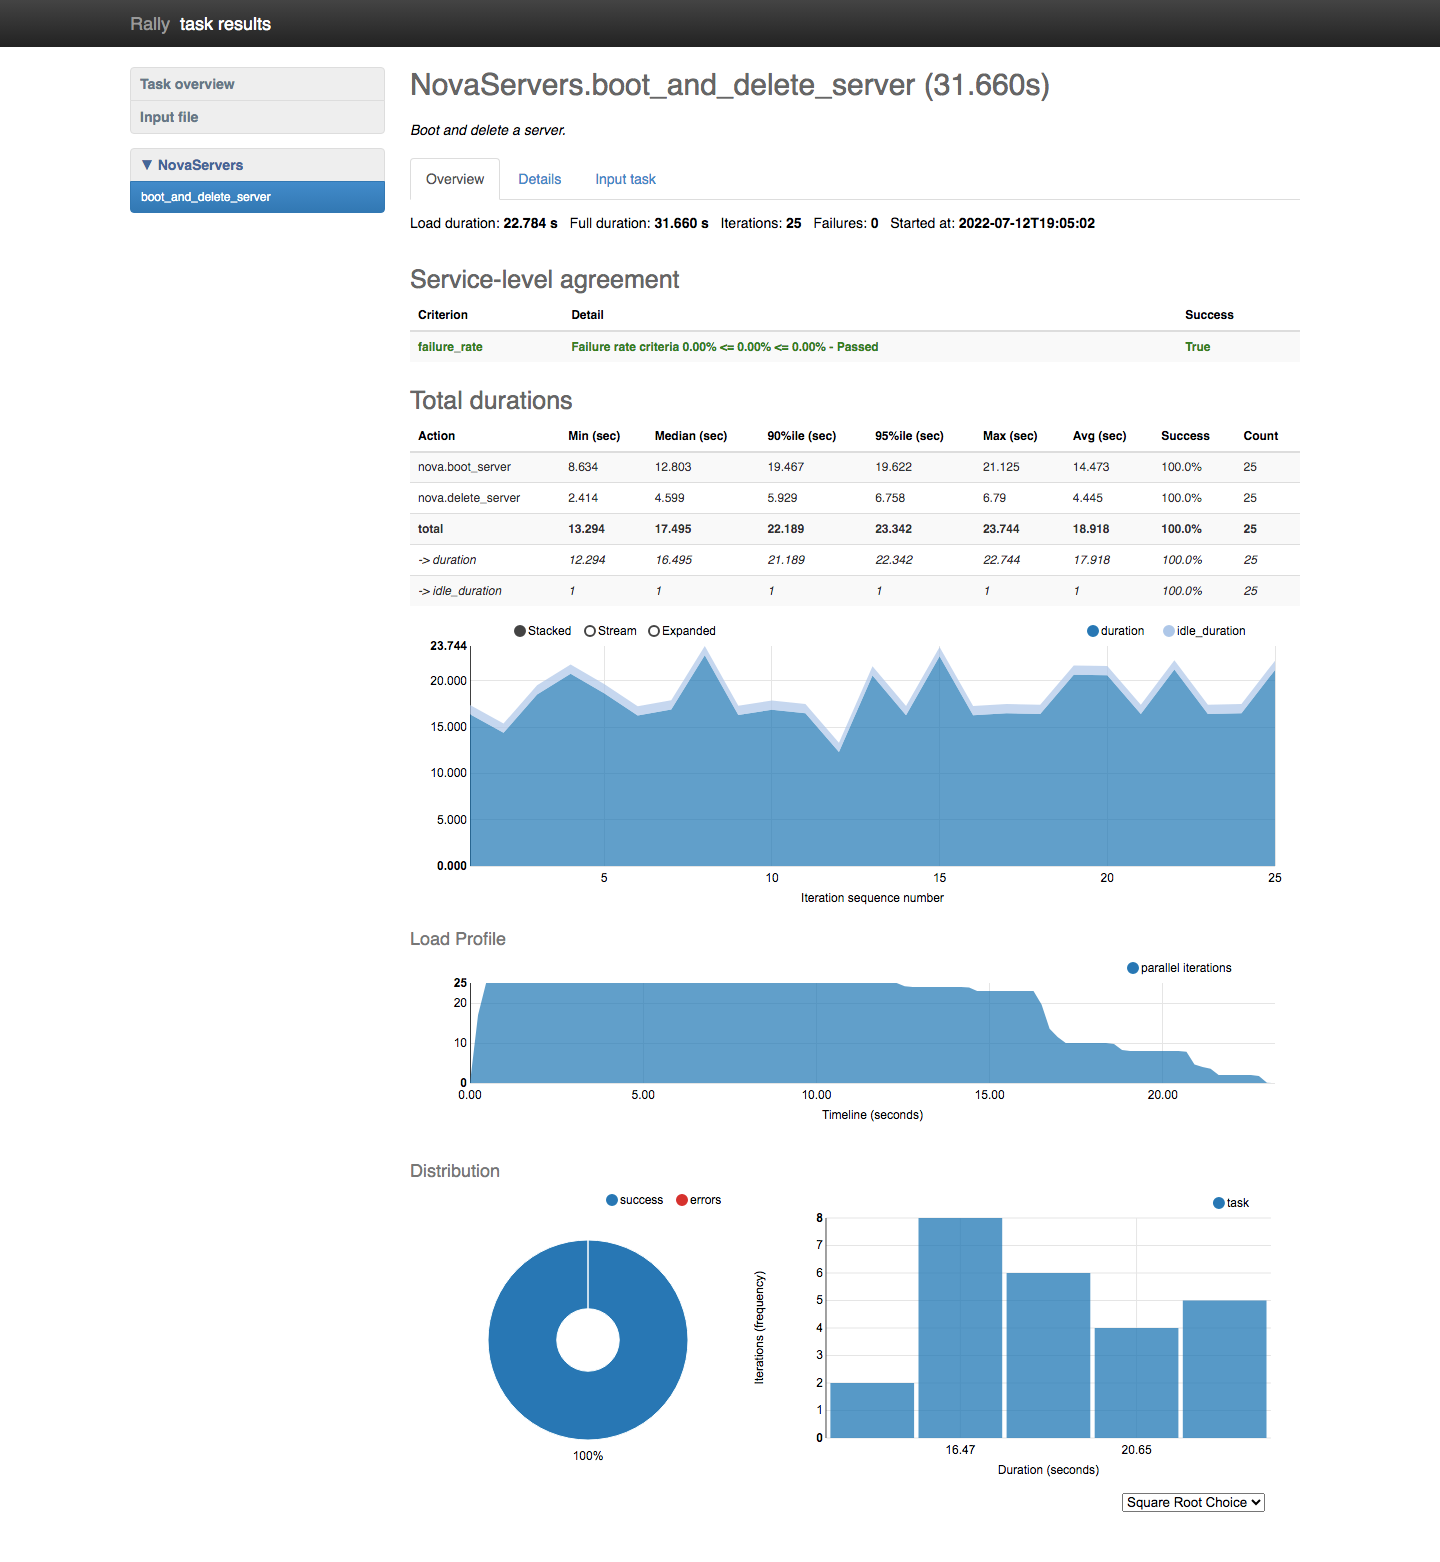
Rally’s dashboard organizes performance metrics into three main tabs – Overview, Details, and Input Task – each designed to assist with specific aspects of your analysis.
The Overview tab offers a snapshot of your test results. It displays general scenario details, total durations, performance trends over time, and success/failure pie charts. For example, a fully solid pie chart indicates a 100% success rate for your tests – or, if you’re running negative tests, the expected failure rate.
One particularly useful feature is the Total Duration chart, which compares performance with and without idle time. This comparison can help you spot scaling issues that might not be immediately visible in other metrics.
Another key metric is the 95-percentile duration value, which tells you that 95% of your benchmark scenario iterations completed faster than this value. This is particularly helpful when analyzing scenarios with varying performance.
Rally’s testing has uncovered unexpected performance bottlenecks in the past. For instance, the amqp_rpc_single_reply_queue setting in Nova was found to degrade cloud performance. In one test, the NovaServers.boot_and_delete scenario measured virtual machine boot-up times with user concurrency levels ranging from 1 to 30, with each group sending 200 requests.
The Details tab provides a deeper breakdown of actions, helping you identify specific bottlenecks in your OpenStack operations. This granular view allows you to focus your optimization efforts where they’re needed most.
Creating Visual Reports
Visual reports simplify the process of summarizing benchmark outcomes, making them easy to share with stakeholders who may not be familiar with raw data. Rally’s visual reporting tools automatically generate HTML reports that include pie charts, performance graphs, and histograms.
You can generate reports in different formats using simple commands:
# HTML report
rally task report --out report.html

# JUnit-compatible report
rally task report <task_id> --junit --out <report-file.xml>

# JSON data
rally task report <task_id> --json --out output.json
Rally supports various report formats, including HTML, JSON, and JUnit-XML. For example, during a demonstration, the OpenStack team we mentioned earlier benchmarked Nova server operations. They initiated the task with:
./rally task start samples/tasks/scenarios/nova/boot-and-delete.json
This scenario booted and deleted servers 10 times with a concurrency level of 2. The resulting HTML report was generated using:
./rally task report 157a3b50-67cd-4f8a-a4ae-a2bbf6d84bb7 --out output.html
The report included detailed response times for actions like nova.boot_server and nova.delete_server, along with success rates and counts. For more comprehensive analysis, you can combine multiple test runs into a single HTML report:
rally verify report --uuid <uuid-1> <uuid-2> <uuid-3> --type html --to ./report.html
These HTML reports come with advanced features, such as filtering results by test status, viewing test tags, and examining tracebacks or reasons for failures and skips. This level of detail ensures that your team can quickly identify and address any issues.
Improving OpenStack Performance Using Rally Data
Rally’s detailed performance reports are not just numbers – they’re a roadmap for improving your OpenStack environment. By analyzing the data from Rally tests, you can identify specific areas to fine-tune your deployment. Rally both measures performance and provides actionable insights for optimization.
Scaling OpenStack Environments
One of Rally’s strengths lies in its ability to help you understand the scaling limits of your OpenStack setup. Start small – test your environment with minimal load and gradually increase the times and concurrency parameters. This step-by-step approach allows you to catch errors early and avoid overwhelming the system. As your environment successfully handles baseline tests, you can increase these parameters incrementally, keeping an eye on success rates to identify when and where performance begins to falter.
Take this example: during initial Rally boot-storm tests, the success rate was only 66% with 50 guests booting concurrently. Instead of settling for this result, the team used Rally’s error reporting to dig deeper. The tests revealed “Connection aborted, BadStatusLine” errors, which pointed to a misconfigured HAProxy. By adjusting the HAProxy timeout value from 30 seconds to 180 seconds – aligning it with Rally’s client connection timeout – the team achieved 170 guests booting concurrently with a 100% success rate.
This case shows how Rally’s insights can lead to specific adjustments that significantly improve scalability. The key is treating Rally’s results as diagnostic tools, not just performance metrics. Identifying and fixing bottlenecks is essential for achieving optimal performance.
Finding and Fixing Bottlenecks
Rally is excellent at uncovering bottlenecks that might otherwise go unnoticed. Its ability to measure performance at both the scenario level and the granular atomic action level provides a clear picture of where your OpenStack deployment struggles.
For instance, one investigation focused on Nova’s amqp_rpc_single_reply_queue option. Rally tests, conducted with varying numbers of concurrent users (ranging from 1 to 30) and multiple boot-and-delete operations, revealed an unexpected result: enabling this option actually degraded performance, contrary to earlier assumptions. This insight came from Rally’s systematic testing, which compared average request times with and without the option enabled.
Another bottleneck Rally helped identify was related to the Nova VM list command. The NovaServers.boot_and_list_server scenario highlighted that as the number of VMs increased, the performance of the list command degraded faster than expected. This was discovered by booting individual VMs and then repeatedly listing all VMs (200 times) within a single-user context.
When Rally pinpoints bottlenecks, focus your optimization efforts on the areas with the greatest impact. Rally’s detailed breakdowns help you determine whether the issues stem from API responses, database queries, network latency, or resource contention.
For OpenMetal’s hosted private cloud environments, Rally testing is particularly valuable. With full control over your hardware and configurations, Rally’s data enables you to make targeted adjustments that maximize performance for your specific workloads.
The best way to resolve bottlenecks is to test systematically. Run Rally tests before and after each change to measure the effect of your optimizations. This ensures your fixes address the actual problem without introducing new complications.
Wrapping Up: Using OpenStack Rally
Rally takes the challenge out of OpenStack testing, offering a streamlined, automated way to gain performance insights. By following the steps in this guide – from installation and registering deployments to running benchmarks and analyzing results – you unlock a tool that can transform how you manage and improve your OpenStack environment.
With Rally, testing and deployment validation become automated and efficient. It supports a variety of testing methods, allowing you to thoroughly assess every aspect of your OpenStack deployment. Instead of running isolated tests, Rally helps you build a complete picture of how your infrastructure performs under different conditions.
The tool’s dashboard goes beyond basic results, turning raw data into actionable insights. Unlike traditional testing tools that often rely on plain tables, Rally provides visual reports, making it easier to pinpoint performance bottlenecks and integration issues.
These insights are invaluable for refining CI/CD processes and fine-tuning operations. For organizations using OpenStack-based private clouds, Rally becomes a key component in improving SLA, stability, and performance through continuous testing and optimization. This ensures your infrastructure evolves to meet your workload demands.
Rally also identifies terminal loads for essential cloud operations, such as starting and stopping VMs, creating and deleting block devices, and executing OpenStack API methods. This data is helpful for making decisions, whether you’re preparing for a new deployment or optimizing an existing one.
In OpenMetal’s hosted private cloud environments, Rally provides immediate, data-driven recommendations, helping you enhance performance and scale with confidence.
FAQs
What are the advantages of using Rally for testing OpenStack environments?
Rally is a specialized tool crafted to test OpenStack environments, offering several standout features:
- In-depth Performance Testing: Rally delivers detailed benchmarks and performance insights for OpenStack components and entire cloud setups. This helps you gauge how your environment handles various workloads and conditions.
- Streamlined Automation: By automating the setup and execution of test scenarios, Rally saves time and helps pinpoint performance bottlenecks more efficiently.
- Flexible Testing Options: Rally supports multiple testing approaches, including functional, load, and scale tests, catering to diverse requirements.
Using Rally ensures your OpenStack environment is fine-tuned for both performance and dependability, making it a crucial tool for cloud validation and performance benchmarking.
How do I add Rally to my CI/CD pipeline for continuous performance testing?
To make Rally a part of your CI/CD pipeline for continuous performance testing, start by setting it up to automatically run tests during key events like code pushes, pull requests, or merges. Tools such as Jenkins or GitLab CI/CD can help you trigger these tests smoothly, without interrupting your workflow.
Once Rally is in place, establish a monitoring system to keep tabs on the performance data it generates. Build dashboards to display critical metrics in real time, and configure alerts to flag any potential performance issues for your team. By weaving Rally into your pipeline, you’ll maintain consistent performance checks and ensure your application stays optimized throughout the development process.
What should I do if Rally detects a performance issue in my OpenStack environment?
If Rally flags a performance issue in your OpenStack setup, the first step is to dive into the test reports it generates. These reports are packed with detailed metrics that can guide you toward the root of the problem – whether it’s tied to compute resources, storage, or networking.
Once you’ve pinpointed the bottleneck, the next move is to adjust your OpenStack configuration. This might mean fine-tuning how resources are allocated, tweaking network settings, or even scaling up your infrastructure. After making these adjustments, it’s essential to run the relevant Rally tests again to ensure the issue has been resolved.
For a more proactive approach, think about integrating continuous monitoring tools into your environment. These tools can help maintain your OpenStack deployment’s efficiency and keep it ready to handle changing demands.
Schedule a Consultation
Get a deeper assessment and discuss your unique requirements.
Read More on the OpenMetal Blog