


In this article
- Why Choose OpenMetal for ClickHouse Hosting?
- Why Self-Host ClickHouse?
- High Availability Considerations
- Prerequisites to Install ClickHouse on OpenMetal
- Step 1: Choose Your OpenMetal Server
- Step 2: Provision Your OpenMetal Server
- Step 3: Install ClickHouse
- Step 4: Configure ClickHouse
- Step 5: Optimize ClickHouse Performance and Security
- Step 6: Troubleshooting Common Issues
- Wrapping Up: Installing Self-Hosted ClickHouse on an OpenMetal Cloud
- Ready to Self-Host ClickHouse on OpenMetal Cloud?
ClickHouse is a powerful and free open source database management system (DBMS) that can handle tons of data and complex queries at super fast speeds. Originally created by Yandex for their web analytics platform, it’s now a popular choice for businesses that need real-time insights and efficient data warehousing.
OpenMetal offers a unique approach to cloud infrastructure, providing high-powered, enterprise-level hosted bare metal servers with custom automation behind them. This gives you an unmatched combo of performance, control, flexibility, and speed, making it a perfect platform for self-hosting ClickHouse.
This guide will walk you through the entire process of setting up ClickHouse on an OpenMetal server. Whether you’re a seasoned developer or a system administrator, you’ll have the knowledge and tools to deploy the ideal ClickHouse instance for your company.
Why Choose OpenMetal for ClickHouse Hosting?
OpenMetal offers several advantages for self-hosting ClickHouse:
- Bare Metal Performance: By accessing hardware directly, you avoid the overhead of virtualization. This allows ClickHouse to fully tap into the server’s resources for faster query processing.
- Hardware Control: Choose from a range of servers and customize them with the CPU, RAM, and storage specs you need. This flexibility lets you exactly fit the hardware to your workload and optimize for cost and performance.
- Cost-Effectiveness: OpenMetal’s transparent pricing and flexible configurations help keep infrastructure costs both reasonable and predictable. You can avoid the high and fluctuating costs of public cloud providers and pay only for the resources needed.
- Private Cloud Flexibility: You have the option to combine bare metal servers with on-demand hosted private cloud for extra scalability and varying styles of resource management. You can easily scale your ClickHouse deployment as your data and query volume grow.
- Open Source Ecosystem: OpenMetal’s commitment to open source technologies makes integrating with ClickHouse and other tools easy. Choosing open source also avoids vendor lock-in, letting you pick the best tools for your needs.
Why Self-Host ClickHouse?
While managed ClickHouse solutions exist, self-hosting has a number of benefits:
- Cost Control: OpenMetal’s bare metal offerings are competitively and transparently priced for high-powered servers. You can also choose from monthly billing all the way up to a five year agreement, letting you lock in your price and avoid increases.
- Customization: Tailor hardware and software configurations completely to your needs to maximize performance and efficiency.
- Data Security: You have complete control over your data and infrastructure, ensuring compliance with internal security policies and industry regulations.
- Performance Optimization: Fine-tune the system to achieve the best performance for your workloads and data access patterns.
- High-Performance Analytics: ClickHouse is designed to address the need for high-performance analytics on large datasets, particularly for real-time applications.
- Handle High-Cardinality Data and Dimensionality: ClickHouse can efficiently store and query data with a large number of columns and wide events.
- Versatile Use Cases: ClickHouse can be used for a range of applications, including log storage as an alternative to Elasticsearch, unbounded analytics for analyzing large volumes of unsampled tracing data, and as a data warehouse for in-house analysts.
High Availability Considerations
For production deployments, high availability is needed for data consistency and minimizing downtime. Consider these factors:
- Redundancy and Failover: Impart redundancy by deploying ClickHouse in a cluster with multiple replicas. This ensures that if one node fails, the others can take over.
- ClickHouse Keeper: ClickHouse Keeper plays a major role in fault tolerance and data consistency in ClickHouse clusters. It manages metadata, coordinates replication, and handles failover scenarios.
- Upgrades: Upgrading ClickHouse clusters can be complex. Plan upgrades carefully and test thoroughly to minimize disruptions.
- Write/Read Services: For high-scale applications, consider dedicated write/read services to handle streaming ingestion and efficiently expose the query engine.
- Observability: Use monitoring and troubleshooting tools to ensure the health and performance of your ClickHouse deployment.
Prerequisites to Install ClickHouse on OpenMetal
Before you begin, ensure you have the following:
- An active OpenMetal account. Create your account here.
- An SSH key pair for accessing your OpenMetal server.
- Basic familiarity with Linux command line and server administration.
Step 1: Choose Your OpenMetal Server
ClickHouse can be resource-intensive, so selecting the right server is a must for optimal performance. Think about these factors when choosing your OpenMetal server:
- CPU: ClickHouse benefits from high core counts and clock speeds. For small deployments, a server with at least 8 cores is recommended. For enterprise-level deployments, consider servers with 32 or more cores.
- RAM: A general guideline is to have a 1:100 to 1:130 memory-to-storage ratio for data warehousing use cases. For example, if you plan to store 10TB of data, aim for 100GB of RAM per replica. For customer-facing workloads with frequent access, a 1:30 to 1:50 ratio is recommended.
- Storage: ClickHouse performs best with fast storage. NVMe SSDs are ideal for high-performance deployments. Currently, all of OpenMetal’s bare metal server options include NVMe SSDs.
- Network: A 10Gbps network is recommended for optimal performance, especially for large deployments with frequent data transfers. Our servers include a generous allotment of bandwidth, so with all but our XS servers you’ll have 20Gbps internal private bandwidth available out of the gate.
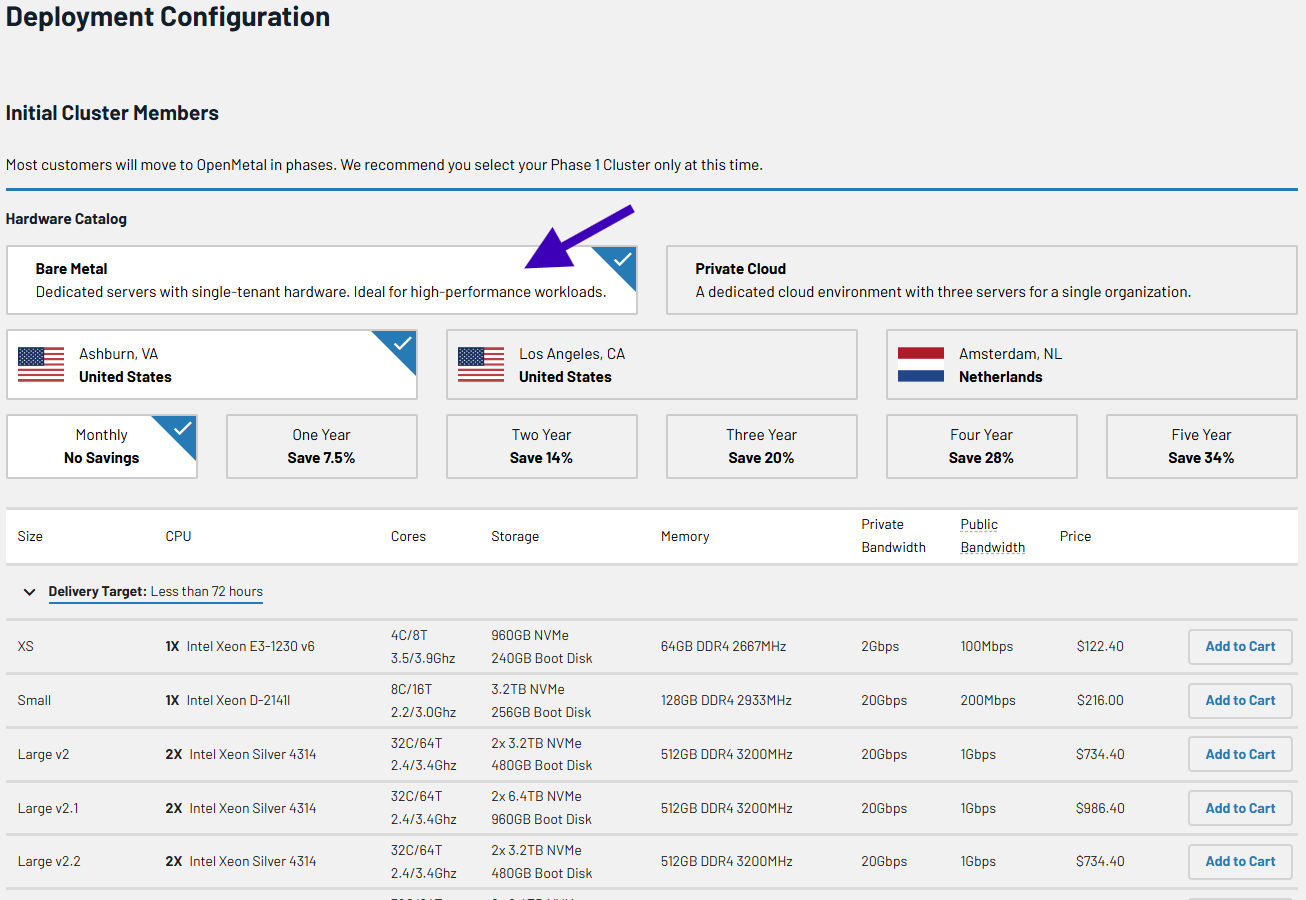
Refer to the OpenMetal Bare Metal Pricing page to explore available server options and choose the one that best suits your needs. We’re also happy to chat with you or meet with you to help you figure out the best choice.
Here are a few recommended server configurations for different deployment sizes:
Deployment Size | CPU (Cores) | RAM (GB) | Storage | Network | OpenMetal Server Options |
| Small | 8+ | 32+ | NVMe SSD | 1Gbps or 10Gbps | Small, Medium |
| Medium | 16+ | 64+ | NVMe SSD | 10Gbps | Medium, Large |
| Enterprise | 32+ | 128+ | NVMe SSD in RAID | 10Gbps | XL, XXL |
Step 2: Provision Your OpenMetal Server
Once you’ve chosen your server, follow these steps to provision it:
- Log in to your OpenMetal account.
- Navigate to the Bare Metal section.

- Select the desired server configuration and operating system. ClickHouse is compatible with various Linux distributions, including Ubuntu, CentOS, and Debian. We recommend using Ubuntu as it’s highly compatible with tools like Kubernetes and Docker, plus has solid security features and efficient resource utilization.

- Configure network settings, including IP addresses and VLANs.
- Assign your SSH key for server access.
- Review your order and confirm the provisioning.
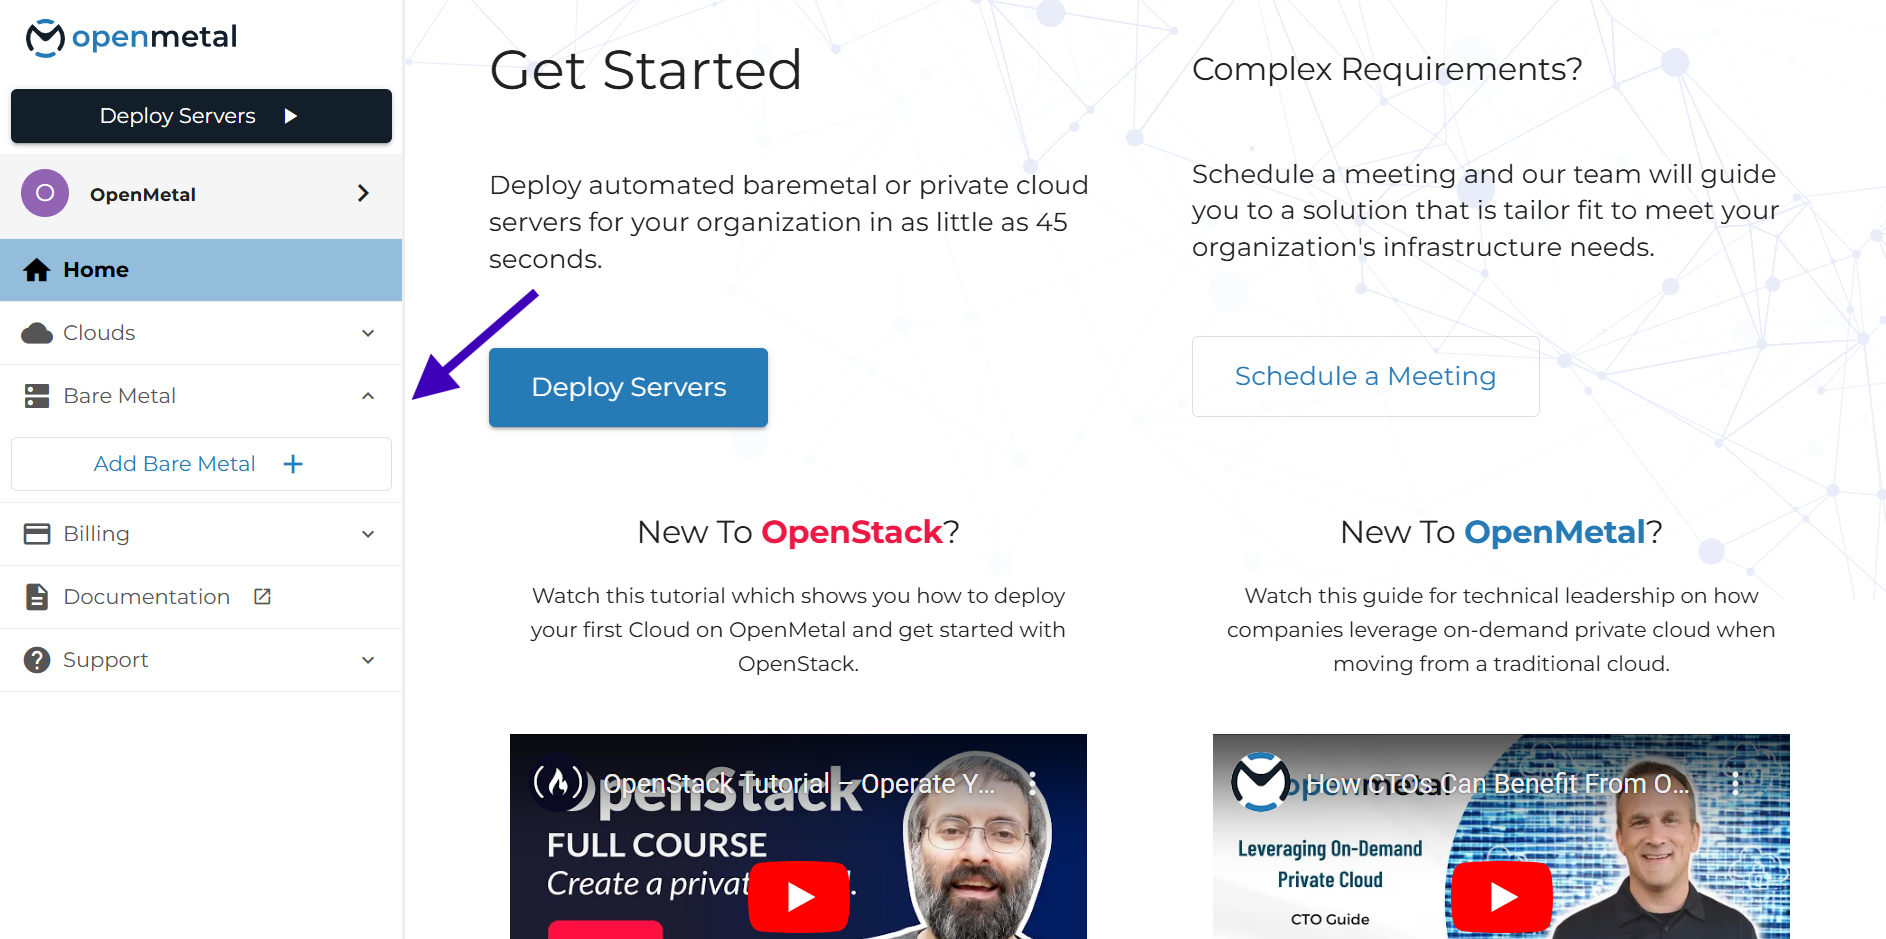
OpenMetal’s automated platform will provision your server in minutes, providing you with a ready-to-use environment for ClickHouse installation.
Step 3: Install ClickHouse
After your server is provisioned, connect to it via SSH and follow these steps in Bash to install ClickHouse:
- Update the system:
sudo apt update && sudo apt upgrade -y
- Install required packages:
sudo apt-get install -y apt-transport-https ca-certificates curl gnupg
- Add the ClickHouse repository:
curl -fsSL 'https://packages.clickhouse.com/rpm/lts/repodata/repomd.xml.key' | sudo gpg --dearmor -o /usr/share/keyrings/clickhouse-keyring.gpg

ARCH=$(dpkg --print-architecture)

echo "deb [signed-by=/usr/share/keyrings/clickhouse-keyring.gpg arch=${ARCH}] https://packages.clickhouse.com/deb stable main" | sudo tee /etc/apt/sources.list.d/clickhouse.list

sudo apt-get update
- Install ClickHouse server and client:
sudo apt-get install -y clickhouse-server clickhouse-client
- Install ClickHouse Keeper (for cluster deployments): If you are deploying ClickHouse in a cluster, you’ll need to install ClickHouse Keeper on dedicated nodes.
sudo apt-get install -y clickhouse-keeper - Start the ClickHouse server:
sudo service clickhouse-server start - Enable and start ClickHouse Keeper (for cluster deployments): If you installed ClickHouse Keeper, enable and start it using these commands.
sudo systemctl enable clickhouse-keeper

sudo systemctl start clickhouse-keeper

sudo systemctl status clickhouse-keeper
- Connect to ClickHouse client:
clickhouse-client
You should now have a running ClickHouse instance on your OpenMetal server!
ClickHouse Clients
ClickHouse provides clients for connecting to the database and executing queries:
- Console Client (
clickhouse-client): A command-line interface for interacting with ClickHouse. - HTTP API: ClickHouse exposes an HTTP API for interacting with the database programmatically.
- Language Wrappers: ClickHouse provides language wrappers for various programming languages, including Python, PHP, NodeJS, Perl, Ruby, and R.
Choose the client that best fits your needs and workflow.
ClickHouse Keeper
ClickHouse Keeper provides fault tolerance and data consistency in ClickHouse clusters. Some of its benefits are:
- Metadata Management: ClickHouse Keeper stores metadata about the cluster, including information about tables, partitions, and replicas.
- Replication Coordination: ClickHouse Keeper coordinates data replication between replicas, making sure that data is consistently copied across the cluster.
- Failover Handling: In case of node failures, ClickHouse Keeper automatically handles failover, promoting a replica to become the new primary and ensuring continuous availability.
For production deployments, it’s recommended to run ClickHouse Keeper on dedicated servers like OpenMetal’s to ensure optimal performance and stability. Learn more about ClickHouse Keeper: https://clickhouse.com/clickhouse/keeper
Step 4: Configure ClickHouse
ClickHouse offers a range of configuration options to fine-tune its performance and security. The main configuration file is located at /etc/clickhouse-server/config.xml.
Here are some main configuration settings to consider:
max_memory_usage: Sets the maximum memory limit for a query. Adjust this based on your server’s RAM and workload characteristics.max_concurrent_queries: Limits the number of concurrently running queries.max_threads: Controls the number of threads used for query processing.listen_host: Specifies the IP address on which ClickHouse listens for connections.tcp_port: Defines the port for client connections using the native protocol.http_port: Sets the port for the HTTP interface.https_port: Sets the port for the HTTPS interface.tcp_port_secure: Sets the port for secure client connections using the native protocol.- Choosing the right MergeTree engine: ClickHouse offers different MergeTree engine variants, each optimized for different data management needs. Choose the appropriate engine based on your requirements:
- ReplacingMergeTree: For managing data deduplication.
- CollapsingMergeTree: For handling events with a lifecycle (like state changes).
- SummingMergeTree: For data that benefits from pre-aggregation.
- Managing data changes: ClickHouse is optimized for immutable data. If your application requires frequent updates or deletes, consider restructuring your tables or using techniques like partitioning by date to delete or overwrite old data every now and then.
- Partitioning: Use time-based or ID-based partitioning to enhance query performance and data management.
- Asynchronous reads: ClickHouse supports asynchronous reads, which can improve throughput in environments with high I/O demands.
For detailed information on ClickHouse configuration settings, refer to the official documentation: https://clickhouse.com/docs/en/operations/server-configuration/settings/
Step 5: Optimize ClickHouse Performance and Security
For the best performance and security, consider these tips:
Performance Optimization
- Batch Inserts: Insert data in batches to improve write performance.
- Optimize Order By Granularity: Choose an appropriate granularity for the
ORDER BYclause in your table definitions to balance merge performance and query performance. - Use Data Skipping Indices: Create data skipping indices to speed up queries that filter on high-cardinality columns.
- Utilize Materialized Views: Create materialized views to pre-aggregate frequently accessed data and improve query performance.
- Monitor System Performance: Use ClickHouse’s system tables and monitoring tools to identify performance bottlenecks and optimize resource utilization.
- Keep Data in Wide Parts: Use the table-level settings
min_rows_for_wide_part=0andmin_bytes_for_wide_part=0to ensure ClickHouse keeps inserted data in the wide format. - Check Merge Levels: Observe merge levels to understand how many times data is re-merged within a part. Adjust the
min_bytes_for_full_part_storagesetting to optimize merge behavior. - Use Compact Column Types: Use the most compact column types possible to reduce storage requirements and improve query performance.
- Denormalization: Consider denormalizing data to avoid slow joins on high-cardinality columns.
- Dictionaries: Use dictionaries as an alternative to joins for frequently accessed data.
- Approximate Count Distinct: For large datasets, use the
uniq()anduniqCombined()functions for approximate distinct counts instead ofCOUNT DISTINCT. - Hash Long Strings: Hash long strings before grouping or sorting to improve efficiency.
- Two-Pass or Multi-Pass Grouping: For heavy grouping operations, use two-pass or multi-pass grouping to improve performance.
- Arrays: Use arrays to store nested data structures within a single column, reducing the need for complex joins.
- Distributed Query Optimizations: Optimize distributed queries by using techniques like
GLOBAL INfor efficient filtering. - Memory Management: Use
perf topto monitor the time spent in the kernel for memory management. Run theSYSTEM JEMALLOC PURGEcommand to flush the memory cached by the memory allocator. Avoid using S3 or Kafka integrations on low-memory machines due to their high memory requirements. - CPU Management: Use the performance scaling governor for optimal CPU performance. Monitor CPU temperatures using
dmesgand check for throttling due to overheating. Useturbostatto monitor CPU performance under load.
Security Best Practices
- Enable SSL Encryption: Secure client-server communication by enabling SSL encryption for all external-facing ports.
- Configure Access Control: Set up user authentication and authorization to restrict access to sensitive data.
- Regularly Update ClickHouse: Keep your ClickHouse installation up-to-date with the latest security patches and bug fixes.
- Monitor Logs for Suspicious Activity: Regularly review ClickHouse logs to detect and prevent potential security breaches.
- Backups: Use the
clickhouse-backuptool to create regular backups of your ClickHouse data.
Step 6: Troubleshooting Common Issues
Here are some common issues you might run into when installing or running ClickHouse and how to troubleshoot them:
- Connection refused: Ensure that ClickHouse is running and listening on the correct IP address and port. Check the
listen_hostandtcp_portsettings in the configuration file. - Memory limit exceeded: Adjust the
max_memory_usagesetting to increase the memory limit for queries. Optimize queries to reduce memory consumption. - Too many parts: Insert data in batches to reduce the number of MergeTree parts. Adjust MergeTree settings to optimize merge behavior.
- Slow query performance: Profile queries to identify bottlenecks. Optimize table schema, use appropriate indices, and consider materialized views.
- Debugging: Use the following commands for debugging ClickHouse issues:
SYSTEM FLUSH LOGS: Ensures that logs are written to disk for debugging purposes.clickhouse-server --config-file: Starts ClickHouse with a specific configuration file for debugging purposes.journalctl -u clickhouse-server: Views ClickHouse server logs for debugging purposes.
For more detailed troubleshooting information, refer to the ClickHouse documentation: https://clickhouse.com/docs/en/guides/troubleshooting
Wrapping Up: Installing Self-Hosted ClickHouse on an OpenMetal Cloud
OpenMetal provides a highly capable and affordable solution for self-hosting ClickHouse. Your business will appreciate its high-performance analytics and data warehousing capabilities, and you’ll find great performance, flexibility, and cost efficiency for your ClickHouse deployment with OpenMetal.
This guide has hopefully made it simple for you to successfully install and configure ClickHouse on OpenMetal. If you have any feedback or issues you’ve run into while following this guide, contact us!
Schedule a Consultation
Get a deeper assessment and discuss your unique requirements.
You can also reach our team at sales@openmetal.io
Read More on the OpenMetal Blog