


Handling continuous streams of data is a common requirement for modern applications, from IoT device monitoring to real-time analytics. A data ingestion pipeline is the foundation that collects and channels this data for processing and storage. As data volumes grow, building a pipeline that can manage high throughput without failure becomes a complex engineering challenge. Apache Kafka is the industry standard for building these real-time data pipelines, but its performance is directly tied to the underlying infrastructure.
This guide walks you through building a high-throughput data ingestion pipeline using Apache Kafka on an OpenMetal private cloud. You will learn how the combination of Kafka’s distributed streaming platform and a dedicated private cloud environment gives you the performance, control, and scalability needed for the most demanding data workloads.
Why a Private Cloud is the Right Foundation for Kafka
When you deploy a high-throughput system like Kafka, the choice of infrastructure has major consequences. In multi-tenant public clouds, you contend with resource contention from “noisy neighbors,” opaque infrastructure abstractions, and networking limitations that can bottleneck performance. For a system where latency and throughput are paramount, these are not acceptable trade-offs.
An OpenMetal private cloud provides a dedicated environment built on bare metal hardware. This approach gives you full root access and control over your servers. You can tune the operating system, networking stack, and storage configurations to match Kafka’s specific needs, a level of control that is not possible in a shared cloud environment. Because the platform is built with open source tools like OpenStack, you avoid vendor lock-in and retain the flexibility to build your stack with the best tools for the job.
This dedicated hardware and direct control mean you can construct a highly customized and secure pipeline. As seen in the real-life customer architecture below, Kafka can be deployed as the central ingestion point within a larger big data ecosystem, feeding data into processing engines like Apache Spark and long-term storage solutions like a Ceph-backed data lake. The entire system runs on a set of horizontally scalable servers that you control.
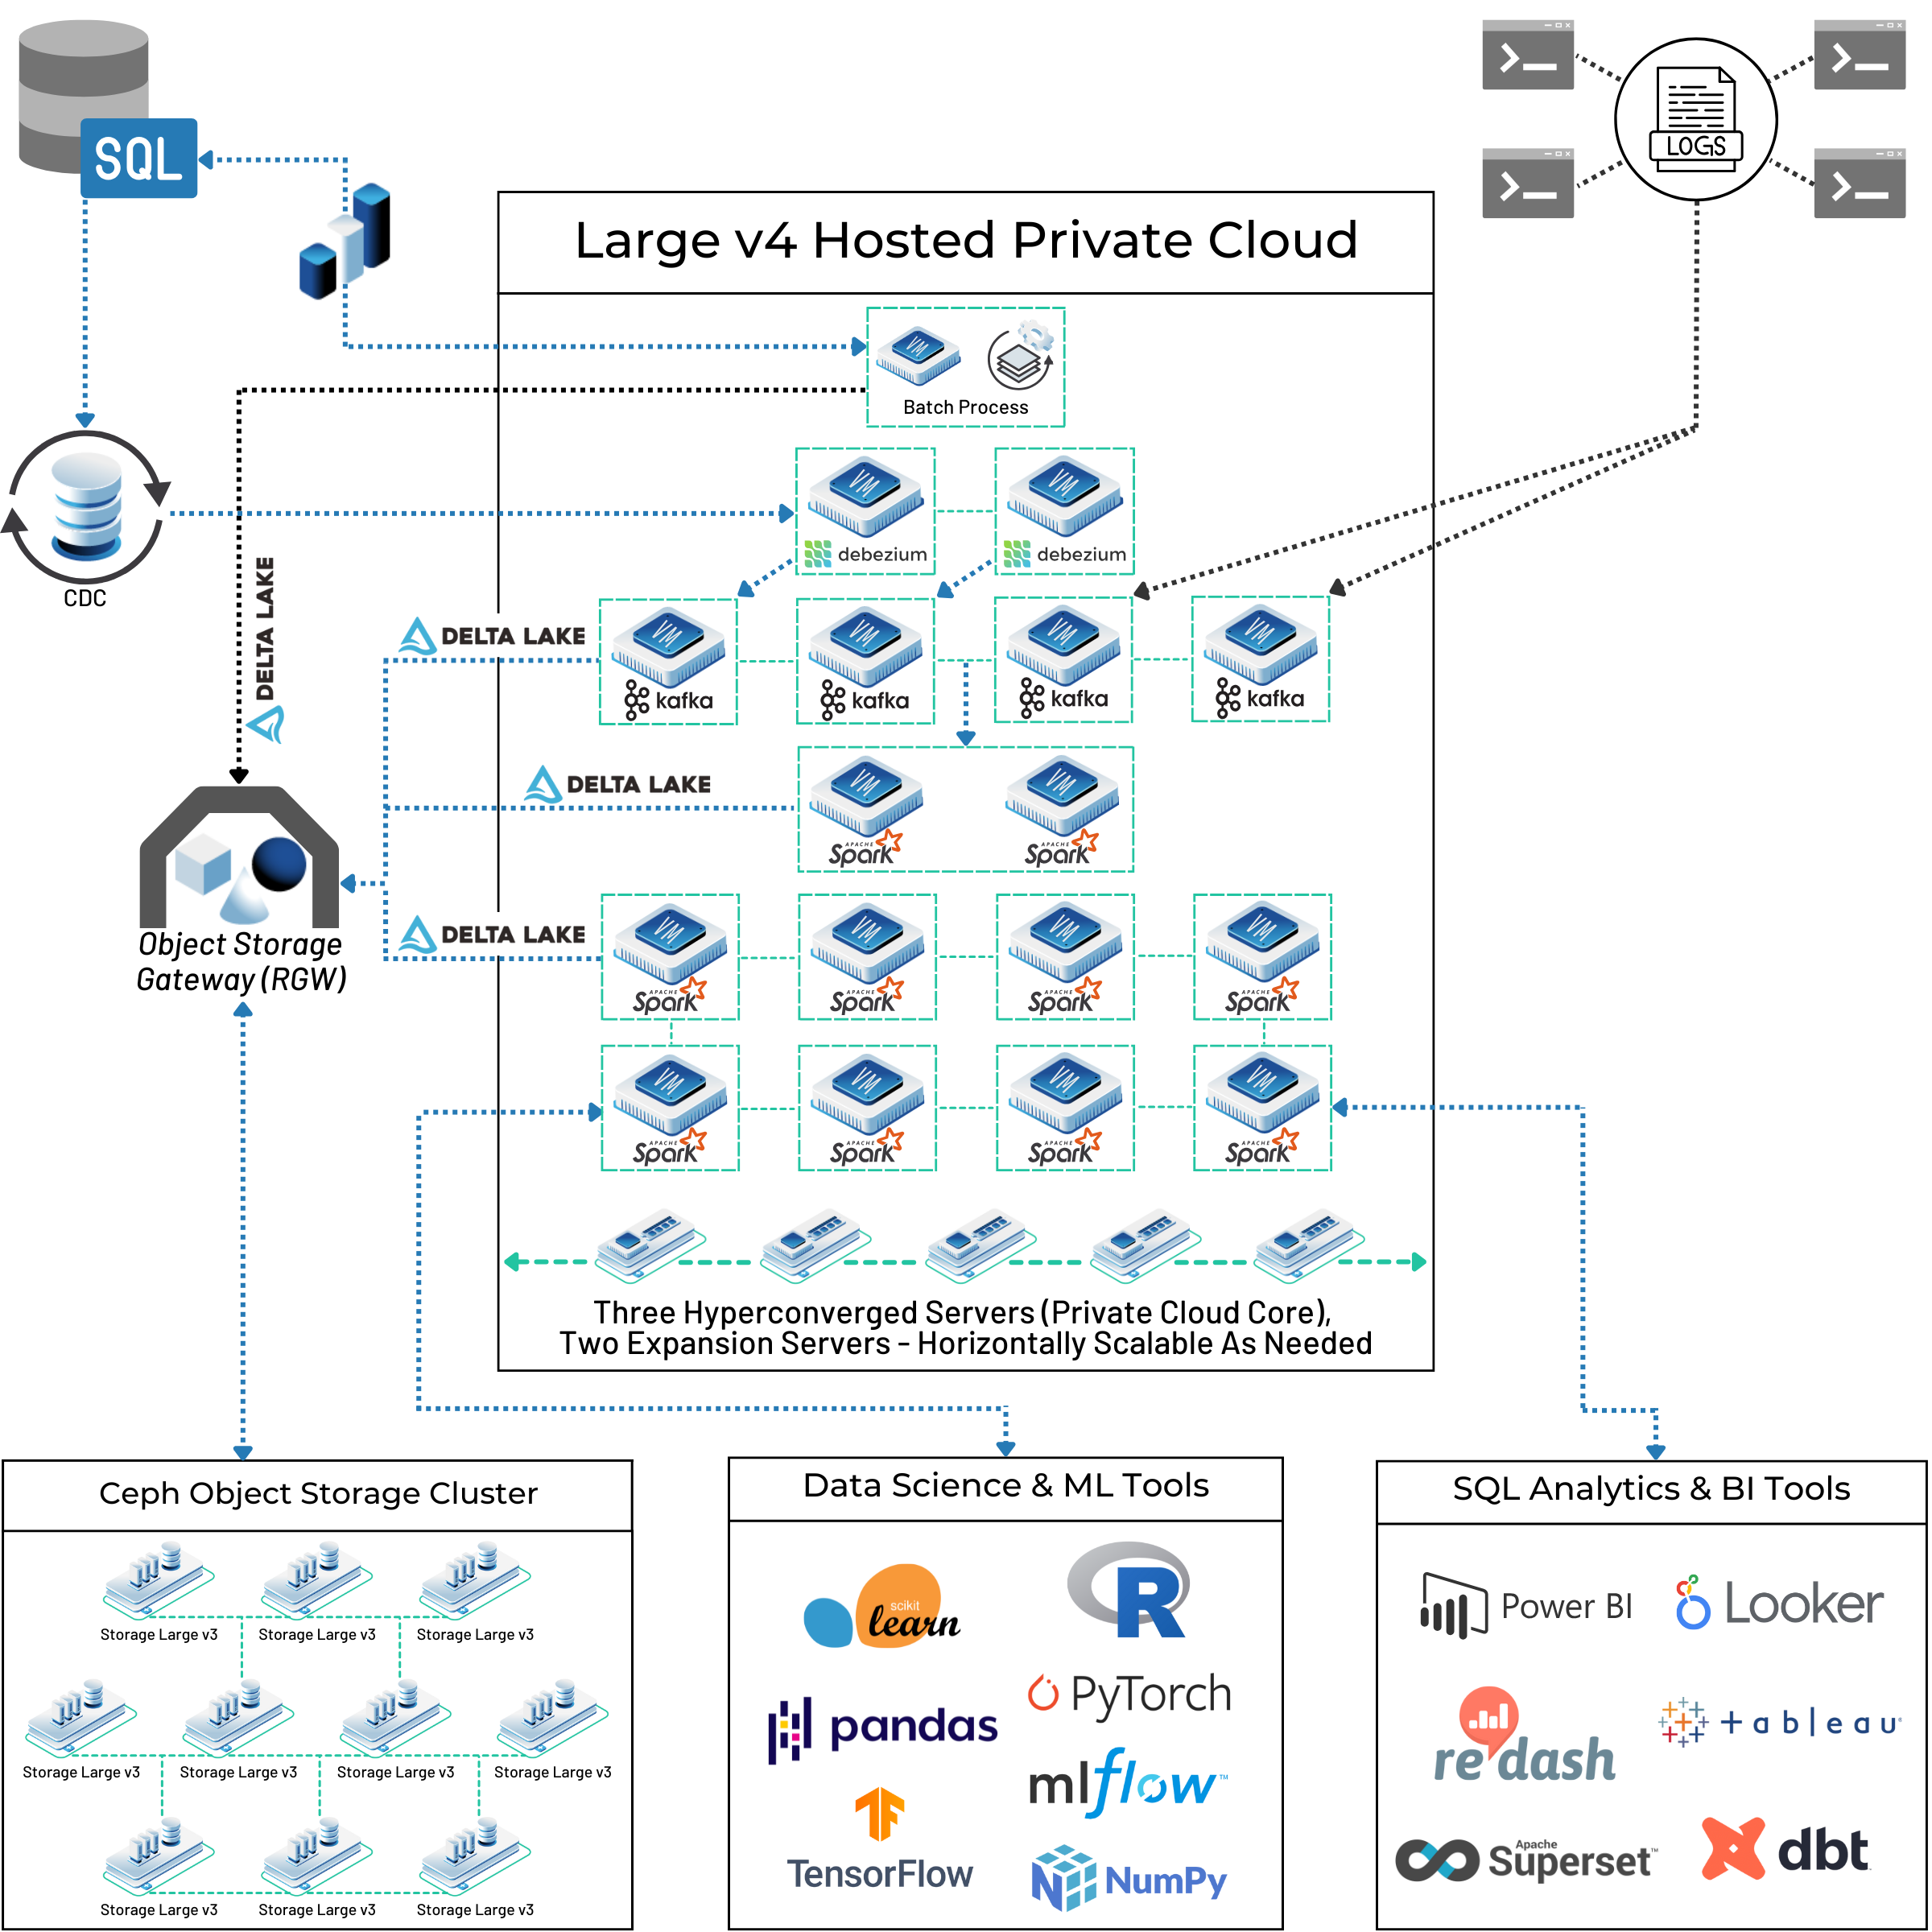
This architecture is designed for growth. When your data ingestion requirements increase, you can add more bare metal nodes to your Kafka cluster and expand your private cloud’s core resources, ensuring your pipeline can scale with demand.
Core Kafka Concepts
Before building the pipeline, it’s helpful to understand the main components of a Kafka system. According to the official Apache Kafka documentation, the system is built around a few key concepts:
- Producer: An application that sends streams of records to one or more Kafka topics.
- Consumer: An application that subscribes to one or more topics and processes the stream of records produced to them.
- Broker: A Kafka server that stores data. A Kafka cluster is composed of one or more brokers. Brokers manage the replication and partitioning of data.
- Topic: A category or feed name to which records are published. Topics in Kafka are always multi-subscriber.
- Partition: Topics are split into ordered, immutable sequences of records known as partitions. Distributing a topic across multiple partitions allows for parallelism, as consumers can read from different partitions simultaneously.
How to Build and Configure the Pipeline
Building a data pipeline with Kafka involves setting up the brokers, configuring them for your workload, creating topics, and developing producers and consumers to send and receive data. A well-architected Kafka pipeline can decouple data sources from data sinks, providing a durable buffer that handles backpressure and allows different parts of your system to evolve independently.
Step 1: Provision Your OpenMetal Cloud
Begin by deploying your on-demand private cloud from the OpenMetal portal. For a production Kafka cluster, you will want a minimum of three bare metal servers to act as brokers. This allows for a replication factor of three, providing a good balance of durability and performance. You can choose server configurations that match your expected workload, with options for CPU cores, RAM, and NVMe storage.
Step 2: Install Kafka
Once your servers are provisioned, SSH into each one and install Java, which is a prerequisite for running Kafka.
# Update package lists and install OpenJDK
sudo apt update
sudo apt install default-jdk -y
Next, download and extract the latest version of Apache Kafka. You can find the most recent release on the official website.
# Download and extract Kafka
wget https://downloads.apache.org/kafka/3.7.0/kafka_2.13-3.7.0.tgz
tar -xzf kafka_2.13-3.7.0.tgz
cd kafka_2.13-3.7.0
Repeat these installation steps on each server that will act as a broker in your cluster.
Step 3: Configure Brokers for High Throughput
This is where running on a private cloud offers major advantages. You can tune Kafka’s configuration to take full advantage of the dedicated hardware. Navigate to the config/ directory and edit the server.properties file on each broker.
Here are a few key parameters to adjust for high throughput:
- Identify Each Broker: Assign a unique ID to each broker and list the addresses of all brokers in the cluster.
# In server.properties on Broker 1 broker.id=1 # In server.properties on Broker 2 broker.id=2 # In server.properties on Broker 3 broker.id=3 # On all brokers, list the full cluster bootstrap.servers=broker1-ip:9092,broker2-ip:9092,broker3-ip:9092 - Tune Network Threads: Adjust the number of threads the broker uses for handling network requests. A good starting point is to match the number of CPU cores on your bare metal server.
# The number of threads that the server uses for receiving requests from the network and sending responses to the network num.network.threads=8 - Tune I/O Threads: This sets the number of threads the broker uses for processing requests, including disk I/O. This value should also be at least the number of cores to handle disk writes efficiently.
# The number of threads that the server uses for processing requests, which may include disk I/O num.io.threads=8 - Adjust Buffer Sizes: With dedicated network hardware, you can increase the socket buffer sizes to handle larger amounts of in-flight data.
# The send buffer (SO_SNDBUF) used by the socket server socket.send.buffer.bytes=102400 # The receive buffer (SO_RCVBUF) used by the socket server socket.receive.buffer.bytes=102400 - Log Configuration: Define the directory for log data. On OpenMetal, you can mount a dedicated high-performance Ceph block device for this path to separate I/O from the operating system.
# A comma separated list of directories where Kafka will store its log data
log.dirs=/var/lib/kafka/data
After configuring each broker, you can start the Kafka service on each server.
# Start the Kafka server in the background
bin/kafka-server-start.sh -daemon config/server.properties
Step 4: Create a Topic
Now, from one of the brokers, create a topic for your data ingestion. When creating a topic for high throughput, the number of partitions is a primary consideration. More partitions allow for greater parallelism, but also add overhead. A good rule of thumb is to start with one to two partitions per core per broker.
This command creates a topic named iot-data with 12 partitions and a replication factor of 3, meaning every message is copied to three different brokers for durability.
bin/kafka-topics.sh --create \
--bootstrap-server localhost:9092 \
--replication-factor 3 \
--partitions 12 \
--topic iot-data
Step 5: Test with a Producer and Consumer
Finally, you can test your pipeline. Use the command-line producer and consumer scripts included with Kafka to validate that the cluster is working correctly.
Open two terminals. In the first, start a producer that sends messages to your iot-data topic.
# Start a producer
bin/kafka-console-producer.sh --broker-list localhost:9092 --topic iot-data
>{"device_id": "temp-sensor-01", "reading": 70.1}
>{"device_id": "temp-sensor-02", "reading": 71.5}
In the second terminal, start a consumer to read the messages from the beginning.
# Start a consumer
bin/kafka-console-consumer.sh --bootstrap-server localhost:9092 --topic iot-data --from-beginning
{"device_id": "temp-sensor-01", "reading": 70.1}
{"device_id": "temp-sensor-02", "reading": 71.5}
You have now created a basic, yet scalable, data ingestion pipeline. For production use, you would replace the console tools with applications using one of Kafka’s client libraries, such as kafka-python or the Java client.
Scaling Your Pipeline for Future Growth
The architecture you have built is ready to scale. As your data volume increases, you have two primary scaling directions:
- Add More Partitions: You can increase the partition count for a topic to further parallelize processing.
- Add More Brokers: With OpenMetal, you can easily provision additional bare metal servers and add them to your Kafka cluster. After adding the new broker to the configuration, you can use Kafka’s tools to reassign partitions and rebalance the load across the expanded cluster.
As shown in the reference architecture above, this Kafka pipeline serves as the entry point to a much larger data platform. The data ingested can be consumed by Apache Spark for real-time ETL, stored in a Delta Lake format on a distributed Ceph object storage cluster, and ultimately made available for analytics and machine learning applications.
By building your high-throughput data ingestion pipeline on a private cloud, you create a foundation that provides the necessary performance and control for today’s needs and the flexibility to grow with your data tomorrow. Feel free to contact us if you’d like help building your big data pipeline. We’ve done this for multiple customers and through our expertise can drastically shorten the time from development to production, saving you time and money!
Interested in OpenMetal Cloud?
Schedule a Consultation
Get a deeper assessment and discuss your unique requirements.
Read More on the OpenMetal Blog